运维篇
打包与运行
程序的打包与运行(Windows版)
如何打包,打开IDEA,在右侧菜单栏,找到Maven,这里以demo2为例
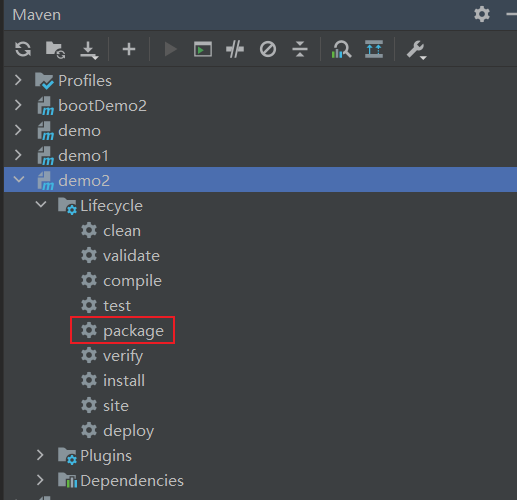
package是打包的命令,双击执行,一般打包之前,如果有对应的target目录,都会先clean一下。清除之前打包的内容,然后再打包
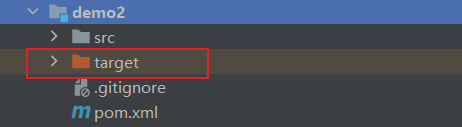
在demo2下,我们看到一个target目录,我们需要clean先清除它,再package打包
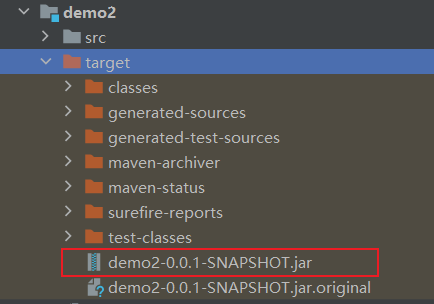
完成后,打开target目录,就能看到对应的jar包
在jar包目录下运行cmd,并输入`java -jar 你的jar包名称`,就可以启动对应的jar包了
启动后,访问之前写的Controller类的地址,就能得到对应的数据了
有时候打包不需要将测试打进去,所以我们可以在IDEA上修改
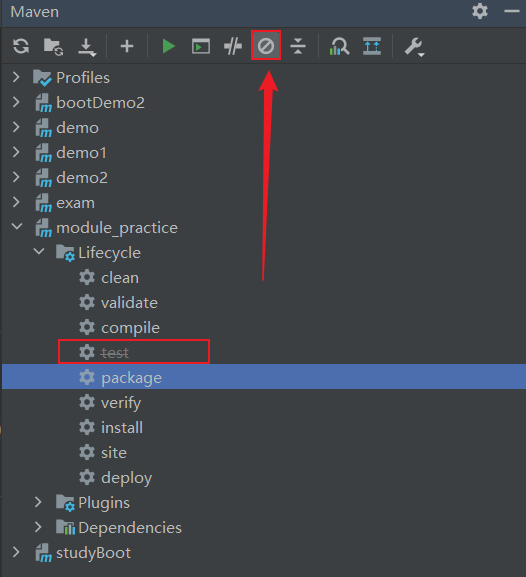
此时test就被禁用了
总结:
1、对SpringBoot项目打包(执行Maven构建指令)
shell
mvn package
2、运行项目(执行启动指令)
shell
java -jar 对应的jar包名
注意事项:
jar支持命令行启动需要依赖maven插件支持,请确认打包时是否具有SpringBoot对应的maven插件
xml
<build>
    <plugins>
        <plugin>
            <groupId>org.springframework.boot</groupId>
            <artifactId>spring-boot-maven-plugin</artifactId>
        </plugin>
    </plugins>
</build>
端口占用的情况
有时候运行程序,端口可能被占用,所以需要修改或删除端口,下面是一组端口的命令
shell

# 查询端口
netstat -ano
# 查询指定端口
netstat -ano | findstr "端口号"
# 根据进程PID查询进程名称
tasklist | findstr "进程PID号"
# 根据PID杀死任务
taskkill /F /PID "进程PID号"
# 根据进程名称杀死任务
taskkill -f -t -im "进程名称"
程序运行(Linux版)
创建一个虚拟机,环境任意
进入虚拟机并查看其IP地址
输入`ifconfig`,可以查看IP,记住这个IP,然后打开虚拟机的连接工具,任意,这里我选择的是Xshell
进入/usr/local文件夹下,并创建一个文件夹app,进入app
shell
cd /usr/local/
mkdir app
cd app
将之前打包的文件上传到该目录下,用虚拟机的连接工具进行上传
使用java -jar jar包名称运行
刚刚的虚拟机ip,复制下来,然后输入`http://你的ip地址/对应的地址`,此时运行后没有数据,而且一直报错
原因是:linux系统下,没有对应的mysql库结构,导致数据库查询不到数据
需要在linux系统中安装一个mysql,安装就不做演示了
使用Navicat来管理linux的数据库比较方便,所以与linux数据库建立一下连接
然后将之前学习用的数据,转为sql文件,并在linux数据库上运行
运行完成后,在linux下运行对应的jar包,再次访问地址,此时就可以正常的返回数据了
一般不这样启动,一般在后台启动
shell
nohup java -jar 对应的jar包名 > server.log 2>&1 &
这段代码是在Linux或Unix系统中使用的一条命令,用于在后台启动一个Java程序,并将输出重定向到一个名为'server.log'的文件中。具体解释如下:
此时,就可以在后台启动,而信息都输出到了server.log中
配置高级
临时属性设置
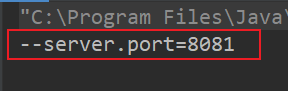
在命令行中,这样来进行修改临时属性
java -jar 对应的jar包名 --server.port=8080如果属性不止一个
java -jar 对应的jar包名 --server.port=8080 --需要修改的属性这里的属性与前面的格式是一致的
操作步骤如下:
1、使用jar命令启动SpringBoot工程时可以使用临时属性替换配置文件中的属性
2、临时属性添加方式:java -jar 工程名.jar --属性名=值
3、多个临时属性之间使用空格分割
4、临时属性必须是当前boot工程支持的属性,否则设置无效
临时属性如何在IDEA中测试
点击Edit Configurations
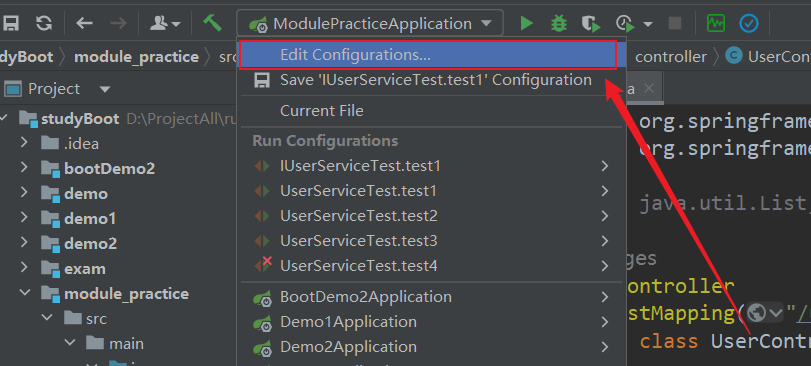
如果没有Program arguments,可以按照以下方法打开并添加
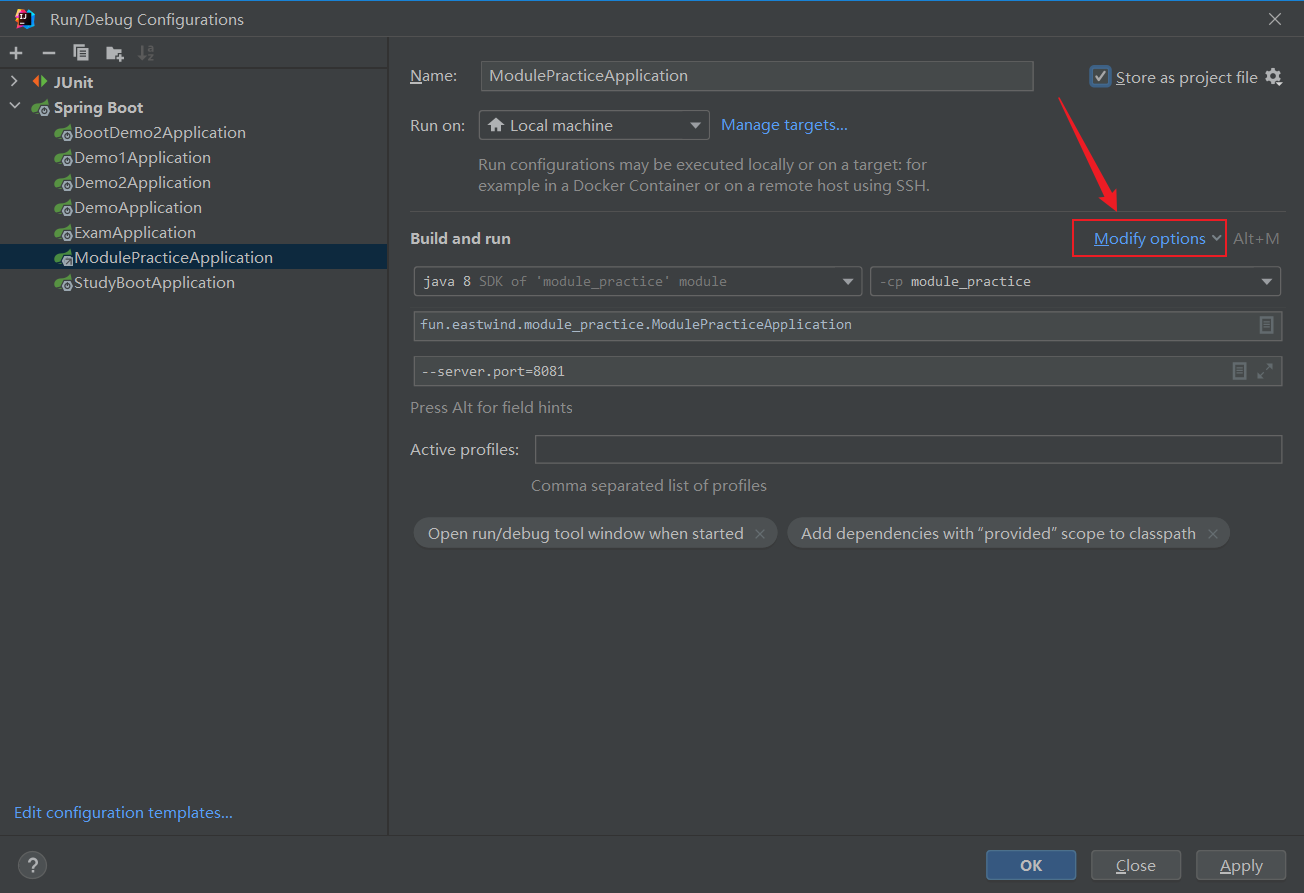
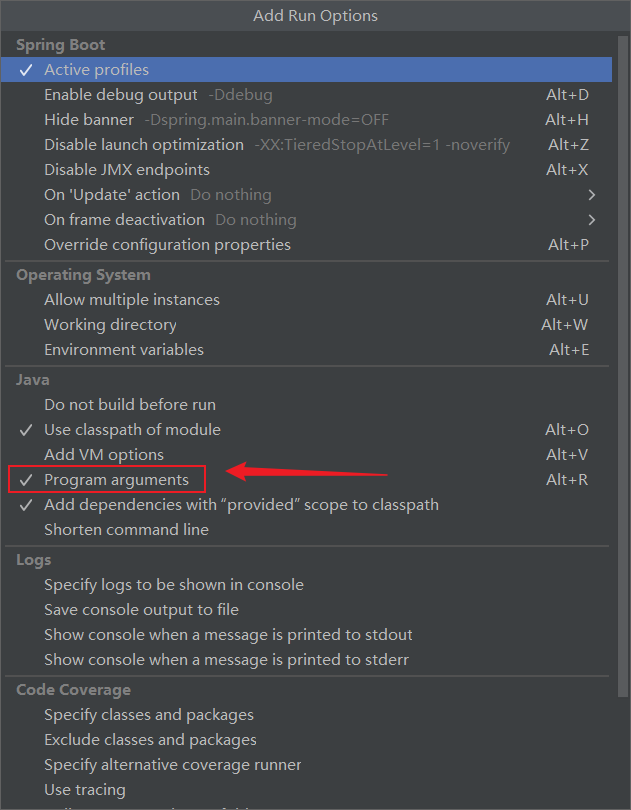
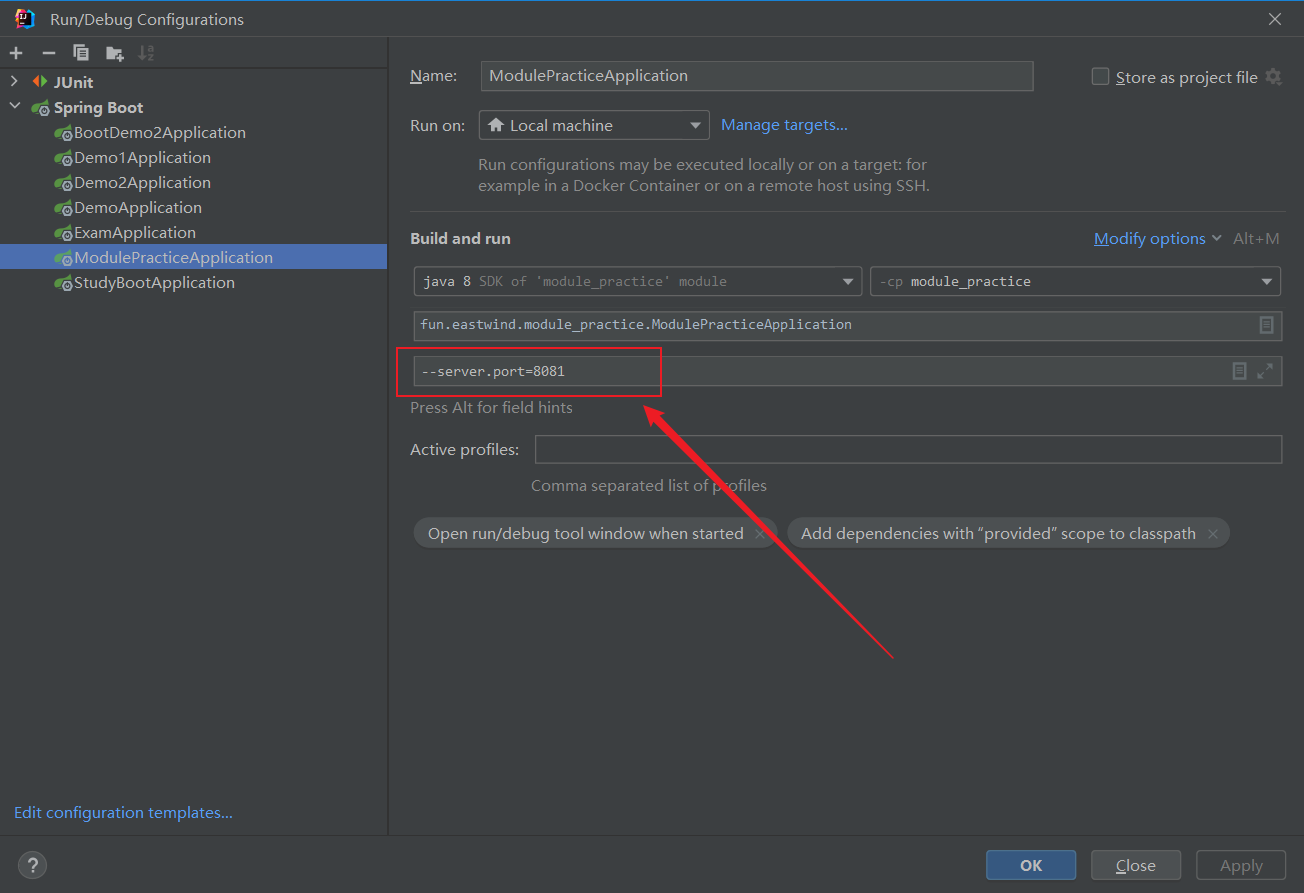
这里修改了临时属性的端口号,测试一下

控制台可以看到,端口被修改为8081了
如果想获取临时属性的参数,可以在启动程序下的args进行打印
java
import org.springframework.boot.SpringApplication;
import org.springframework.boot.autoconfigure.SpringBootApplication;

@SpringBootApplication
public class ModulePracticeApplication {

    public static void main(String[] args) {
        for (String arg : args) {
            System.out.println(arg);
        }
        SpringApplication.run(ModulePracticeApplication.class, args);
    }

}
此时,args中就获取到对应的参数了
如果想在运行时进行端口的修改,可以在运行主程序前,给args赋值,但是需要在主程序上带上args的参数
java
import org.springframework.boot.SpringApplication;
import org.springframework.boot.autoconfigure.SpringBootApplication;

@SpringBootApplication
public class ModulePracticeApplication {

    public static void main(String[] args) {
        args = new String[1];
        args[0] = "--server.port=8082";
        SpringApplication.run(ModulePracticeApplication.class, args);
    }

}
可以在启动boot程序时断开读取外部临时配置对应的入口,也就是去掉读取外部参数的形参,可以提高安全性
配置文件4级分类
SpringBoot中4级配置文件
1级:file:config/application.yml【最高】
2级:file:application.yml
3级:classpath:config/application.yml
4级:classpath:application.yml【最低】
作用:
总结:
自定义配置属性
新建一个模块,添加Spring Web依赖
随意写一个控制类
java
import org.springframework.web.bind.annotation.GetMapping;
import org.springframework.web.bind.annotation.RestController;

@RestController
public class TestController {

    @GetMapping("/test")
    public void test(){
        System.out.println("测试已运行");
    }


}
将配置文件改成任意的名字,并写入`server.port = 80`,看看是否生效

此时发现,并没有生效,如果我们要它生效该怎么办呢?
在之前配置临时属性的位置,添加一条
--spring.config.name=你修改后的文件名(不需要加后缀名)重新运行并测试

此时临时配置就生效了
修改刚刚的临时配置文件,properties文件的后缀为yml文件
yaml
server:
  port: 83

yml也是有效存在的
再次回到之前配置临时属性的位置,修改此处的代码为
--spring.config.location=classpath:/你修改后的文件名.yml修改yaml文件中的内容为
yaml
server:
  port: 88
运行并测试

自定义配置文件-重要说明
多环境开发
什么是多环境呢?
环境分为三个:开发环境、测试环境、生产环境
yaml版
在application.yml文件中进行配置,如果有多个不同环境的配置,可以使用三个`-`分割开
在yml文件中,配置了三个环境,并且每个环境都配置了不同的端口
yaml
# 应用环境
# 公共配置
spring:
profiles:
active: pro
---
# 设置环境
# 生产环境
# 为三个环境起个名字
server:
port: 80
spring:
profiles: pro
---
# 开发环境
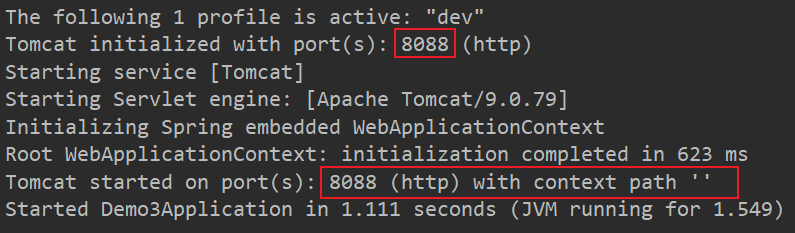
spring:
profiles: dev
server:
port: 81
---
# 测试环境
spring:
profiles: test
server:
port: 82运行测试前记得把之前在临时属性处的配置删除
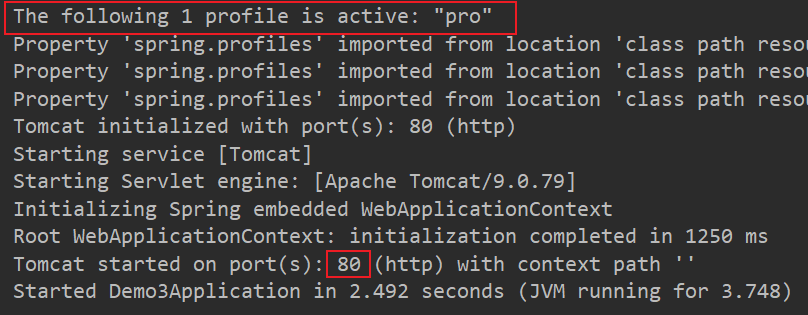
这里使用的是pro进行的测试,也可以切换不同的生产环境进行测试
公共配置里写的是三个环境都需要的配置
我们在文件中可能会看到profiles上是有一条删除线的,这说明该方法是过时的
yaml
spring:
  profiles:
怎样让它不过时呢,它有一个标准格式
yaml
spring:
  config:
    activate:
      on-profile: test
但是这个比较长,但又是标准格式
没啥影响,只是换了个名,都能用
yaml安全版
将yml文件复制三份并粘贴在与yml文件同目录的位置,分别命名为
并对其中对应的生产环境修改为对应的环境内容
application.yml
yaml
# 应用环境
# 公共配置
spring:
  profiles:
    active: pro
application-pro.yml
yaml
server:
  port: 80
spring:
  profiles: pro
application-dev.yml
yaml
spring:
  profiles: dev
server:
  port: 81
application-test.yml
yaml
server:
  port: 82
spring:
  config:
    activate:
      on-profile: test
运行测试,结果与yaml版中的一致
1. 使用独立配置文件定义环境属性
2. 独立配置文件便于线上系统维护更新并保障系统安全性
properties版
properties与yml几乎一模一样,就语法不同,然后改了个文件后缀名为properties即可,这里就不进行讲述了
多环境开发独立配置文件书写技巧
yaml
spring:
	profiles:
		active: dev
		include: devDB,devRedis,devMVC
新建不同的配置文件,并改为对应需求的名字
application.yml
yaml
spring:
  profiles:
    active: dev
application-dev.yml
yaml
server:
  port: 8088
application-devDB.yml
# 数据库相关配置application-devMVC.yml
yaml
server:
  servlet:
    context-path: /test
以此类推,这里就不写了
测试启动一下
这里的8088生效了,但是application-devMVC.yml没有生效
原因是:在加载配置时,并没有包含其他的配置文件
application.yml
yaml
spring:
  profiles:
    active: dev
    include: devMVC,devDB
将配置文件包含在内,使用include来进行包含,包含名称为文件--后的名称
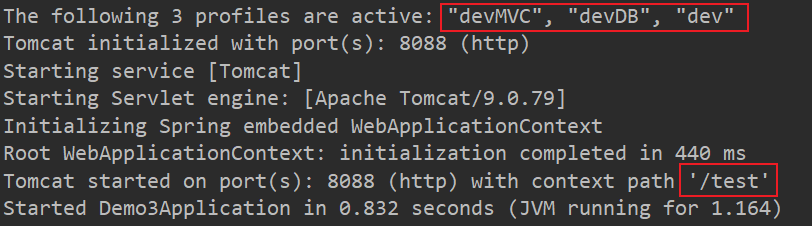
此时,就将这些配置包含进来了,但在这里面,似乎有一个配置的顺序,我们来测试一下看看谁先谁后
在application-devDB.yml添加
yaml
server:
  port: 8089
在application-devMVC.yml添加
yaml
server:
  port: 8090
运行,并进行测试

原因是:dev文件是最后一个加载的,所以端口号是8088,注释掉dev文件中的代码,我们再看其他两个文件,查看是谁大谁小

此时是8089,因为devDB是最后一个加载的,覆盖了前面的
得到一个结论,后加载的会覆盖先加载的,而include中的顺序会决定谁先加载,而主启动的dev永远是最后一个,无论前面加载了什么,最后的dev都会将其覆盖
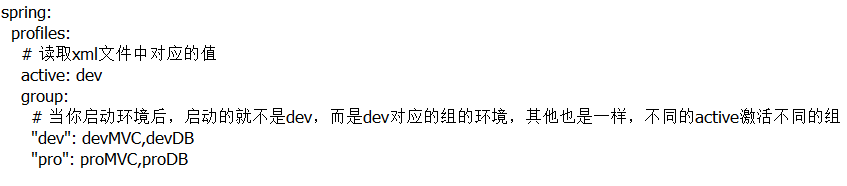
在`Spring2.4`后,使用group替代了include属性,因为include属性有限制性,当active为dev时,include只能使用dev的内容,而为其他时,include的都要被替换为其他的内容,很麻烦
yaml
spring:
  profiles:
    active: dev
    group:
      # 当你启动环境后,启动的就不是dev,而是dev对应的组的环境,其他也是一样,不同的active激活不同的组
      "dev": devMVC,devDB
      "pro": proMVC,proDB
启动查看一下效果
启动后发现,顺序变了,原来dev是在最后的,顺序变了,这里要注意,是个坑
当主环境dev与其他环境有相同属性时,主环境属性生效;其他环境中有相同属性时,最后加载的环境属性生效
多环境开发控制
当maven和boot冲突时,应该让boot使用maven中的配置环境,因为boot是依赖于maven的
在pom.xml文件中设置多环境
xml
<!--  设置多环境-->
    <profiles>
        <profile>
            <id>eastwind_dev</id>
            <properties>
                <profile.active>dev</profile.active>
            </properties>
            <activation>
                <!--是否默认启动 -->
                <activeByDefault>true</activeByDefault>
            </activation>
        </profile>
        <profile>
            <id>eastwind_pro</id>
            <properties>
                <profile.active>pro</profile.active>
            </properties>
        </profile>
    </profiles>
在application.yml中引用并读取对应的属性
yaml
spring:
  profiles:
    # 读取xml文件中对应的值
    active: @profile.active@
    group:
      # 当你启动环境后,启动的就不是dev,而是dev对应的组的环境,其他也是一样,不同的active激活不同的组
      "dev": devMVC,devDB
      "pro": proMVC,proDB
使用maven进行打包,打包完成后,用解压工具查看里面的application.yml文件
路径为:/BOOT-INF/classesapplication.yml
查看后,这里的active已经被初始化成功了,此时就相当于用maven控制了boot程序
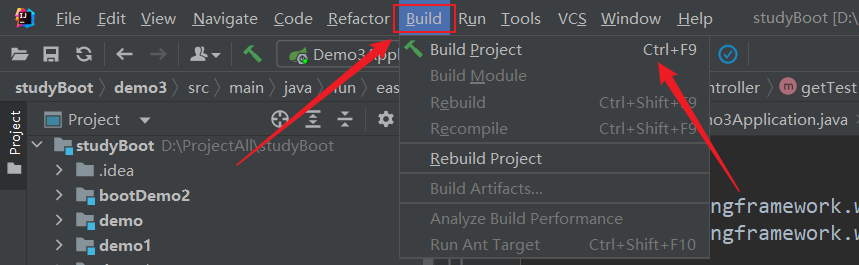
多环境开发控制bug
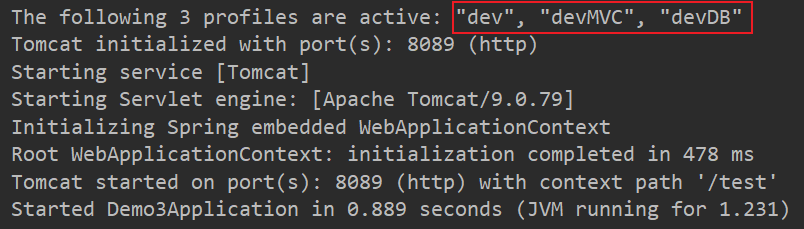
有时候可能会遇到一个bug,就是当运行时,会一直是一个环境,而且切换环境后或是clean清除后,依然是之前的环境,启动刚刚的环境,运行后,会是dev的环境,此时我们切换为pro的环境
此时,还是dev,`The following 3 profiles are active: "dev", "devMVC", "devDB"`
解决方法:
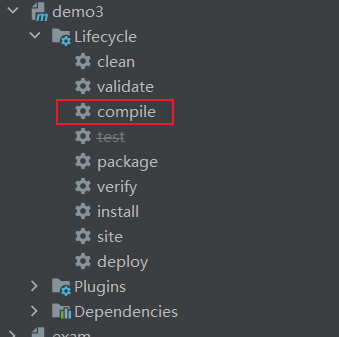
点击一下compile(编译),再次运行
此时的环境,更新为了`pro`,`The following 3 profiles are active: "pro", "proMVC", "proDB"`
总结:
日志
日志基础
日志(log)作用
编写日志
java
import org.slf4j.Logger;
import org.slf4j.LoggerFactory;
import org.springframework.web.bind.annotation.GetMapping;
import org.springframework.web.bind.annotation.RestController;

@RestController
public class TestController {

    // 创建记录日志的对象
    private static final Logger log = LoggerFactory.getLogger(TestController.class);

    @GetMapping("/test")
    public void test(){
        // 级别过低,一般没人使用
        // log.trace("堆栈信息");
        // debug调试信息
        log.debug("debug");
        // info记录运行信息
        log.info("运行信息");
        // warn记录警告信息
        log.warn("警告信息");
        // error记录报错信息
        log.error("报错信息");
    }


}
运行代码

此时发现,这里只有三行,并没有debug的提示信息,是因为系统默认启动后是info信息,所以看到的都是info及以上的提示信息,如果需要查看debug的信息,可以在`application.yml`中进行修改
yaml
debug: true
不推荐使用上面这种形式
一般情况下都是这样使用的
yaml
logging:
  level:
    root: debug
第一种呢是开启debug模式,输出调试信息,常用于检查系统运行状况
第二种是设置日志级别,root表示根节点,即整体应用日志级别
第一种只是输出与springboot有关的信息,而第二种的是所有包的信息
设置单一包下的日志
yaml
logging:
  group:
    eastwind: fun.eastwind.demo3.controller,fun.eastwind.demo3.service,fun.eastwind.demo3.mapper
  level:
    root: debug
    # 设置某个包的日志级别(其他都是debug级别,而声明的包是info级别)
    fun.eastwind.demo3.controller: info
    # 设置分组,对某个组设置日志级别(这里对eastwind组内的包级别设置为info)
    eastwind: info
日志级别
快速创建日志对象
创建一个日志对象BaseClass
java
import org.slf4j.Logger;
import org.slf4j.LoggerFactory;

public class BaseClass {
    private Class clazz;
    public static Logger log;

    public BaseClass(){
        // 从构造器中获取当前类
        clazz = this.getClass();
        // 传递到日志工厂中使用
        log = LoggerFactory.getLogger(clazz);
    }

}
测试,运行没啥毛病
你也可以引入lombok的包,里面有个注解`@Slf4j`,就是用于日志内容的
java
import lombok.extern.slf4j.Slf4j;
import org.springframework.web.bind.annotation.GetMapping;
import org.springframework.web.bind.annotation.RestController;

@RestController
@Slf4j
public class TestController{

    @GetMapping("/test")
    public void test(){
        // 级别过低,一般没人使用
        // log.trace("堆栈信息");
        // debug调试信息
        log.debug("debug");
        // info记录运行信息
        log.info("运行信息");
        // warn记录警告信息
        log.warn("警告信息");
        // error记录报错信息
        log.error("报错信息");
    }


}
日志输出格式控制

设置日志输出格式
在application.yml文件中书写
yaml
# 设置日志的模版格式
logging:
  pattern:
    console: "%d - %m%n"
%d:日期
%m:消息
%n:换行
%p:日志级别
%clr(里面可以是%p或%d或者其他的任意的文字):设置文字的颜色,在%clr(){加入颜色的名称,red 或者其他的,只有系统内有的才可以使用}
%t:线程名
%c:类名
如果类名太长,可以通过%-40.40c的方式,将类名压缩到40位,如果超过了,就进行截取,-号是左对齐
如果需要设置占位,例如[ main],可以在%号前面加入数字,例如%16t等

运行后发现,日志已经与模版格式一致了
格式不固定,随意的写
文件记录日志
日志信息一直显示在控制台,不太方便查找,需要记录到文件中比较好,在application.yml中进行配置,可以将日志记录到文件中
yaml
logging:
  file:
    path: server.log
设置完成后,运行一下,等服务器停止后,再到工程下,就可以看到日志了

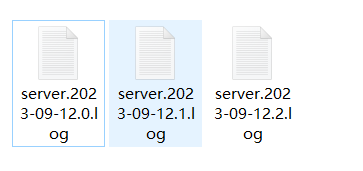
如果日志只存放在一个文件中,那么这个日志文件一定非常大,那我们该怎么办呢?
分文件,每天记一个
yaml
logging:
  file:
    path: server.log
  logback:
    rolling policy:
      # 日志文件的最大大小为 1KB
      # 当文件大小超过1KB时,就创建一个新的文件
      max-file-size: 1KB
      # file-name-pattern文件名称: server.年月日.今天第几个.log
      file-name-pattern: server.%d{yyyy-MM-dd}.%i.log
开启服务器后多运行几次,就发现出现了几个不同的文件了
开发篇
热部署
热部署是为了快速的重启项目而产生的一个工具
启动热部署
使用前需要先导入对应的依赖开启开发者工具
xml
<dependency>
    <groupId>org.springframework.boot</groupId>
    <artifactId>spring-boot-devtools</artifactId>
    <version>2.5.15</version>
</dependency>
写一些测试代码
java
import org.springframework.web.bind.annotation.GetMapping;
import org.springframework.web.bind.annotation.RestController;

@RestController
public class Test2Controller {

    @GetMapping("/test")
    public String getTest(){
        System.out.println("Test2Controller!");
        return "Test2Controller";
    }

}
打开postman进行测试,直接运行,控制台会打印一条
修改代码
java
import org.springframework.web.bind.annotation.GetMapping;
import org.springframework.web.bind.annotation.RestController;

@RestController
public class Test2Controller {

    @GetMapping("/test")
    public String getTest(){
        System.out.println("Test2Controller!");
        System.out.println("Test2Controller!");
        System.out.println("Test2Controller!");
        return "Test2Controller";
    }

}
如果我们选择右上角的按钮重启服务,会很慢,所以我们使用热部署
激活热部署:Ctrl + F9或
热部署很快就完成了,并且也成功出现了修改后代码的效果
关于热部署:
区别在于重启是重启的代码等内容,而重载会重载jar包
打开服务器时,这两个方法都会使用;而热部署时,只会使用重启,更新代码等
热部署仅仅加载当前开发者自定义开发的资源,不加载jar资源
自动启动热部署
操作步骤如下:
设置完成后,我们只需要启动工程,修改一下测试代码
当IDEA这个工具失去焦点,也就是不动这个工具五秒后,就会自动进行热部署
热部署范围配置
默认不触发重启的目录列表
在application.yml文件中修改
yaml
spring:
  devtools:
    restart:
      # 设置不参与热部署的文件夹或文件
      exclude: static/**,public/**,config/**,application.yml
关闭热部署
yaml
spring:
  devtools:
    restart:
      exclude: static/**,public/**,config/**
      # 设置为不启用
      enabled: false
热部署一般只在开发环境使用,在其他环境都不使用,可能你在这关闭了,但是有比你权限更高的人不小心开启了,那就不太好了,所以我们需要用到系统属性配置,来让热部署的优先级变高
系统属性配置的优先级是比application.yml文件的优先级更高的
java
import org.springframework.boot.SpringApplication;
import org.springframework.boot.autoconfigure.SpringBootApplication;

@SpringBootApplication
public class Demo3Application {

    public static void main(String[] args) {
        System.setProperty("spring.devtools.restart.enabled","false");
        SpringApplication.run(Demo3Application.class, args);
    }

}
配置高级
第三方bean属性绑定
创建一个springboot的项目,不需要勾选任何内容
引入依赖
xml
<dependency>
    <groupId>org.projectlombok</groupId>
    <artifactId>lombok</artifactId>
</dependency>
新建一个服务器的配置类
java
import lombok.Data;
import org.springframework.boot.context.properties.ConfigurationProperties;
import org.springframework.stereotype.Component;

@Component
@Data
// 配置属性前缀为servers
@ConfigurationProperties(prefix = "servers")
public class ServerConfig {
    private String ipaddress;
    private int port;
    private long timeout;
}
在application.yml文件中进行配置
利用servers的前缀来和配置文件里的内容进行连接
yaml
servers:
  ipAddress: 192.168.0.1
  port: 6666
  timeout: -1
在主程序中测试一下
java
import fun.eastwind.demo5.config.ServerConfig;
import org.springframework.boot.SpringApplication;
import org.springframework.boot.autoconfigure.SpringBootApplication;
import org.springframework.context.ConfigurableApplicationContext;

@SpringBootApplication
public class Demo5Application {

    public static void main(String[] args) {
        ConfigurableApplicationContext run = SpringApplication.run(Demo5Application.class, args);
        System.out.println(run.getBean(ServerConfig.class));
    }

}
得到结果`ServerConfig(ipaddress=192.168.0.1, port=6666, timeout=-1)`
自己定义的bean可以这样绑定属性,第三方bean如何进行属性绑定呢?
引入第三方依赖
xml
<dependency>
    <groupId>com.alibaba</groupId>
    <artifactId>druid</artifactId>
    <version>1.1.16.</version>
</dependency>
注入第三方的bean
java
import com.alibaba.druid.pool.DruidDataSource;
import fun.eastwind.demo5.config.ServerConfig;
import org.springframework.boot.SpringApplication;
import org.springframework.boot.autoconfigure.SpringBootApplication;
import org.springframework.context.ConfigurableApplicationContext;
import org.springframework.context.annotation.Bean;

@SpringBootApplication
public class Demo5Application {

    @Bean
    public DruidDataSource getDruidDataSource(){
        DruidDataSource druidDataSource = new DruidDataSource();
        return druidDataSource;
    }

    public static void main(String[] args) {
        ConfigurableApplicationContext run = SpringApplication.run(Demo5Application.class, args);
        System.out.println(run.getBean(ServerConfig.class));
        DruidDataSource druidDataSource = run.getBean(DruidDataSource.class);
        System.out.println(druidDataSource);
    }

}
运行后可以输出对应的bean的属性,但是里面都是空的,因为我们没有进行设置
设置第三方bean的属性
java
@Bean
public DruidDataSource getDruidDataSource(){
    DruidDataSource druidDataSource = new DruidDataSource();
    druidDataSource.setPassword("123456");
    return druidDataSource;
}

public static void main(String[] args) {
        ConfigurableApplicationContext run = SpringApplication.run(Demo5Application.class, args);
        System.out.println(run.getBean(ServerConfig.class));
        DruidDataSource druidDataSource = run.getBean(DruidDataSource.class);
        System.out.println(druidDataSource.getPassword());
    }
测试一下
如何将配置文件中的属性注入到第三方bean中
@ConfigurationProperties:为第三方bean绑定属性
yaml
datasource:
  driver-class-name: com.alibaba.druid.proxy.DruidDriver
java
@Bean
@ConfigurationProperties(prefix = "datasource")
public DruidDataSource getDruidDataSource(){
DruidDataSource druidDataSource = new DruidDataSource();
return druidDataSource;
}
public static void main(String[] args) {
ConfigurableApplicationContext run = SpringApplication.run(Demo5Application.class, args);
System.out.println(run.getBean(ServerConfig.class));
DruidDataSource druidDataSource = run.getBean(DruidDataSource.class);
System.out.println(druidDataSource.getDriverClassName());
}还有另一种方式,直接在主程序加入`@EnableConfigurationProperties(ServerConfig.class)`
`@EnableConfigurationProperties`可以将使用`@ConfigurationProperties`注解对应的类加入到容器中,跟使用了`@Component`是一个道理
这个是开启配置属性,在里面写入需要加入的配置属性类,就不需要在ServerConfig这个类中加入`@Component`
注意:
`@EnableConfigurationProperties`和`@Component`不能同时使用,如果同时使用会报错,说有两个容器

需要注入依赖
xml
<dependency>
    <groupId>org.springframework.boot</groupId>
    <artifactId>spring-boot-configuration-processor</artifactId>
</dependency>
松散绑定
当我们使用`@ConfigurationProperties`绑定属性支持属性名宽松绑定时,支持各种形式的绑定
分别有:驼峰模式、下划线模式、中划线模式、常量模式
当前缀(prefix绑定完成后),里面的数据格式要求会简单很多
yaml
servers:
#  ipAddress: 192.168.0.1   驼峰
#  IP_ADDRESS: 192.168.0.2   常量
#  ip-A-d-d-res-s: 192.168.0.3
#  i_p_A_d_d_r_e_ss: 192.168.0.4  unline
  ip-Address: 192.168.0.1   # 烤肉串模式 xx-xx-xx-xx
  port: 6666
  timeout: -1
datasource:
  driver-class-name: com.alibaba.druid.proxy.DruidDriver
java
import lombok.Data;
import org.springframework.boot.context.properties.ConfigurationProperties;
//@Component
@Data
// 配置属性前缀为servers
@ConfigurationProperties(prefix = "servers")
public class ServerConfig {
private String ipaddress;
private int port;
private long timeout;
}在servers被绑定后的ipAddress,会自动省略大小写以及_和-,即使改动了ServerConfig中的ipaddress也会自动忽略大小写和下划线
注意事项:
总结:
常用计量单位应用
有时候需要设置服务器的超时时间,当服务器的超时时间很大的时候,就会出现问题,例如300000000000,这样的话,我们不清楚这个时间的单位是什么,是300000000000秒,还是300000000000分钟,还是其他什么的
使用jdk8提供的一套单位`Duration`
java
// 将属性设置为小时
@DurationUnit(ChronoUnit.HOURS)
private Duration serverTimeout;
yaml
servers:
port: 6666
timeout: -1
serverTimeout: 10此时的结果就会以小时的形式显示
`ServerConfig(ipaddress=null, port=6666, timeout=-1, serverTimeout=PT10H)`
配置存储容量的大小
java
// 将大小设置为MB
@DataSizeUnit(DataUnit.MEGABYTES)
private DataSize dataSize;
yaml
servers:
port: 6666
timeout: -1
serverTimeout: 10
datasource:
driver-class-name: com.alibaba.druid.proxy.DruidDriver也可以这样`private DataSize dataSize;`,然后在yml文件中修改为`dataSize: 10MB`,但要注意,这样打印出来的会是Byte的形式`dataSize=10485760B`
bean属性校验
开启数据校验有助于系统安全性,J2EE规范中JSR303规范定义了一组有关数据校验相关的API
使用规范需要导入依赖
导入JSR303规范
xml
<!-- https://mvnrepository.com/artifact/javax.validation/validation-api -->
<dependency>
    <groupId>javax.validation</groupId>
    <artifactId>validation-api</artifactId>
</dependency>
开启对当前bean的属性注入校验
在需要属性注入校验的类上加入该注解
java
@Validated
`@Max`:value设置的最大值限制,message是超过后的提示信息
java
// @Max是校验最大值限制的,value是值,message是提示消息
@Max(value = 8888,message = "最大值不能超过8888")
private int port;
`@Min`:value设置的最小值限制,message是小于时的提示信息
java
@Min(value = 266,message = "最小值不能低于266")
private int port;
运行后报错`The Bean Validation API is on the classpath but no implementation could be found`
说这个bean的api的实现类没有找到
`Add an implementation, such as Hibernate Validator, to the classpath`
添加一个`Hibernate` 实现类,把它放到类路径下
导入依赖
xml
<!-- https://mvnrepository.com/artifact/org.hibernate.validator/hibernate-validator -->
        <dependency>
            <groupId>org.hibernate.validator</groupId>
            <artifactId>hibernate-validator</artifactId>
        </dependency>
修改为可能会出警告的值即可
yaml
servers:
  port: 9999
  timeout: -1
  serverTimeout: 10
  dataSize: 10MB
运行即可
此时校验效果就出来了,没啥毛病
测试
加载测试专用属性
新建一个spring的模块,什么也不需要勾选
先在测试类中测试配置文件中的属性能否正常读取
application.yml
yaml
test:
  value: 66
测试类
java
import org.junit.jupiter.api.Test;
import org.springframework.beans.factory.annotation.Value;
import org.springframework.boot.test.context.SpringBootTest;

@SpringBootTest
class Demo6ApplicationTests {

    @Value("${test.value}")
    private int value;

    @Test
    void contextLoads() {
        System.out.println(value);
    }

}
为当前测试用例添加临时属性
java
import org.junit.jupiter.api.Test;
import org.springframework.beans.factory.annotation.Value;
import org.springframework.boot.test.context.SpringBootTest;

@SpringBootTest(properties = {"test.value=888"})
class Demo6ApplicationTests {

    @Value("${test.value}")
    private int value;

    @Test
    void contextLoads() {
        System.out.println(value);
    }

}
`@SpringBootTest(properties = {"test.value=888"})`在SpringBootTest上可以添加properties属性,这个属性是一个String类型的数组,它可以添加和修改对应的临时属性
临时配置是覆盖配置文件的,可以理解为配置文件加载完成后,再次加载了一组临时配置
第二种方式,通过args属性进行配置
java
@SpringBootTest(args = {"--test.value=888"})
这里的args与之前命令行修改临时属性是类似的
args参数的优先级比properties设置的优先级较高
加载测试专用配置
有时候需要在测试时导入一些临时的配置类,可以使用`@Import`注解
在test目录下添加一个测试配置类
java
import org.springframework.context.annotation.Bean;
import org.springframework.context.annotation.Configuration;

@Configuration
public class MsgConfig {

    @Bean
    public String test(){
        return "test";
    }

}
编写测试类
java
import fun.eastwind.demo6.config.MsgConfig;
import org.junit.jupiter.api.Test;
import org.springframework.beans.factory.annotation.Autowired;
import org.springframework.boot.test.context.SpringBootTest;
import org.springframework.context.annotation.Import;

@SpringBootTest
// 导入相关的配置类
@Import({MsgConfig.class})
public class ConfigurationTest {

    @Autowired
    private String msg;

    @Test
    void test1(){
        System.out.println(msg);
    }

}
测试得到对应配置类的结果
测试类中启动web环境
在pom.xml文件中修改配置
diff
<dependency>
    <groupId>org.springframework.boot</groupId>
-	<artifactId>spring-boot-starter</artifactId>
+   <artifactId>spring-boot-starter-web</artifactId>
</dependency>
运行主程序类查看效果
然后创建一个测试类,然后看看该测试类启动后能否启动web环境
运行后发现,测试类只是一个普通的Java程序
我们需要在测试类中进行设置
java
import org.junit.jupiter.api.Test;
import org.springframework.boot.test.context.SpringBootTest;
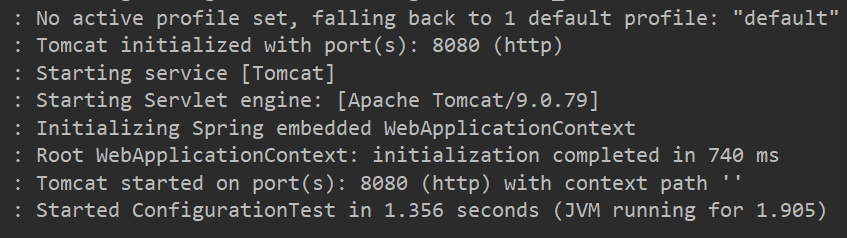
// 启动默认端口
@SpringBootTest(webEnvironment = SpringBootTest.WebEnvironment.DEFINED_PORT)
public class ConfigurationTest {
@Test
void test1(){
}
}再次运行测试,往下一直翻,就能看到对应的服务器被启动了
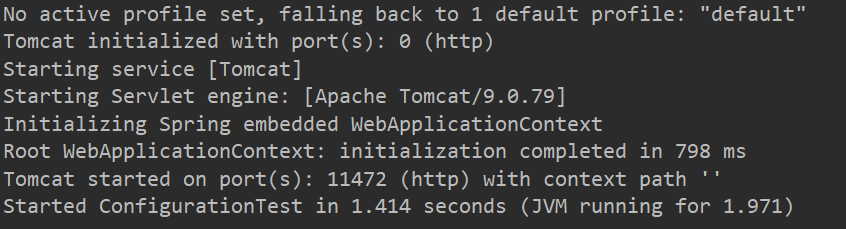
也可以使用随机端口来启动测试
java
import org.junit.jupiter.api.Test;
import org.springframework.boot.test.context.SpringBootTest;


@SpringBootTest(webEnvironment = SpringBootTest.WebEnvironment.RANDOM_PORT)
public class ConfigurationTest {

    @Test
    void test1(){

    }

}
发送虚拟请求
我们一般都会在java这个目录下写代码启动服务器来发送请求,那么,如何在测试下发送请求呢?
先写一个控制类,用于在测试类中测试
java
import org.springframework.web.bind.annotation.GetMapping;
import org.springframework.web.bind.annotation.RequestMapping;
import org.springframework.web.bind.annotation.RestController;

@RestController
@RequestMapping("/hellos")
public class HelloController {

    @GetMapping
    public String hello(){
        System.out.println("6666666");
        System.out.println("hello");
        return "Hello";
    }

}
在测试类下编写如下代码
java
import org.junit.jupiter.api.Test;
import org.springframework.beans.factory.annotation.Autowired;
import org.springframework.boot.test.autoconfigure.web.servlet.AutoConfigureMockMvc;
import org.springframework.boot.test.context.SpringBootTest;
import org.springframework.test.web.servlet.MockMvc;
import org.springframework.test.web.servlet.request.MockHttpServletRequestBuilder;
import org.springframework.test.web.servlet.request.MockMvcRequestBuilders;


// 使用随机端口启动服务器
@SpringBootTest(webEnvironment = SpringBootTest.WebEnvironment.RANDOM_PORT)

// 开启虚拟MVC调用
@AutoConfigureMockMvc
public class ConfigurationTest {

    @Test
    // 注入虚拟mvc调用对象
    public void testWeb(@Autowired MockMvc mvc) throws Exception {
        // 创建虚拟请求,访问指定地址(get发送get请求,也可以指定为其他的)
//        MockHttpServletRequestBuilder builder = MockMvcRequestBuilders.delete("/hello");
        MockHttpServletRequestBuilder builder = MockMvcRequestBuilders.get("/hellos");
        // 执行请求
        mvc.perform(builder);
    }

}
匹配响应执行状态
直接上代码了
在测试类中添加
java
@Test
void testStatus(@Autowired MockMvc mvc) throws Exception {
    MockHttpServletRequestBuilder builder = MockMvcRequestBuilders.get("/books");
    ResultActions actions = mvc.perform(builder);
    // 匹配执行状态(是否预期值)
    // 定义执行状态匹配器
    StatusResultMatchers status = MockMvcResultMatchers.status();
    // 定义预期执行状态
    ResultMatcher ok = status.isOk();
    actions.andExpect(ok);
}
上面这一段是定义了一个响应执行状态,当代码正常的情况下,只会普通的输出内容,而出现异常时,就会打印出对应的信息
假设将测试类中的testStatus方法修改一下
java
@Test
    void testStatus(@Autowired MockMvc mvc) throws Exception {
        MockHttpServletRequestBuilder builder = MockMvcRequestBuilders.get("/books1");
        ResultActions actions = mvc.perform(builder);
        // 匹配执行状态(是否预期值)
        // 定义执行状态匹配器
        StatusResultMatchers status = MockMvcResultMatchers.status();
        // 定义预期执行状态
        ResultMatcher ok = status.isOk();
        actions.andExpect(ok);
    }
/books1是一个不存在的地址,访问后会出现404的异常
运行一下,查看响应执行状态
shell
MockHttpServletRequest:
      HTTP Method = GET
      Request URI = /books1
       Parameters = {}
          Headers = []
             Body = null
    Session Attrs = {}

Handler:
             Type = org.springframework.web.servlet.resource.ResourceHttpRequestHandler

Async:
    Async started = false
     Async result = null

Resolved Exception:
             Type = null

ModelAndView:
        View name = null
             View = null
            Model = null

FlashMap:
       Attributes = null

MockHttpServletResponse:
           Status = 404
    Error message = null
          Headers = [Vary:"Origin", "Access-Control-Request-Method", "Access-Control-Request-Headers"]
     Content type = null
             Body =
    Forwarded URL = null
   Redirected URL = null
          Cookies = []

java.lang.AssertionError: Status expected:<200> but was:<404>
Expected :200
Actual   :404
匹配响应体
这里的匹配就是匹配响应的内容了,不一致就报错
测试类中编写代码
java
@Test
void testBody(@Autowired MockMvc mvc) throws Exception {
    MockHttpServletRequestBuilder builder = MockMvcRequestBuilders.get("/books");
    ResultActions actions = mvc.perform(builder);
    // 设定预期值,与真实值进行比较,成功测试通过,失败测试失败
    // 定义本次调用的预期值
    ContentResultMatchers content = MockMvcResultMatchers.content();
    ResultMatcher springboot2 = content.string("springboot2");
    // 添加预计值到本次调用过程中进行匹配
    actions.andExpect(springboot2);
}
预期结果为springboot2,实际为SpringBoot,响应断言异常
error
java.lang.AssertionError: Response content expected:<springboot2> but was:<SpringBoot>
Expected :springboot2
Actual :SpringBoot
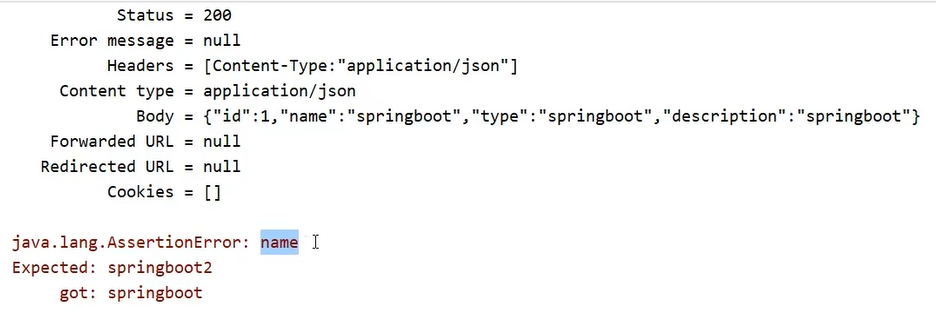
<Click to see difference>匹配响应体(Json)
匹配json的测试基本上没什么变化
java
@Test
    void testJson(@Autowired MockMvc mvc) throws Exception {
        MockHttpServletRequestBuilder builder = MockMvcRequestBuilders.get("/books");
        ResultActions action = mvc.perform(builder);

        //设定预期值 与真实值进行比较,成功测试通过,失败测试失败
        //定义本次调用的预期值
        ContentResultMatchers content = MockMvcResultMatchers.content();
        ResultMatcher result = content.json
                ("{\"id\":1,\"name\":\"springboot2\",\"type\":\"springboot2\",\"description\":\"springboot\"}");
        //添加预计值到本次调用过程中进行匹配
        action.andExpect(result);

    }
看错误后的结果
这里的断言很明显,断言是name出错了,说明预期的是springboot2,获取到了springboot所导致的,/books这里我是模拟了一个book的对象,然后给了一些测试数据
java
@GetMapping
public Book getById(){
    System.out.println("getById is running .....");

    Book book = new Book();
    book.setId(1);
    book.setName("springboot");
    book.setType("springboot");
    book.setDescription("springboot");

    return book;
}
匹配响应头
java
@Test
void testContentType(@Autowired MockMvc mvc) throws Exception {
    MockHttpServletRequestBuilder builder = MockMvcRequestBuilders.get("/books");
    ResultActions action = mvc.perform(builder);

    //设定预期值 与真实值进行比较,成功测试通过,失败测试失败
    //定义本次调用的预期值
    HeaderResultMatchers header = MockMvcResultMatchers.header();
    ResultMatcher contentType = header.string("Content-Type", "application/json");
    //添加预计值到本次调用过程中进行匹配
    action.andExpect(contentType);

}
看一下报错结果,其实也和前面是类似的
报错是说响应头Content-Type预期是json结果是text,没啥好说的,预计不通过所导致的

业务层测试事务回滚
一般情况下的测试,也会测试数据库的crud操作,当crud成功后,一般会在数据库中留下数据,但是一般测试是不会留下数据的,所以我们需要让测试进行事务回滚,让crud的数据成功后回滚
我们可以通过为测试用例添加一个注解`@Transactional`,在带有`@SpringBootTest`的测试类中加上该注解,表明,该测试类所进行的数据库操作都会被回滚,如果我们想进行数据库操作且不进行回滚,我们可以再加入一个注解`@Rollback(false)`,默认是`@Rollback(true)`回滚,改为false就是不回滚了,下面给出一个案例代码
这里设置`@Rollback(true)`说明是回滚的,执行完这段后,数据库的操作是成功了,但是会被回滚
java
@SpringBootTest
@Transactional
@Rollback(true)
public class DaoTest {

    @Autowired
    private BookService bookService;

    @Test
    void testSave(){
        Book book = new Book();
        book.setName("springboot3");
        book.setType("springboot3");
        book.setDescription("springboot3");

        bookService.save(book);
    }

}
测试用例设置随机数据
想要在测试用例中设置随机数据,可以在application.yml中进行随机测试用例数据的编写
${random.xxx},这里的xxx是随机值的格式
yaml
testcase:
  book:
    id: ${random.int}
    id2: ${random.int(10)}
    type: ${random.int!5,10!}
    name: ${random.value}		# 字符串
    uuid: ${random.uuid}		# uuid
    publishTime: ${random.long}	# 长整型
想要使用,可以通过`@ConfigurationProperties`来进行属性的配置,这里的prefix就指定了在application.yml文件中的随机属性,当然,名称需要同上
java
@Component
@Data
@ConfigurationProperties(prefix = "testcase.book")
public class BookCase {
    private int id;
    private int id2;
    private int type;
    private String name;
    private String uuid;
    private long publishTime;
}
对于随机值的产生,还有一些小的限定规则,比如数值可以限定范围等
想要为数值限定范围的话,可以通过
SpringBoot内置的数据层解决方案
SQL
内置数据源
springboot提供了3款内嵌数据源技术,分别如下:
目前我们所使用的数据源是Druid,运行时可以在日志中看到数据源的初始化信息
INFO 28600 --- [           main] c.a.d.s.b.a.DruidDataSourceAutoConfigure : Init DruidDataSource
INFO 28600 --- [           main] com.alibaba.druid.pool.DruidDataSource   : {dataSource-1} inited
当我们删除Druid数据源,会出现什么呢
INFO 31820 --- [           main] com.zaxxer.hikari.HikariDataSource       : HikariPool-1 - Starting...
INFO 31820 --- [           main] com.zaxxer.hikari.HikariDataSource       : HikariPool-1 - Start completed.
此时出现了一个陌生的数据源,也就是说,当我们不使用任何数据源时,springboot会加载一个默认的数据源`HikariDataSource`,而且我们可以对这个默认的数据源在application.yml文件中进行一个配置
yaml
spring:
  datasource:
    url: 路径
    hikari:
      driver-class-name: com.mysql.cj.jdbc.Driver
      username: root
      password: 123456
      maximum-pool-size: 50
专门的对默认的数据源做一个配置
JDBCTemplate
JdbcTemplate是一套现成的数据库技术,由Spring提供,想要使用它,需要下面几个步骤
xml
<dependency>
    <groupId>org.springframework.boot</groupId>
    <artifactId>spring-boot-starter-jdbc</artifactId>
</dependency
mybatis-plus的坐标中包含了`spring-boot-starter-jdbc`
java
@SpringBootTest
class Springboot15SqlApplicationTests {
    @Test
    void testJdbcTemplate(@Autowired JdbcTemplate jdbcTemplate){
    }
}java
@Test
void testJdbcTemplate(@Autowired JdbcTemplate jdbcTemplate){
String sql = "select * from tbl_book";
List<Map<String, Object>> maps = jdbcTemplate.queryForList(sql);
System.out.println(maps);
}
java
@Test
void testJdbcTemplate(@Autowired JdbcTemplate jdbcTemplate){

    String sql = "select * from tbl_book";
    RowMapper<Book> rm = new RowMapper<Book>() {
        @Override
        public Book mapRow(ResultSet rs, int rowNum) throws SQLException {
            Book temp = new Book();
            temp.setId(rs.getInt("id"));
            temp.setName(rs.getString("name"));
            temp.setType(rs.getString("type"));
            temp.setDescription(rs.getString("description"));
            return temp;
        }
    };
    List<Book> list = jdbcTemplate.query(sql, rm);
    System.out.println(list);
}java
@Test
void testJdbcTemplateSave(@Autowired JdbcTemplate jdbcTemplate){
String sql = "insert into tbl_book values(3,'springboot1','springboot2','springboot3')";
jdbcTemplate.update(sql);
}删除修改也是同理的
传一个sql语句进去
yaml
spring:
  jdbc:
    template:
      query-timeout: -1   # 查询超时时间
      max-rows: 500       # 最大行数
      fetch-size: -1      # 缓存行数
数据库
springboot提供了3款内置的数据库,分别是
内嵌数据库的优势是在进行测试时,数据无需存储在磁盘上,而是运行在内存中,当服务器关闭后,数据库也跟着消失,方便功能测试。
xml
<dependency>
    <groupId>com.h2database</groupId>
    <artifactId>h2</artifactId>
</dependency>
<dependency>
    <groupId>org.springframework.boot</groupId>
    <artifactId>spring-boot-starter-data-jpa</artifactId>
</dependency>xml
<dependency>
<groupId>org.springframework.boot</groupId>
<artifactId>spring-boot-starter-web</artifactId>
</dependency>yaml
spring:
h2:
console:
enabled: true
path: /h2web端访问路径/h2,访问密码123456,如果访问失败,先配置下列数据源,启动程序运行后再次访问/h2路径就可以正常访问了
yaml
datasource:
  url: jdbc:h2:~/test
  hikari:
    driver-class-name: org.h2.Driver
    username: eastwind
    password: 123456
其他的都没有任何变化,只是更换了一个数据库而已
总结
1. H2内嵌式数据库启动方式,添加坐标,添加配置
2. H2数据库线上运行时请务必关闭
到这里SQL相关的数据层解决方案就讲完了,现在的可选技术就丰富的多了。
NOSQL
nosql,其实指代的就是非关系型数据库,就是说,数据该存存,该取取
SpringBoot整合Redis(默认的lettucs)
Redis是一款采用key-value数据存储格式的内存级NoSQL数据库,重点关注数据存储格式,是key-value格式,也就是键值对的存储形式。与MySQL数据库不同,MySQL数据库有表、有字段、有记录,Redis没有这些东西,就是一个名称对应一个值,并且数据以存储在内存中使用为主。什么叫以存储在内存中为主?其实Redis有它的数据持久化方案,分别是RDB和AOF,但是Redis自身并不是为了数据持久化而生的,主要是在内存中保存数据,加速数据访问的,所以说是一款内存级数据库。Redis支持多种数据存储格式,比如可以直接存字符串,也可以存一个map集合,list集合。
Redis默认的端口号是6379,可以下载Windows版的:windows版安装包下载地址:https://github.com/tporadowski/redis/releases,因为Linux不是特别友好,后面专门学习的时候再进行学习
安装完毕后,打开刚刚安装的文件夹
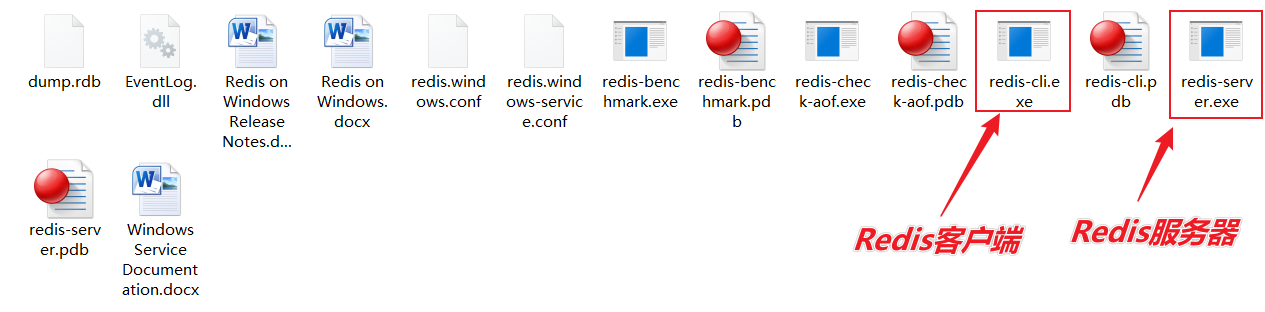
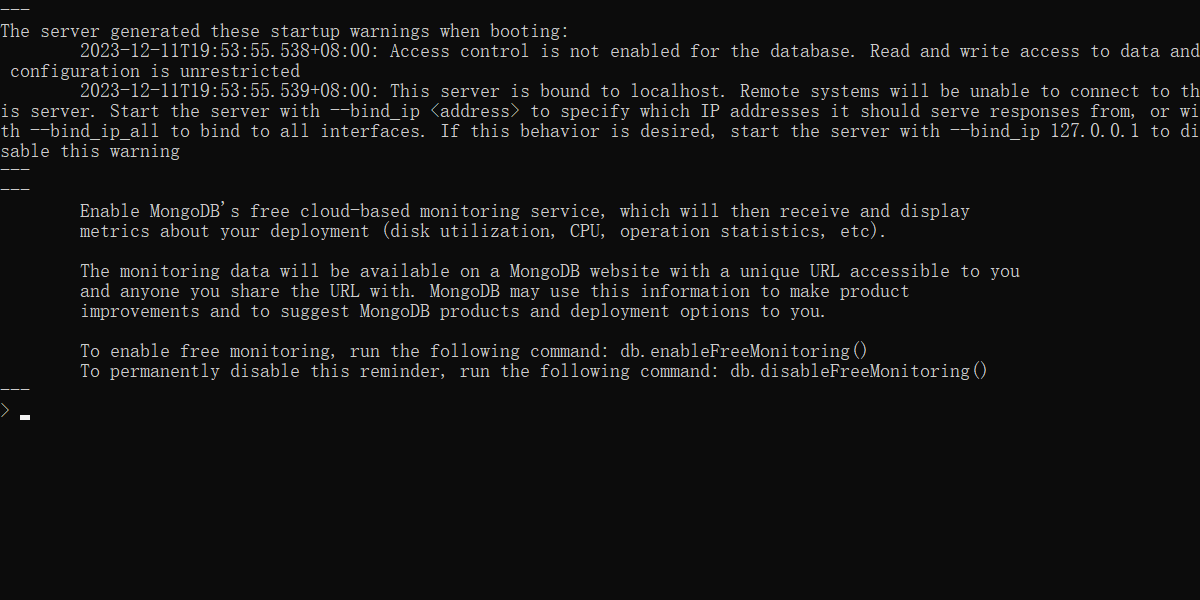
`redis-server.exe redis.windows.conf`这里的redis.windows.conf是一个配置文件,在当前文件夹下很明显也可以看到
启动客户端可以直接双击,也可以通过命令行的形式,`redis-cli.exe`
放置一个字符串数据到redis中,先为数据定义一个名称,比如name,age等,然后使用命令set设置数据到redis服务器中即可
CMD
set name itheima
set age 12 从redis中取出已经放入的数据,根据名称取,就可以得到对应数据。如果没有对应数据就会得到(nil)
CMD
get name
get age 以上使用的数据存储是一个名称对应一个值,如果要维护的数据过多,可以使用别的数据存储结构。例如hash,它是一种一个名称下可以存储多个数据的存储模型,并且每个数据也可以有自己的二级存储名称。向hash结构中存储数据格式如下:
hset a a1 aa1		#对外key名称是a,在名称为a的存储模型中,a1这个key中保存了数据aa1
hset a a2 aa2 获取hash结构中的数据命令如下
CMD
hget a a1			#得到aa1
hget a a2			#得到aa2
整合的话,一般是三个步骤,导入坐标,配置信息,进行编写
xml
<dependency>
    <groupId>org.springframework.boot</groupId>
    <artifactId>spring-boot-starter-data-redis</artifactId>
</dependency>yaml
spring:
redis:
host: localhost
port: 6379
java
@SpringBootTest
class Springboot16RedisApplicationTests {
    @Autowired
    private RedisTemplate redisTemplate;
    @Test
    void set() {
        ValueOperations ops = redisTemplate.opsForValue();
        ops.set("age",41);
    }
    @Test
    void get() {
        ValueOperations ops = redisTemplate.opsForValue();
        Object age = ops.get("name");
        System.out.println(age);
    }
    @Test
    void hset() {
        HashOperations ops = redisTemplate.opsForHash();
        ops.put("info","b","bb");
    }
    @Test
    void hget() {
        HashOperations ops = redisTemplate.opsForHash();
        Object val = ops.get("info", "b");
        System.out.println(val);
    }
}
StringRedisTemplate
由于redis内部不提供java对象的存储格式,因此当操作的数据以对象的形式存在时,会进行转码,转换成字符串格式后进行操作。为了方便开发者使用基于字符串为数据的操作,springboot整合redis时提供了专用的API接口StringRedisTemplate,你可以理解为这是RedisTemplate的一种指定数据泛型的操作API。
java
@SpringBootTest
public class StringRedisTemplateTest {
    @Autowired
    private StringRedisTemplate stringRedisTemplate;
    @Test
    void get(){
        ValueOperations<String, String> ops = stringRedisTemplate.opsForValue();
        String name = ops.get("name");
        System.out.println(name);
    }
}
jedis
springboot整合redis技术提供了多种客户端兼容模式,默认提供的是lettucs客户端技术,也可以根据需要切换成指定客户端技术,例如jedis客户端技术,切换成jedis客户端技术操作步骤如下:
xml
<dependency>
    <groupId>redis.clients</groupId>
    <artifactId>jedis</artifactId>
</dependency>
jedis坐标受springboot管理,无需提供版本号
yml
spring:
  redis:
    host: localhost
    port: 6379
client-type: jedisyaml
spring:
redis:
host: localhost
port: 6379
client-type: jedis
lettuce:
pool:
max-active: 16
jedis:
pool:
max-active: 16lettcus与jedis区别
SpringBoot整合MongoDB
使用Redis技术可以有效的提高数据访问速度,但是由于Redis的数据格式单一性,无法操作结构化数据,当操作对象型的数据时,Redis就显得捉襟见肘。在保障访问速度的情况下,如果想操作结构化数据,看来Redis无法满足要求了,此时需要使用全新的数据存储结束来解决此问题,本节讲解springboot如何整合MongoDB技术。
MongoDB是一个开源、高性能、无模式的文档型数据库,它是NoSQL数据库产品中的一种,是最像关系型数据库的非关系型数据库。
上述描述中几个词,其中对于我们最陌生的词是无模式的。什么叫无模式呢?简单说就是作为一款数据库,没有固定的数据存储结构,第一条数据可能有A、B、C一共3个字段,第二条数据可能有D、E、F也是3个字段,第三条数据可能是A、C、E3个字段,也就是说数据的结构不固定,这就是无模式。有人会说这有什么用啊?灵活,随时变更,不受约束。基于上述特点,MongoDB的应用面也会产生一些变化。以下列出了一些可以使用MongoDB作为数据存储的场景,但是并不是必须使用MongoDB的场景:
基础操作及其安装
windows版安装包下载地址:https://www.mongodb.com/try/download
将安装包下载完成后解压到自己的某盘下,接着进到该目录,在与bin目录同级的目录中,新建一个data目录,再到data目录下新建db目录用来存储数据
回到mongodb的bin目录下,在该目录下,有一个叫`mongod.exe`的文件,这个文件是运行mongodb的,在这之前,我们还需要指定mongodb的数据存储目录:`mongod --dbpath=..\data\db`
这个命令指定了数据存储的位置,..\是返回上一级目录,bin目录的上一级目录中存在data,data下存在db目录
默认服务端口是27017。
启动客户端
服务器启动了,接着启动客户端,依然是在刚刚的bin目录打开cmd,输入如下命令,指定一下服务端口,我这里的服务端口是27017
`mongo --host=127.0.0.1 --port=27017`
看到这个页面,说明你成功的登入了mongodb的客户端
这里的话,使用mongo命令行写很麻烦,所以这里用mongo的客户端来进行代码编写
安装的软件是Robo3t,自行下载即可,下载的软件版本需要和mongo的版本保持一致最好,否则容易有兼容性问题
打开后,需要先创建mongo的连接
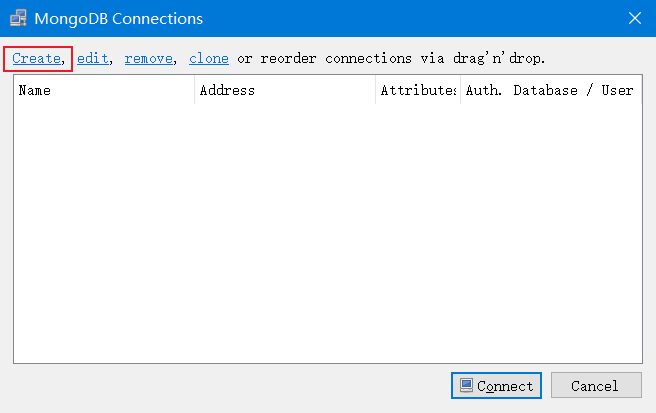
对连接的一些设置

配置好设置后,点击Save,再点击连接,即可
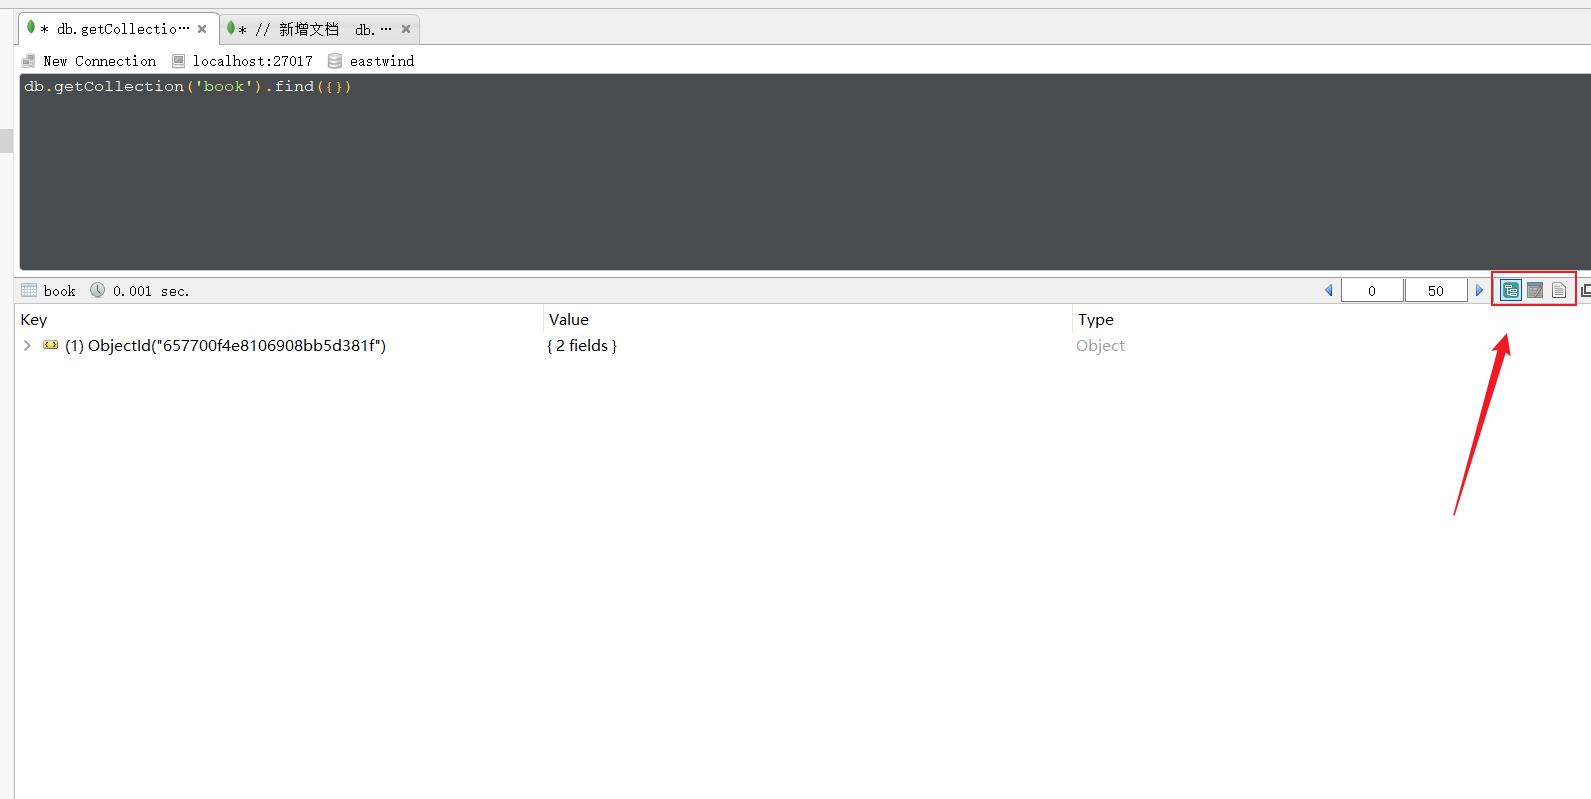
创建数据库:在左侧菜单中使用右键创建,输入数据库名称即可
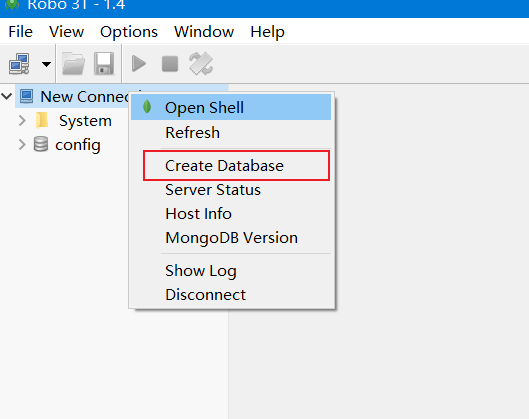
创建集合:在数据库中的Collections上使用右键创建,输入集合名称即可,集合等同于数据库中的表的作用
这里的集合可以理解为mysql中的表,双击这个表就能进入客户端了
在这里可以调整数据的展示模式
注释使用//
新增文档:(文档是一种类似json格式的数据,初学者可以先把数据理解为就是json数据)
CMD
db.集合名称.insert/save/insertOne(文档)
删除文档:
CMD
db.集合名称.remove(条件)
修改文档:
cmd
db.集合名称.update(条件,{操作种类:{文档}})
查询文档:
CMD
基础查询
查询全部:		   db.集合.find();
查第一条:		   db.集合.findOne()
查询指定数量文档:	db.集合.find().limit(10)					//查10条文档
跳过指定数量文档:	db.集合.find().skip(20)					//跳过20条文档
统计:			  	db.集合.count()
排序:				db.集合.sort({age:1})						//按age升序排序
投影:				db.集合名称.find(条件,{name:1,age:1})		 //仅保留name与age域

条件查询
基本格式:			db.集合.find({条件})
模糊查询:			db.集合.find({域名:/正则表达式/})		  //等同SQL中的like,比like强大,可以执行正则所有规则
条件比较运算:		   db.集合.find({域名:{$gt:值}})				//等同SQL中的数值比较操作,例如:name>18
包含查询:			db.集合.find({域名:{$in:[值1,值2]}})		//等同于SQL中的in
条件连接查询:		   db.集合.find({$and:[{条件1},{条件2}]})	   //等同于SQL中的and、or
案例
mongodb
// 新增文档
db.book.insert({name:"springboot"})

db.book.save({name:'springboot2'})

db.book.insertOne({name:'springboot3'})

// 删除文档

db.book.remove({name:'springboot'})

// 修改文档
// update仅更新找到的第一条,update(条件,{更新内容})
db.book.update({name:'springboot2'},{name:'springboot1'})
通过IDEA整合MongoDB
导入坐标
xml
<dependency>
    <groupId>org.springframework.boot</groupId>
    <artifactId>spring-boot-starter-data-mongodb</artifactId>
</dependency>
配置文件
yaml
spring:
  data:
    mongodb:
      # 这里的uri代指的mongodb中所创建的数据库
      uri: mongodb://localhost/eastwind
编写实体类
java
import lombok.Data;

@Data
public class Book {
    private int id;
    private String name;
    private String type;
    private String description;
}
编写测试类
java
import com.itheima.domain.Book;
import org.junit.jupiter.api.Test;
import org.springframework.beans.factory.annotation.Autowired;
import org.springframework.boot.test.context.SpringBootTest;
import org.springframework.data.mongodb.core.MongoTemplate;

import java.util.List;

@SpringBootTest
class Springboot17MongodbApplicationTests {

    @Autowired
    private MongoTemplate mongoTemplate;

    @Test
    void contextLoads() {
        // 创建测试的实体类
        Book book = new Book();
        book.setId(2);
        book.setName("springboot2");
        book.setType("springboot2");
        book.setDescription("springboot2");
        // 保存实体类到mongoDB中
        mongoTemplate.save(book);
    }

    @Test
    void find(){
        // 查找mongoDB中的所有数据
        List<Book> all = mongoTemplate.findAll(Book.class);
        System.out.println(all);
    }
}
ES(Elasticsearch)
ES(Elasticsearch)是一个分布式全文搜索引擎,重点是全文搜索。
可以说ES的思想就是查询对应的关键字,查到关键字后,获取的是其的id,再根据id来进行查询
那什么是全文搜索呢?比如用户要买一本书,以Java为关键字进行搜索,不管是书名中还是书的介绍中,甚至是书的作者名字,只要包含java就作为查询结果返回给用户查看,上述过程就使用了全文搜索技术。搜索的条件不再是仅用于对某一个字段进行比对,而是在一条数据中使用搜索条件去比对更多的字段,只要能匹配上就列入查询结果,这就是全文搜索的目的。而ES技术就是一种可以实现上述效果的技术。
要实现全文搜索的效果,不可能使用数据库中like操作去进行比对,这种效率太低了。ES设计了一种全新的思想,来实现全文搜索。具体操作过程如下:
1. 将被查询的字段的数据全部文本信息进行查分,分成若干个词
2. 将分词得到的结果存储起来,对应每条数据的id
3. 当进行查询时,如果输入“人民”作为查询条件,可以通过上述表格数据进行比对,得到id值1,2,然后根据id值就可以得到查询的结果数据了。
上述过程中分词结果关键字内容每一个都不相同,作用有点类似于数据库中的索引,是用来加速数据查询的。但是数据库中的索引是对某一个字段进行添加索引,而这里的分词结果关键字不是一个完整的字段值,只是一个字段中的其中的一部分内容。并且索引使用时是根据索引内容查找整条数据,全文搜索中的分词结果关键字查询后得到的并不是整条的数据,而是数据的id,要想获得具体数据还要再次查询,因此这里为这种分词结果关键字起了一个全新的名称,叫做倒排索引。
ES的安装
windows版安装包下载地址:https://www.elastic.co/cn/downloads/elasticsearch
下载的安装包是解压缩就能使用的zip文件,解压缩完毕后会得到如下文件

启动服务器
CMD
elasticsearch.bat 双击elasticsearch.bat文件即可启动ES服务器,默认服务端口9200。通过浏览器访问http://localhost:9200看到如下信息视为ES服务器正常启动
{
  "name" : "CZBK-**********",
  "cluster_name" : "elasticsearch",
  "cluster_uuid" : "j137DSswTPG8U4Yb-0T1Mg",
  "version" : {
    "number" : "7.16.2",
    "build_flavor" : "default",
    "build_type" : "zip",
    "build_hash" : "2b937c44140b6559905130a8650c64dbd0879cfb",
    "build_date" : "2021-12-18T19:42:46.604893745Z",
    "build_snapshot" : false,
    "lucene_version" : "8.10.1",
    "minimum_wire_compatibility_version" : "6.8.0",
    "minimum_index_compatibility_version" : "6.0.0-beta1"
  },
  "tagline" : "You Know, for Search"
}
ES的基本操作
ES中保存有我们要查询的数据,只不过格式和数据库存储数据格式不同而已。在ES中我们要先创建倒排索引,这个索引的功能又点类似于数据库的表,然后将数据添加到倒排索引中,添加的数据称为文档。所以要进行ES的操作要先创建索引,再添加文档,这样才能进行后续的查询操作。
要操作ES可以通过Rest风格的请求来进行,也就是说发送一个请求就可以执行一个操作。比如新建索引,删除索引这些操作都可以使用发送请求的形式来进行。
以下发送请求的操作都可以通过PostMan来进行
Put请求 http://localhost:9200/books books是索引名称发送请求后,看到如下信息说明索引创建成功
{
    "acknowledged": true,
    "shards_acknowledged": true,
    "index": "books"
}重复创建已经存在的索引会出现错误信息,reason属性中描述错误原因
{
    "error": {
        "root_cause": [
            {
                "type": "resource_already_exists_exception",
                "reason": "index [books/gOLfXbjFQxSLPk-eq9LV8Q] already exists",
                "index_uuid": "gOLfXbjFQxSLPk-eq9LV8Q",
                "index": "books"
            }
        ],
        "type": "resource_already_exists_exception",
        "reason": "index [books/gOLfXbjFQxSLPk-eq9LV8Q] already exists",
        "index_uuid": "gOLfXbjFQxSLPk-eq9LV8Q",
        "index": "books"
    },
    "status": 400
}GET请求 http://localhost:9200/books查询索引得到索引相关信息,如下
{
    "books": {
        "aliases": {},
        "mappings": {},
        "settings": {
            "index": {
                "routing": {
                    "allocation": {
                        "include": {
                            "_tier_preference": "data_content"
                        }
                    }
                },
                "number_of_shards": "1",
                "provided_name": "books",
                "creation_date": "1702356563110",
                "number_of_replicas": "1",
                "uuid": "gOLfXbjFQxSLPk-eq9LV8Q",
                "version": {
                    "created": "7160299"
                }
            }
        }
    }
}
查询不存在的索引信息会报错,详细描述在reason中
{
    "error": {
        "root_cause": [
            {
                "type": "index_not_found_exception",
                "reason": "no such index [books1]",
                "resource.type": "index_or_alias",
                "resource.id": "books1",
                "index_uuid": "_na_",
                "index": "books1"
            }
        ],
        "type": "index_not_found_exception",
        "reason": "no such index [books1]",
        "resource.type": "index_or_alias",
        "resource.id": "books1",
        "index_uuid": "_na_",
        "index": "books1"
    },
    "status": 404
}CMD
DELETE请求 http://localhost:9200/books删除所有后,给出删除结果
json
{
    "acknowledged": true
}
如果删除不存在的,会给出错误信息,同样在reason属性中描述具体的错误原因
JSON
{
    "error": {
        "root_cause": [
            {
                "type": "index_not_found_exception",
                "reason": "no such index [books1]",
                "resource.type": "index_or_alias",
                "resource.id": "books1",
                "index_uuid": "_na_",
                "index": "books1"
            }
        ],
        "type": "index_not_found_exception",
        "reason": "no such index [books1]",
        "resource.type": "index_or_alias",
        "resource.id": "books1",
        "index_uuid": "_na_",
        "index": "books1"
    },
    "status": 404
}
到这里ES还并没有分词效果,我们需要为ES添加一个分词器
在安装ES的目录中

可以新建一个IK文件夹,解压刚刚的IK分词器到里面,然后我们需要重启ES,因为新添加了一个插件
重启完成后,我们新建索引,此时发送请求的话,就需要携带参数来发送了,这里携带的参数,就是分词器的相关信息
json
{
    "mappings":{		# 定义mappings属性,替换创建索引时对应的mappings
        "properties":{		# 定义索引中包含的属性设置
            "id":{		# 设置索引中包含id属性
                "type":"keyword"	# 当前属性可以被直接搜索
            },
            "name":{		# 设置索引中包含name属性
                "type":"text",		# 当前属性是文本信息,参与分词
                "analyzer":"ik_max_word",		# 使用IK分词器进行分词
                 "copy_to":"all"		# 将数据拷贝到all一份
            },
            "type":{
                "type":"keyword"
            },
            "description":{
                "type":"text",
                "analyzer":"ik_max_word",
                "copy_to":"all"
            },
    		"all":{
                "type":"text",
                "analyzer":"ik_max_word"
            }
        }
    }
}
Put请求 http://localhost:9200/books 携带上述的json参数接着再次查询,查看刚刚添加的内容
Get请求 http://localhost:9200/books
{
    "books": {
        "aliases": {},
        "mappings": {
            "properties": {
                "all": {
                    "type": "text",
                    "analyzer": "ik_max_word"
                },
                "description": {
                    "type": "text",
                    "copy_to": [
                        "all"
                    ],
                    "analyzer": "ik_max_word"
                },
                "id": {
                    "type": "keyword"
                },
                "name": {
                    "type": "text",
                    "copy_to": [
                        "all"
                    ],
                    "analyzer": "ik_max_word"
                },
                "type": {
                    "type": "keyword"
                }
            }
        },
        "settings": {
            "index": {
                "routing": {
                    "allocation": {
                        "include": {
                            "_tier_preference": "data_content"
                        }
                    }
                },
                "number_of_shards": "1",
                "provided_name": "books",
                "creation_date": "1702358131045",
                "number_of_replicas": "1",
                "uuid": "kobkcinJSGC6WlBX5BeIhA",
                "version": {
                    "created": "7160299"
                }
            }
        }
    }
}
新建文档
POST请求	http://localhost:9200/books/_doc		#使用系统自动生成id
POST请求	http://localhost:9200/books/_create/1	#使用指定id
POST请求	http://localhost:9200/books/_doc/1		#使用指定id,不存在创建,存在更新(版本递增)

文档通过请求参数传递,数据格式json
{
    "id":1,
    "name":"springboot",
    "type":"springboot",
    "description":"springboot"
}
创建成功后,结果如下
{
    "_index": "books",
    "_type": "_doc",
    "_id": "-6B7XIwBlbXQYAoKOhZf",
    "_version": 1,
    "result": "created",
    "_shards": {
        "total": 2,
        "successful": 1,
        "failed": 0
    },
    "_seq_no": 0,
    "_primary_term": 1
}
查询文档
查询时不携带参数
GET请求	http://localhost:9200/books/_doc/1		 #查询单个文档
GET请求	http://localhost:9200/books/_search		 #查询全部文档
查询单个文档时所携带的id,是创建时的id,也就是系统生成或者在路径后跟随的指定的那个id,跟json参数中携带的内容无关
{
    "_index": "books",
    "_type": "_doc",
    "_id": "1",
    "_version": 1,
    "_seq_no": 1,
    "_primary_term": 1,
    "found": true,
    "_source": {
        "id": 1,
        "name": "springboot",
        "type": "springboot",
        "description": "springboot"
    }
}
查询全部文档
{
    "took": 883,
    "timed_out": false,
    "_shards": {
        "total": 1,
        "successful": 1,
        "skipped": 0,
        "failed": 0
    },
    "hits": {
        "total": {
            "value": 1,
            "relation": "eq"
        },
        "max_score": 1.0,
        "hits": [
            {
                "_index": "books",
                "_type": "_doc",
                "_id": "-6B7XIwBlbXQYAoKOhZf",
                "_score": 1.0,
                "_source": {
                    "id": 1,
                    "name": "springboot",
                    "type": "springboot",
                    "description": "springboot"
                }
            }
        ]
    }
}
其他操作
json
	GET请求	http://localhost:9200/books/_search?q=name:springboot	# q=查询属性名:查询属性值
json
DELETE请求 http://localhost:9200/books/_doc/1全覆盖
json
	PUT请求	http://localhost:9200/books/_doc/1

	文档通过请求参数传递,数据格式json
	{
	    "name":"springboot",
	    "type":"springboot",
	    "description":"springboot"
	}
json
	POST请求	http://localhost:9200/books/_update/1

	文档通过请求参数传递,数据格式json
	{
	    "doc":{						#部分更新并不是对原始文档进行更新,而是对原始文档对象中的doc属性中的指定属性更新
	        "name":"springboot"		#仅更新提供的属性值,未提供的属性值不参与更新操作
	    }
	}
ES整合
xml
<dependency>
    <groupId>org.springframework.boot</groupId>
    <artifactId>spring-boot-starter-data-elasticsearch</artifactId>
</dependency>yaml
spring:
elasticsearch:
rest:
uris: http://localhost:9200 配置ES服务器地址,端口9200
java
@SpringBootTest
class Springboot18EsApplicationTests {
    @Autowired
    private ElasticsearchRestTemplate template;
} 上述操作形式是ES早期的操作方式,使用的客户端被称为Low Level Client,这种客户端操作方式性能方面略显不足,于是ES开发了全新的客户端操作方式,称为High Level Client。高级别客户端与ES版本同步更新,但是springboot最初整合ES的时候使用的是低级别客户端,所以企业开发需要更换成高级别的客户端模式。
下面使用高级别客户端方式进行springboot整合ES,操作步骤如下:
xml
<dependency>
    <groupId>org.elasticsearch.client</groupId>
    <artifactId>elasticsearch-rest-high-level-client</artifactId>
</dependency>java
@SpringBootTest
class Springboot18EsApplicationTests {
private RestHighLevelClient client;
@Test
void testCreateClient() throws IOException {
HttpHost host = HttpHost.create("http://localhost:9200");
RestClientBuilder builder = RestClient.builder(host);
client = new RestHighLevelClient(builder);
client.close();
}
} 配置ES服务器地址与端口9200,记得客户端使用完毕需要手工关闭。由于当前客户端是手工维护的,因此不能通过自动装配的形式加载对象。
java
@SpringBootTest
class Springboot18EsApplicationTests {
    private RestHighLevelClient client;
      @Test
      void testCreateIndex() throws IOException {
          // 建立连接
          HttpHost host = HttpHost.create("http://localhost:9200");
          // 构建客户端
          RestClientBuilder builder = RestClient.builder(host);
          client = new RestHighLevelClient(builder);

          // 创建请求对象
          CreateIndexRequest request = new CreateIndexRequest("books");
          // 使用客户端发送请求
          client.indices().create(request, RequestOptions.DEFAULT);
          // 关闭客户端
          client.close();
      }
} 高级别客户端操作是通过发送请求的方式完成所有操作的,ES针对各种不同的操作,设定了各式各样的请求对象,上例中创建索引的对象是CreateIndexRequest,其他操作也会有自己专用的Request对象。
当前操作我们发现,无论进行ES何种操作,第一步永远是获取RestHighLevelClient对象,最后一步永远是关闭该对象的连接。在测试中可以使用测试类的特性去帮助开发者一次性的完成上述操作,但是在业务书写时,还需要自行管理。将上述代码格式转换成使用测试类的初始化方法和销毁方法进行客户端对象的维护。
JAVA
@SpringBootTest
class Springboot18EsApplicationTests {
    @BeforeEach		//在测试类中每个操作运行前运行的方法
    void setUp() {
        HttpHost host = HttpHost.create("http://localhost:9200");
        RestClientBuilder builder = RestClient.builder(host);
        client = new RestHighLevelClient(builder);
    }

    @AfterEach		//在测试类中每个操作运行后运行的方法
    void tearDown() throws IOException {
        client.close();
    }

    private RestHighLevelClient client;

    @Test
    void testCreateIndex() throws IOException {
        CreateIndexRequest request = new CreateIndexRequest("books");
        client.indices().create(request, RequestOptions.DEFAULT);
    }
} 现在的书写简化了很多,也更合理。下面使用上述模式将所有的ES操作执行一遍,测试结果
创建索引(IK分词器):
java
@Test
void testCreateIndexByIK() throws IOException {
    CreateIndexRequest request = new CreateIndexRequest("books");
    String json = "{\n" +
            "    \"mappings\":{\n" +
            "        \"properties\":{\n" +
            "            \"id\":{\n" +
            "                \"type\":\"keyword\"\n" +
            "            },\n" +
            "            \"name\":{\n" +
            "                \"type\":\"text\",\n" +
            "                \"analyzer\":\"ik_max_word\",\n" +
            "                \"copy_to\":\"all\"\n" +
            "            },\n" +
            "            \"type\":{\n" +
            "                \"type\":\"keyword\"\n" +
            "            },\n" +
            "            \"description\":{\n" +
            "                \"type\":\"text\",\n" +
            "                \"analyzer\":\"ik_max_word\",\n" +
            "                \"copy_to\":\"all\"\n" +
            "            },\n" +
            "            \"all\":{\n" +
            "                \"type\":\"text\",\n" +
            "                \"analyzer\":\"ik_max_word\"\n" +
            "            }\n" +
            "        }\n" +
            "    }\n" +
            "}";
    //设置请求中的参数
    request.source(json, XContentType.JSON);
    client.indices().create(request, RequestOptions.DEFAULT);
} IK分词器是通过请求参数的形式进行设置的,设置请求参数使用request对象中的source方法进行设置,至于参数是什么,取决于你的操作种类。当请求中需要参数时,均可使用当前形式进行参数设置。
添加文档:
java
@Test
//添加文档
void testCreateDoc() throws IOException {
    // 从数据库中根据id查询出数据信息
    Book book = bookDao.selectById(1);
    // 创建请求,id是数据库中的id
    IndexRequest request = new IndexRequest("books").id(book.getId().toString());
    // 将数据转为json
    String json = JSON.toJSONString(book);
    // 发送请求的数据类型是json
    request.source(json,XContentType.JSON);
    // 发送请求
    client.index(request,RequestOptions.DEFAULT);
} 添加文档使用的请求对象是IndexRequest,与创建索引使用的请求对象不同。
批量添加文档:
java
@Test
//批量添加文档
void testCreateDocAll() throws IOException {
    List<Book> bookList = bookDao.selectList(null);
    // 创建一个类似数组的Request
    BulkRequest bulk = new BulkRequest();
    for (Book book : bookList) {
        IndexRequest request = new IndexRequest("books").id(book.getId().toString());
        String json = JSON.toJSONString(book);
        request.source(json,XContentType.JSON);
        // 将每一个IndexRequest添加到Bulk请求中
        bulk.add(request);
    }
    client.bulk(bulk,RequestOptions.DEFAULT);
} 批量做时,先创建一个BulkRequest的对象,可以将该对象理解为是一个保存request对象的容器,将所有的请求都初始化好后,添加到BulkRequest对象中,再使用BulkRequest对象的bulk方法,一次性执行完毕。
按id查询文档:
java
@Test
//按id查询
void testGet() throws IOException {
    // 传入名称和对应的id
    GetRequest request = new GetRequest("books","1");
    // 发送请求后返回响应对象
    GetResponse response = client.get(request, RequestOptions.DEFAULT);
    String json = response.getSourceAsString();
    System.out.println(json);
} 根据id查询文档使用的请求对象是GetRequest。
按条件查询文档:
java
@Test
//按条件查询
void testSearch() throws IOException {
    SearchRequest request = new SearchRequest("books");

    SearchSourceBuilder builder = new SearchSourceBuilder();
    // 根据条件查询文档,通过all里来查询,因为all里面存在合并字段
    builder.query(QueryBuilders.termQuery("all","spring"));
    request.source(builder);

    SearchResponse response = client.search(request, RequestOptions.DEFAULT);
    // 得到一个类似数组的玩意,遍历一下,得到一堆JSON,再转为Book对象
    SearchHits hits = response.getHits();
    for (SearchHit hit : hits) {
        String source = hit.getSourceAsString();
        //System.out.println(source);
        Book book = JSON.parseObject(source, Book.class);
        System.out.println(book);
    }
} 按条件查询文档使用的请求对象是SearchRequest,查询时调用SearchRequest对象的termQuery方法,需要给出查询属性名,此处支持使用合并字段,也就是前面定义索引属性时添加的all属性。
springboot整合ES的操作到这里就说完了,与前期进行springboot整合redis和mongodb的差别还是蛮大的,主要原始就是我们没有使用springboot整合ES的客户端对象。至于操作,由于ES操作种类过多,所以显得操作略微有点复杂。有关springboot整合ES就先学习到这里吧。
总结
1. springboot整合ES步骤
1. 导入springboot整合ES的High Level Client坐标
2. 手工管理客户端对象,包括初始化和关闭操作
3. 使用High Level Client根据操作的种类不同,选择不同的Request对象完成对应操作
整合第三方技术
缓存
缓存分为本地缓存和远程缓存,本地缓存中是在客户端本地或应用程序内部的缓存,而远程缓存则缓存在远程服务器上,例如Redis
企业级应用主要作用是信息处理,当需要读取数据时,由于受限于数据库的访问效率,导致整体系统性能偏低。
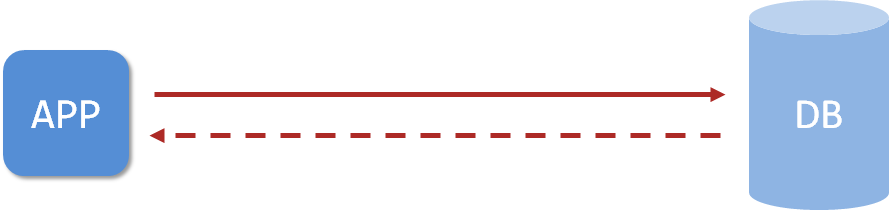
应用程序直接与数据库打交道,访问效率低
为了改善上述现象,开发者通常会在应用程序与数据库之间建立一种临时的数据存储机制,该区域中的数据在内存中保存,读写速度较快,可以有效解决数据库访问效率低下的问题。这一块临时存储数据的区域就是缓存。
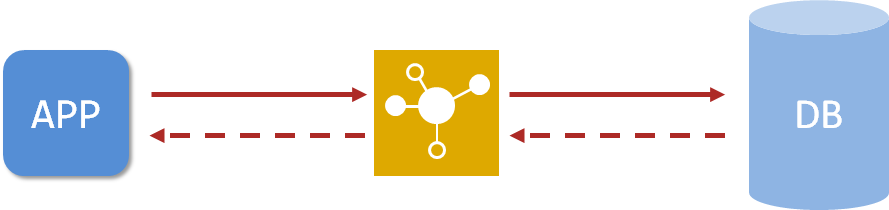
使用缓存后,应用程序与缓存打交道,缓存与数据库打交道,数据访问效率提高
缓存是什么?缓存是一种介于数据永久存储介质与应用程序之间的数据临时存储介质,使用缓存可以有效的减少低速数据读取过程的次数(例如磁盘IO),提高系统性能。此外缓存不仅可以用于提高永久性存储介质的数据读取效率,还可以提供临时的数据存储空间。而springboot提供了对市面上几乎所有的缓存技术进行整合的方案
SpringBoot内置缓存解决方案
springboot技术提供有内置的缓存解决方案,可以帮助开发者快速开启缓存技术,并使用缓存技术进行数据的快速操作,例如读取缓存数据和写入数据到缓存。
xml
<dependency>
    <groupId>org.springframework.boot</groupId>
    <artifactId>spring-boot-starter-cache</artifactId>
</dependency>java
@SpringBootApplication
//开启缓存功能
@EnableCaching
public class Springboot19CacheApplication {
public static void main(String[] args) {
SpringApplication.run(Springboot19CacheApplication.class, args);
}
}java
@Service
public class BookServiceImpl implements BookService {
@Autowired
private BookDao bookDao;
@Cacheable(value="cacheSpace",key="#id")
public Book getById(Integer id) {
return bookDao.selectById(id);
}
} 在业务方法上面使用注解@Cacheable声明当前方法的返回值放入缓存中,其中要指定缓存的存储位置,以及缓存中保存当前方法返回值对应的名称。上例中value属性描述缓存的存储位置,可以理解为是一个存储空间名,key属性描述了缓存中保存数据的名称,使用#id读取形参中的id值作为缓存名称。
使用@Cacheable注解后,执行当前操作,如果发现对应名称在缓存中没有数据,就正常读取数据,然后放入缓存;如果对应名称在缓存中有数据,就终止当前业务方法执行,直接返回缓存中的数据。
SpringBoot整合Ehcache缓存
xml
<dependency>
    <groupId>net.sf.ehcache</groupId>
    <artifactId>ehcache</artifactId>
</dependency>yaml
spring:
cache:
type: ehcache
ehcache:
# 配置文件
config: ehcache.xml 配置缓存的类型type为ehcache,此处需要说明一下,当前springboot可以整合的缓存技术中包含有ehcach,所以可以这样书写。其实这个type不可以随便写的,不是随便写一个名称就可以整合的。
由于ehcache的配置有独立的配置文件格式,因此还需要指定ehcache的配置文件,以便于读取相应配置
xml
<?xml version="1.0" encoding="UTF-8"?>
<ehcache xmlns:xsi="http://www.w3.org/2001/XMLSchema-instance"
         xsi:noNamespaceSchemaLocation="http://ehcache.org/ehcache.xsd"
         updateCheck="false">
    <!-- 设置diskPersistent磁盘持久化的存放位置 -->
    <diskStore path="D:\ehcache" />

    <!--默认缓存策略 -->
    <!-- external:是否永久存在,设置为true则不会被清除,此时与timeout冲突,通常设置为false-->
    <!-- diskPersistent:是否启用磁盘持久化-->
    <!-- maxElementsInMemory:最大缓存数量-->
    <!-- overflowToDisk:超过最大缓存数量是否持久化到磁盘-->
    <!-- timeToIdleSeconds:最大不活动间隔,设置过长缓存容易溢出,设置过短无效果,可用于记录时效性数据,例如验证码-->
    <!-- timeToLiveSeconds:最大存活时间-->
    <!-- memoryStoreEvictionPolicy:缓存清除策略-->
    <defaultCache
        eternal="false"
        diskPersistent="false"
        maxElementsInMemory="1000"
        overflowToDisk="false"
        timeToIdleSeconds="60"
        timeToLiveSeconds="60"
        memoryStoreEvictionPolicy="LRU" />

    <cache
        name="smsCode"
        eternal="false"
        diskPersistent="false"
        maxElementsInMemory="1000"
        overflowToDisk="false"
        timeToIdleSeconds="10"
        timeToLiveSeconds="10"
        memoryStoreEvictionPolicy="LRU" />
</ehcache>
用法与前面相同
总结
1. springboot使用Ehcache作为缓存实现需要导入Ehcache的坐标
2. 修改设置,配置缓存供应商为ehcache,并提供对应的缓存配置文件
SpringBoot整合Memcached缓存
windows版安装包下载地址:https://www.runoob.com/memcached/window-install-memcached.html
解压到一个文件夹下,里面有一个memcached.exe,使用该文件可以启动服务,在这个文件夹中打开命令行,通过`memcached.exe -d install`执行安装服务的命令,服务安装后,可以通过
cmd
memcached.exe -d start		# 启动服务
memcached.exe -d stop		# 停止服务
详细的操作在下载地址中都有
memcached目前提供有三种客户端技术,分别是Memcached Client for Java、SpyMemcached和Xmemcached,其中性能指标各方面最好的客户端是Xmemcached,本次整合就使用这个作为客户端实现技术了。下面开始使用Xmemcached
xml
<dependency>
    <groupId>com.googlecode.xmemcached</groupId>
    <artifactId>xmemcached</artifactId>
    <version>2.4.7</version>
</dependency>java
@Configuration
public class XMemcachedConfig {
@Bean
public MemcachedClient getMemcachedClient() throws IOException {
// 创建一个客户端
MemcachedClientBuilder memcachedClientBuilder = new XMemcachedClientBuilder("localhost:11211");
MemcachedClient memcachedClient = memcachedClientBuilder.build();
return memcachedClient;
}
}memcached默认对外服务端口11211。
java
@Service
public class SMSCodeServiceImpl implements SMSCodeService {
    @Autowired
    private CodeUtils codeUtils;
    @Autowired
    private MemcachedClient memcachedClient;

    public String sendCodeToSMS(String tele) {
        String code = codeUtils.generator(tele);
        try {
            // memcachedClient.set(key,过期时间,value);
            memcachedClient.set(tele,10,code);
        } catch (Exception e) {
            e.printStackTrace();
        }
        return code;
    }

    public boolean checkCode(SMSCode smsCode) {
        String code = null;
        try {
            code = memcachedClient.get(smsCode.getTele()).toString();
        } catch (Exception e) {
            e.printStackTrace();
        }
        return smsCode.getCode().equals(code);
    }
}
还是一种Get和Set的方法
定义配置属性
java
@Component
@ConfigurationProperties(prefix = "memcached")
@Data
public class XMemcachedProperties {
    private String servers;
    private int poolSize;
    private long opTimeout;
}yaml
memcached:
servers: localhost:11211
poolSize: 10
opTimeout: 3000java
@Configuration
public class XMemcachedConfig {
@Autowired
private XMemcachedProperties props;
@Bean
public MemcachedClient getMemcachedClient() throws IOException {
MemcachedClientBuilder memcachedClientBuilder = new XMemcachedClientBuilder(props.getServers());
memcachedClientBuilder.setConnectionPoolSize(props.getPoolSize());
memcachedClientBuilder.setOpTimeout(props.getOpTimeout());
MemcachedClient memcachedClient = memcachedClientBuilder.build();
return memcachedClient;
}
}总结
1. memcached安装后需要启动对应服务才可以对外提供缓存功能,安装memcached服务需要基于windows系统管理员权限
2. 由于springboot没有提供对memcached的缓存整合方案,需要采用手工编码的形式创建xmemcached客户端操作缓存
3. 导入xmemcached坐标后,创建memcached配置类,注册MemcachedClient对应的bean,用于操作缓存
4. 初始化MemcachedClient对象所需要使用的属性可以通过自定义配置属性类的形式加载
SpringBoot整合jetcache缓存
redis和mongodb需要安装独立的服务器,连接时需要输入对应的服务器地址,这种是远程缓存,Ehcache是一个典型的内存级缓存,因为它什么也不用安装,启动后导入jar包就有缓存功能了。这个时候就要问了,能不能这两种缓存一起用呢?
阿里的jetcache刚好就满足了这一点
jetcache严格意义上来说,并不是一个缓存解决方案,只能说他算是一个缓存框架,然后把别的缓存放到jetcache中管理,这样就可以支持AB缓存一起用了。并且jetcache参考了springboot整合缓存的思想,整体技术使用方式和springboot的缓存解决方案思想非常类似。
目前jetcache支持的缓存方案本地缓存支持两种,远程缓存支持两种,分别如下:
这里使用的是LinkedHashMap+Redis的方案实现本地与远程缓存方案同时使用。
纯远程方案
导入springboot整合jetcache对应的坐标starter,当前坐标默认使用的远程方案是redis
xml
<dependency>
    <groupId>com.alicp.jetcache</groupId>
    <artifactId>jetcache-starter-redis</artifactId>
    <version>2.6.2</version>
</dependency>
远程方案基本配置
yml
jetcache:
  remote:
    default:
      type: redis
      host: localhost
      port: 6379
      poolConfig:
        maxTotal: 50
poolConfig是必配项,否则会报错
启用缓存,在引导类上方标注注解@EnableCreateCacheAnnotation配置springboot程序中可以使用注解的形式创建缓存
java
@SpringBootApplication
//jetcache启用缓存的主开关
@EnableCreateCacheAnnotation
public class Springboot20JetCacheApplication {
    public static void main(String[] args) {
        SpringApplication.run(Springboot20JetCacheApplication.class, args);
    }
}
创建缓存对象Cache,并使用注解@CreateCache标记当前缓存的信息,然后使用Cache对象的API操作缓存,put写缓存,get读缓存。
java
@Service
public class SMSCodeServiceImpl implements SMSCodeService {
    @Autowired
    private CodeUtils codeUtils;

    // 创建缓存,name为jetCache_,expire是10秒(保存时间)
    @CreateCache(name="jetCache_",expire = 10,timeUnit = TimeUnit.SECONDS)
    private Cache<String ,String> jetCache;

    public String sendCodeToSMS(String tele) {
        String code = codeUtils.generator(tele);
        // 创造出code后保存到jetCache中
        jetCache.put(tele,code);
        return code;
    }

    public boolean checkCode(SMSCode smsCode) {
        // 检查code时get出来
        String code = jetCache.get(smsCode.getTele());
        return smsCode.getCode().equals(code);
    }
} 通过上述jetcache使用远程方案连接redis可以看出,jetcache操作缓存时的接口操作更符合开发者习惯,使用缓存就先获取缓存对象Cache,放数据进去就是put,取数据出来就是get,更加简单易懂。并且jetcache操作缓存时,可以为某个缓存对象设置过期时间,将同类型的数据放入缓存中,方便有效周期的管理。
上述方案中使用的是配置中定义的default缓存,其实这个default是个名字,可以随便写,也可以随便加。例如再添加一种缓存解决方案,参照如下配置进行
yaml
jetcache:
  remote:
    default:
      type: redis
      host: localhost
      port: 6379
      poolConfig:
        maxTotal: 50
    # 这里的sms可以是任意的name
    sms:
      type: redis
      host: localhost
      port: 6379
      poolConfig:
        maxTotal: 50
如果想使用名称是sms的缓存,需要再创建缓存时指定参数area,声明使用对应缓存即可
java
@Service
public class SMSCodeServiceImpl implements SMSCodeService {
    @Autowired
    private CodeUtils codeUtils;

    // area指定使用名称为sms的缓存
    @CreateCache(area="sms",name="jetCache_",expire = 10,timeUnit = TimeUnit.SECONDS)
    private Cache<String ,String> jetCache;

    public String sendCodeToSMS(String tele) {
        String code = codeUtils.generator(tele);
        jetCache.put(tele,code);
        return code;
    }

    public boolean checkCode(SMSCode smsCode) {
        String code = jetCache.get(smsCode.getTele());
        return smsCode.getCode().equals(code);
    }
}
纯本地方案
远程方案中,配置中使用remote表示远程,换成local就是本地,只不过类型不一样而已。
导入springboot整合jetcache对应的坐标starter
xml
<dependency>
    <groupId>com.alicp.jetcache</groupId>
    <artifactId>jetcache-starter-redis</artifactId>
    <version>2.6.2</version>
</dependency>
本地缓存基本配置
yaml
jetcache:
  local:
    default:
      type: linkedhashmap
      keyConvertor: fastjson
为了加速数据获取时key的匹配速度,jetcache要求指定key的类型转换器。简单说就是,如果你给了一个Object作为key的话,我先用key的类型转换器给转换成字符串,然后再保存。等到获取数据时,仍然是先使用给定的Object转换成字符串,然后根据字符串匹配。由于jetcache是阿里的技术,这里推荐key的类型转换器使用阿里的fastjson。
启用缓存
java
@SpringBootApplication
//jetcache启用缓存的主开关
@EnableCreateCacheAnnotation
public class Springboot20JetCacheApplication {
    public static void main(String[] args) {
        SpringApplication.run(Springboot20JetCacheApplication.class, args);
    }
}
创建缓存对象Cache时,标注当前使用本地缓存
cacheType控制当前缓存使用本地缓存还是远程缓存,配置cacheType=CacheType.LOCAL即使用本地缓存。
java
@Service
public class SMSCodeServiceImpl implements SMSCodeService {
    // cacheType标注使用本地缓存
    @CreateCache(name="jetCache_",expire = 1000,timeUnit = TimeUnit.SECONDS,cacheType = CacheType.LOCAL)
    private Cache<String ,String> jetCache;

    public String sendCodeToSMS(String tele) {
        String code = codeUtils.generator(tele);
        jetCache.put(tele,code);
        return code;
    }

    public boolean checkCode(SMSCode smsCode) {
        String code = jetCache.get(smsCode.getTele());
        return smsCode.getCode().equals(code);
    }
}
本地+远程方案
本地和远程方法都有了,两种方案一起使用如何配置呢?其实就是将两种配置合并到一起就可以了。
yaml
jetcache:
# 本地
  local:
    default:
      type: linkedhashmap
      keyConvertor: fastjson
# 远程
  remote:
    default:
      type: redis
      host: localhost
      port: 6379
      poolConfig:
        maxTotal: 50
    sms:
      type: redis
      host: localhost
      port: 6379
      poolConfig:
        maxTotal: 50
在创建缓存的时候,配置cacheType为BOTH即则本地缓存与远程缓存同时使用。
java
@Service
public class SMSCodeServiceImpl implements SMSCodeService {
    @CreateCache(name="jetCache_",expire = 1000,timeUnit = TimeUnit.SECONDS,cacheType = CacheType.BOTH)
    private Cache<String ,String> jetCache;
}
cacheType如果不进行配置,默认值是REMOTE,即仅使用远程缓存方案。关于jetcache的配置,参考以下信息
以上方案仅支持手工控制缓存,但是springcache方案中的方法缓存特别好用,给一个方法添加一个注解,方法就会自动使用缓存。jetcache也提供了对应的功能,即方法缓存。
方法缓存
jetcache提供了方法缓存方案,只不过名称变更了而已。在对应的操作接口上方使用注解@Cached即可
导入springboot整合jetcache对应的坐标starter
xml
<dependency>
    <groupId>com.alicp.jetcache</groupId>
    <artifactId>jetcache-starter-redis</artifactId>
    <version>2.6.2</version>
</dependency>
配置缓存
yaml
jetcache:
  local:
    default:
      type: linkedhashmap
      keyConvertor: fastjson
  remote:
    default:
      type: redis
      host: localhost
      port: 6379
      keyConvertor: fastjson
      valueEncode: java
      valueDecode: java
      poolConfig:
        maxTotal: 50
    sms:
      type: redis
      host: localhost
      port: 6379
      poolConfig:
        maxTotal: 50
由于redis缓存中不支持保存对象,因此需要对redis设置当Object类型数据进入到redis中时如何进行类型转换。需要配置keyConvertor表示key的类型转换方式,同时标注value的转换类型方式,值进入redis时是java类型,标注valueEncode为java,值从redis中读取时转换成java,标注valueDecode为java。
注意,为了实现Object类型的值进出redis,需要保障进出redis的Object类型的数据必须实现序列化接口。
java
@Data
public class Book implements Serializable {
    private Integer id;
    private String type;
    private String name;
    private String description;
}
启用缓存时开启方法缓存功能,并配置basePackages,说明在哪些包中开启方法缓存
java
@SpringBootApplication
//jetcache启用缓存的主开关
@EnableCreateCacheAnnotation
//开启方法注解缓存
@EnableMethodCache(basePackages = "需要开启缓存的包位置")
public class Springboot20JetCacheApplication {
    public static void main(String[] args) {
        SpringApplication.run(Springboot20JetCacheApplication.class, args);
    }
}
使用注解@Cached标注当前方法使用缓存,查询出来的东西会加入到内存中
java
@Service
public class BookServiceImpl implements BookService {
    @Autowired
    private BookDao bookDao;

    @Override
    @Cached(name="book_",key="#id",expire = 3600,cacheType = CacheType.REMOTE)
    public Book getById(Integer id) {
        return bookDao.selectById(id);
    }
}
远程方案的数据同步
由于远程方案中redis保存的数据可以被多个客户端共享,这就存在了数据同步问题。jetcache提供了3个注解解决此问题,分别在更新、删除操作时同步缓存数据,和读取缓存时定时刷新数据
更新缓存
java
// #是将该值获取,value="#xxx"就是获取到xxx的值
@CacheUpdate(name="book_",key="#book.id",value="#book")
public boolean update(Book book) {
    return bookDao.updateById(book) > 0;
}
删除缓存
JAVA
@CacheInvalidate(name="book_",key = "#id")
public boolean delete(Integer id) {
    return bookDao.deleteById(id) > 0;
}
定时刷新缓存
JAVA
@Cached(name="book_",key="#id",expire = 3600,cacheType = CacheType.REMOTE)
// 当缓存中的数据存在时,每5秒刷新一次
@CacheRefresh(refresh = 5)
public Book getById(Integer id) {
    return bookDao.selectById(id);
}
数据报表
jetcache还提供有简单的数据报表功能,帮助开发者快速查看缓存命中信息,只需要添加一个配置即可
yaml
jetcache:
  statIntervalMinutes: 1
设置后,每1分钟在控制台输出缓存数据命中信息
[DefaultExecutor] c.alicp.jetcache.support.StatInfoLogger  : jetcache stat from 2022-02-28 09:32:15,892 to 2022-02-28 09:33:00,003
cache    |    qps|   rate|   get|    hit|   fail|   expire|   avgLoadTime|   maxLoadTime
---------+-------+-------+------+-------+-------+---------+--------------+--------------
book_    |   0.66| 75.86%|    29|     22|      0|        0|          28.0|           188
---------+-------+-------+------+-------+-------+---------+--------------+--------------
总结
1. jetcache是一个类似于springcache的缓存解决方案,自身不具有缓存功能,它提供有本地缓存与远程缓存多级共同使用的缓存解决方案
2. jetcache提供的缓存解决方案受限于目前支持的方案,本地缓存支持两种,远程缓存支持两种
3. 注意数据进入远程缓存时的类型转换问题
4. jetcache提供方法缓存,并提供了对应的缓存更新与刷新功能
5. jetcache提供有简单的缓存信息命中报表方便开发者即时监控缓存数据命中情况
SpringBoot整合j2cache缓存
导入j2cache、redis、ehcache坐标
xml
<dependency>
    <groupId>net.oschina.j2cache</groupId>
    <artifactId>j2cache-core</artifactId>
    <version>2.8.4-release</version>
</dependency>
<dependency>
    <groupId>net.oschina.j2cache</groupId>
    <artifactId>j2cache-spring-boot2-starter</artifactId>
    <version>2.8.0-release</version>
</dependency>
<dependency>
    <groupId>net.sf.ehcache</groupId>
    <artifactId>ehcache</artifactId>
</dependency>
j2cache的starter中默认包含了redis坐标,官方推荐使用redis作为二级缓存,因此此处无需导入redis坐标
配置一级与二级缓存,并配置一二级缓存间数据传递方式,配置书写在名称为j2cache.properties的文件中。如果使用ehcache还需要单独添加ehcache的配置文件
yaml
server:
  port: 80

j2cache:
#  j2cache的配置文件名
  config-location: j2cache.properties
j2cache的配置文件:j2cache.properties
properties
# 1级缓存的配置
j2cache.L1.provider_class = ehcache
# 1级缓存的配置文件名
ehcache.configXml = ehcache.xml

# 2级缓存的配置
j2cache.L2.provider_class = net.oschina.j2cache.cache.support.redis.SpringRedisProvider
# 支持自定义前缀名(j2cache.L2.config_section)这里的内容填什么,下面的前缀就填什么
j2cache.L2.config_section = redis
redis.hosts = localhost:6379

# 1级缓存如何到达2级缓存
# 通过消息的订阅与发布
j2cache.broadcast = net.oschina.j2cache.cache.support.redis.SpringRedisPubSubPolicy
java
import com.itheima.domain.SMSCode;
import com.itheima.service.SMSCodeService;
import com.itheima.utils.CodeUtils;
import net.oschina.j2cache.CacheChannel;
import org.springframework.beans.factory.annotation.Autowired;
import org.springframework.stereotype.Service;

@Service
public class SMSCodeServiceImpl implements SMSCodeService {

    @Autowired
    private CodeUtils codeUtils;

    @Autowired
    // 缓存对象
    private CacheChannel cacheChannel;

    @Override
    public String sendCodeToSMS(String tele) {
        String code = codeUtils.generator(tele);
        // set(name,key,value)
        cacheChannel.set("sms",tele,code);
        return code;
    }

    @Override
    public boolean checkCode(SMSCode smsCode) {
        // get(name,key)
        String code = cacheChannel.get("sms",smsCode.getTele()).asString();
        return smsCode.getCode().equals(code);
    }

} j2cache的使用和jetcache比较类似,但是无需开启使用的开关,直接定义缓存对象即可使用,缓存对象名CacheChannel。
j2cache的使用不复杂,配置是j2cache的核心,毕竟是一个整合型的缓存框架。缓存相关的配置过多,可以查阅j2cache-core核心包中的j2cache.properties文件中的说明。
properties
#J2Cache configuration
#########################################
# Cache Broadcast Method
# values:
# jgroups -> use jgroups's multicast
# redis -> use redis publish/subscribe mechanism (using jedis)
# lettuce -> use redis publish/subscribe mechanism (using lettuce, Recommend)
# rabbitmq -> use RabbitMQ publisher/consumer mechanism
# rocketmq -> use RocketMQ publisher/consumer mechanism
# none -> don't notify the other nodes in cluster
# xx.xxxx.xxxx.Xxxxx your own cache broadcast policy classname that implement net.oschina.j2cache.cluster.ClusterPolicy
#########################################
j2cache.broadcast = redis

# jgroups properties
jgroups.channel.name = j2cache
jgroups.configXml = /network.xml

# RabbitMQ properties
rabbitmq.exchange = j2cache
rabbitmq.host = localhost
rabbitmq.port = 5672
rabbitmq.username = guest
rabbitmq.password = guest

# RocketMQ properties
rocketmq.name = j2cache
rocketmq.topic = j2cache
# use ; to split multi hosts
rocketmq.hosts = 127.0.0.1:9876

#########################################
# Level 1&2 provider
# values:
# none -> disable this level cache
# ehcache -> use ehcache2 as level 1 cache
# ehcache3 -> use ehcache3 as level 1 cache
# caffeine -> use caffeine as level 1 cache(only in memory)
# redis -> use redis as level 2 cache (using jedis)
# lettuce -> use redis as level 2 cache (using lettuce)
# readonly-redis -> use redis as level 2 cache ,but never write data to it. if use this provider, you must uncomment `j2cache.L2.config_section` to make the redis configurations available.
# memcached -> use memcached as level 2 cache (xmemcached),
# [classname] -> use custom provider
#########################################

j2cache.L1.provider_class = caffeine
j2cache.L2.provider_class = redis

# When L2 provider isn't `redis`, using `L2.config_section = redis` to read redis configurations
# j2cache.L2.config_section = redis

# Enable/Disable ttl in redis cache data (if disabled, the object in redis will never expire, default:true)
# NOTICE: redis hash mode (redis.storage = hash) do not support this feature)
j2cache.sync_ttl_to_redis = true

# Whether to cache null objects by default (default false)
j2cache.default_cache_null_object = true

#########################################
# Cache Serialization Provider
# values:
# fst -> using fast-serialization (recommend)
# kryo -> using kryo serialization
# json -> using fst's json serialization (testing)
# fastjson -> using fastjson serialization (embed non-static class not support)
# java -> java standard
# fse -> using fse serialization
# [classname implements Serializer]
#########################################

j2cache.serialization = json
#json.map.person = net.oschina.j2cache.demo.Person

#########################################
# Ehcache configuration
#########################################

# ehcache.configXml = /ehcache.xml

# ehcache3.configXml = /ehcache3.xml
# ehcache3.defaultHeapSize = 1000

#########################################
# Caffeine configuration
# caffeine.region.[name] = size, xxxx[s|m|h|d]
#
#########################################
caffeine.properties = /caffeine.properties

#########################################
# Redis connection configuration
#########################################

#########################################
# Redis Cluster Mode
#
# single -> single redis server
# sentinel -> master-slaves servers
# cluster -> cluster servers (数据库配置无效,使用 database = 0)
# sharded -> sharded servers  (密码、数据库必须在 hosts 中指定,且连接池配置无效 ; redis://user:password@127.0.0.1:6379/0)
#
#########################################

redis.mode = single

#redis storage mode (generic|hash)
redis.storage = generic

## redis pub/sub channel name
redis.channel = j2cache
## redis pub/sub server (using redis.hosts when empty)
redis.channel.host =

#cluster name just for sharded
redis.cluster_name = j2cache

## redis cache namespace optional, default[empty]
redis.namespace =

## redis command scan parameter count, default[1000]
#redis.scanCount = 1000

## connection
# Separate multiple redis nodes with commas, such as 192.168.0.10:6379,192.168.0.11:6379,192.168.0.12:6379

redis.hosts = 127.0.0.1:6379
redis.timeout = 2000
redis.password =
redis.database = 0
redis.ssl = false

## redis pool properties
redis.maxTotal = 100
redis.maxIdle = 10
redis.maxWaitMillis = 5000
redis.minEvictableIdleTimeMillis = 60000
redis.minIdle = 1
redis.numTestsPerEvictionRun = 10
redis.lifo = false
redis.softMinEvictableIdleTimeMillis = 10
redis.testOnBorrow = true
redis.testOnReturn = false
redis.testWhileIdle = true
redis.timeBetweenEvictionRunsMillis = 300000
redis.blockWhenExhausted = false
redis.jmxEnabled = false

#########################################
# Lettuce scheme
#
# redis -> single redis server
# rediss -> single redis server with ssl
# redis-sentinel -> redis sentinel
# redis-cluster -> cluster servers
#
#########################################

#########################################
# Lettuce Mode
#
# single -> single redis server
# sentinel -> master-slaves servers
# cluster -> cluster servers (数据库配置无效,使用 database = 0)
# sharded -> sharded servers  (密码、数据库必须在 hosts 中指定,且连接池配置无效 ; redis://user:password@127.0.0.1:6379/0)
#
#########################################

## redis command scan parameter count, default[1000]
#lettuce.scanCount = 1000
lettuce.mode = single
lettuce.namespace =
lettuce.storage = hash
lettuce.channel = j2cache
lettuce.scheme = redis
lettuce.hosts = 127.0.0.1:6379
lettuce.password =
lettuce.database = 0
lettuce.sentinelMasterId =
lettuce.maxTotal = 100
lettuce.maxIdle = 10
lettuce.minIdle = 10
# timeout in milliseconds
lettuce.timeout = 10000
# redis cluster topology refresh interval in milliseconds
lettuce.clusterTopologyRefresh = 3000

#########################################
# memcached server configurations
# refer to https://gitee.com/mirrors/XMemcached
#########################################

memcached.servers = 127.0.0.1:11211
memcached.username =
memcached.password =
memcached.connectionPoolSize = 10
memcached.connectTimeout = 1000
memcached.failureMode = false
memcached.healSessionInterval = 1000
memcached.maxQueuedNoReplyOperations = 100
memcached.opTimeout = 100
memcached.sanitizeKeys = false
总结
1. j2cache是一个缓存框架,自身不具有缓存功能,它提供多种缓存整合在一起使用的方案
2. j2cache需要通过复杂的配置设置各级缓存,以及缓存之间数据交换的方式
3. j2cache操作接口通过CacheChannel实现
定时任务
定时任务非常的常见,比如说定时统计报表、缓存统计报告之类的
Java就有提供了默认的Api
java
import java.util.Timer;
import java.util.TimerTask;

public class TimerTaskApp {
    public static void main(String[] args) {
        // 创建定时器的对象
        Timer timer = new Timer();
        // 定时任务
        TimerTask task = new TimerTask() {
            @Override
            public void run() {
                System.out.println("timer task run...");
            }
        };
        // schedule(要执行的任务(task),什么时候执行(0表示立刻执行,可以设置为1000,说明是1秒后执行),间隔几秒执行一次(2000毫秒执行一次))
        timer.schedule(task,0,2000);
    }
}
但这样还是不太行,所以出现了一个定时任务框架,Quartz,然后Spring也造出了一个类似的,而且比Quartz快一丢丢,是一个叫Spring Task的玩意
想使用Quartz需要先引入依赖,SpringBoot内置有这个quartz,所以不需要添加版本
xml
 <dependency>
     <groupId>org.springframework.boot</groupId>
     <artifactId>spring-boot-starter-quartz</artifactId>
 </dependency>
创建一个类继承并实现`QuartzJobBean`里面的方法
java
import org.quartz.JobExecutionContext;
import org.quartz.JobExecutionException;
import org.springframework.scheduling.quartz.QuartzJobBean;

// 继承QuartzJobBean
public class MyQuartz extends QuartzJobBean {
    @Override
    protected void executeInternal(JobExecutionContext context) throws JobExecutionException {
        System.out.println("quartz task run...");
    }
}
设定一个配置类,在配置类里新建一个工作详情(JobDetail)和一个触发器(Trigger),用于绑定这个JobDetail
java
import com.itheima.quartz.MyQuartz;
import org.quartz.*;
import org.springframework.context.annotation.Bean;
import org.springframework.context.annotation.Configuration;

// 配置类
@Configuration
public class QuartzConfig {

    // 工作明细,具体要做什么
    @Bean
    public JobDetail printJobDetail(){
        //绑定具体的工作
        // 需要进行工作的类
        // storeDurably:当工作类不使用时,对工作类做持久化操作
        return JobBuilder.newJob(MyQuartz.class).storeDurably().build();
    }

    @Bean
    public Trigger printJobTrigger(){
        // 0/5 * * * * ?:从任意年任意月任意日任意时任意分,每5秒执行一次
        ScheduleBuilder schedBuilder = CronScheduleBuilder.cronSchedule("0/5 * * * * ?");
        //绑定对应的工作明细
        // forJob(printJobDetail触发器)
        return TriggerBuilder.newTrigger().forJob(printJobDetail()).withSchedule(schedBuilder).build();
    }

}
SpringBoot整合Task
在启动类上开启定时任务功能
`@EnableScheduling`
java
import org.springframework.boot.SpringApplication;
import org.springframework.boot.autoconfigure.SpringBootApplication;
import org.springframework.scheduling.annotation.EnableScheduling;

@SpringBootApplication
//开启定时任务功能
@EnableScheduling
public class Springboot22TaskApplication {

    public static void main(String[] args) {
        SpringApplication.run(Springboot22TaskApplication.class, args);
    }

}
接着定义一个Bean容器用于编写定时任务
java
import org.springframework.scheduling.annotation.Scheduled;
import org.springframework.stereotype.Component;

@Component
public class MyBean {

    // 注解式定时任务
    @Scheduled(cron = "0/1 * * * * ?")
    public void print(){
        System.out.println(Thread.currentThread().getName()+" :spring task run...");
    }

}
可以在application.yml中对定时任务进行配置
yaml
spring:
  task:
    scheduling:
      # 任务调度线程池大小 默认1
      pool:
      	size: 1
      # 调度线程名称前缀 默认scheduling-
      thread-name-prefix: spring_tasks_
	  # 线程池关闭时的操作
      shutdown:
      	# 线程池关闭时是否等待所有任务完成
        await-termination: false
        # 调度线程关闭前最大等待时间,确保最后一定关闭
        await-termination-period: 10s
SpringBoot整合JavaMail
简单邮件发送
导入坐标
xml
<dependency>
    <groupId>org.springframework.boot</groupId>
    <artifactId>spring-boot-starter-mail</artifactId>
</dependency>
在yml配置文件中进行配置
yml
spring:
mail:
# 邮件供应商,例如163,126等
# 使用163: smtp.163.com
# 使用qq: smtp.qq.com
# 使用126: smtp.126.com
host: smtp.163.com
# 邮箱的名称
username: test@126.com
# 密码需要通过邮箱获取
password: test拿QQ邮箱举例,我们需要先开启对应的服务
开启之后,会出现一个授权码,这个授权码就是发送邮箱的密码
编写一个接口
java
public interface SendMailService {
void sendMail();
}编写对应的实现类
java
import com.itheima.service.SendMailService;
import org.springframework.beans.factory.annotation.Autowired;
import org.springframework.mail.SimpleMailMessage;
import org.springframework.mail.javamail.JavaMailSender;
import org.springframework.stereotype.Service;
@Service
public class SendMailServiceImpl implements SendMailService {
@Autowired
private JavaMailSender javaMailSender;
//发送人
private String from = "test@qq.com";
//接收人
private String to = "test@qq.com";
//标题
private String subject = "测试邮件";
//正文
private String context = "测试邮件正文内容";
@Override
public void sendMail() {
SimpleMailMessage message = new SimpleMailMessage();
// from+"(O了个Big K)"这个+后面的内容会替代发邮件的发件人
message.setFrom(from+"(O了个Big K)");
message.setTo(to);
message.setSubject(subject);
message.setText(context);
// 发送邮件
javaMailSender.send(message);
}
}编写测试类
java
import com.itheima.service.SendMailService;
import org.junit.jupiter.api.Test;
import org.springframework.beans.factory.annotation.Autowired;
import org.springframework.boot.test.context.SpringBootTest;
@SpringBootTest
class Springboot23MailApplicationTests {
@Autowired
private SendMailService sendMailService;
@Test
void contextLoads() {
sendMailService.sendMail();
}
}复杂邮件发送
java
import com.itheima.service.SendMailService;
import org.springframework.beans.factory.annotation.Autowired;
import org.springframework.mail.javamail.JavaMailSender;
import org.springframework.mail.javamail.MimeMessageHelper;
import org.springframework.stereotype.Service;
import javax.mail.internet.MimeMessage;
@Service
public class SendMailServiceImpl2 implements SendMailService {
@Autowired
private JavaMailSender javaMailSender;
//发送人
private String from = "test@qq.com";
//接收人
private String to = "test@126.com";
//标题
private String subject = "测试邮件";
//正文:可以编写类似于html之类的标签内容
private String context = "" +
"<img src='https://gimg2.baidu.com/image_search/src=http%3A%2F%2Fbkimg.cdn.bcebos.com%2Fpic%2F8326cffc1e178a82b9018131e84f648da97739124247&refer=http%3A%2F%2Fbkimg.cdn.bcebos.com&app=2002&size=f9999,10000&q=a80&n=0&g=0n&fmt=jpeg?sec=1645001879&t=f4d8895e53576eacf54605dcc63c6861'/>" +
"<a href='https://www.baidu.com'>点开有惊喜</a>";
@Override
public void sendMail(int i) {
try {
MimeMessage message = javaMailSender.createMimeMessage();
// 这里的ture表示的是否运行添加多附件:MimeMessageHelper helper = new MimeMessageHelper(message,true);
MimeMessageHelper helper = new MimeMessageHelper(message, true);
helper.setFrom(to + "(小甜甜)");
helper.setTo(from);
helper.setSubject(subject);
// setText(context,true);这里的true表示的是,是否解析html
helper.setText(context, true);
//添加附件
// File f1 = new File("D:\\workspace\\springboot\\springboot_23_mail\\target\\springboot_23_mail-0.0.1-SNAPSHOT.jar");
// File f2 = new File("D:\\workspace\\springboot\\springboot_23_mail\\src\\main\\resources\\logo.png");
// 添加文件名
// helper.addAttachment(f1.getName(),f1);
// helper.addAttachment("最靠谱的培训结构.png",f2);
javaMailSender.send(message);
} catch (Exception e) {
e.printStackTrace();
}
}
}消息
简介
消息有两种,一种是同步消息,一种是异步消息,比较常用的异步消息,同步消息比较占用性能
JMS
AMQP
MQTT
Kafka
Kafka,一种高吞吐量的分布式发布订阅消息系统,提供实时消息功能
ActiveMq的使用及安装
windows版安装包下载地址:https://activemq.apache.org/components/classic/download/
下载下来后,直接解压到本地即可
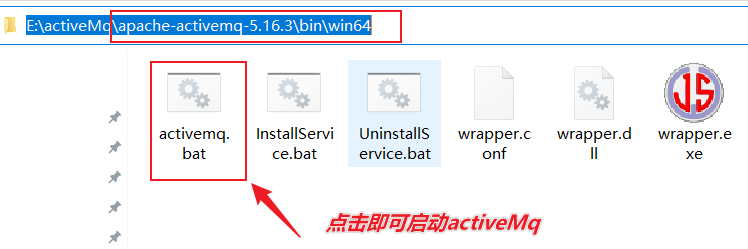
启动后
访问:http://localhost:8161/index.html
第一次登录可能要用户名和密码,这俩都是admin
接着就登录到管理后台了
SpringBoot整合ActiveMq
导入ActiveMq的依赖
xml
<dependency>
<groupId>org.springframework.boot</groupId>
<artifactId>spring-boot-starter-activemq</artifactId>
</dependency>添加ActiveMq的配置
yaml
spring:
activemq:
broker-url: tcp:localhost:61616编写ActiveMq的准备工作
订单类
java
public interface OrderService {
void order(String id);
}订单实现类,使用该类对订单进行操作
java
import com.example.springboot_mq.service.MessageService;
import com.example.springboot_mq.service.OrderService;
import org.springframework.beans.factory.annotation.Autowired;
import org.springframework.stereotype.Service;
@Service
public class OrderServiceImpl implements OrderService {
@Autowired
private MessageService messageService;
@Override
public void order(String id) {
// 一系列的操作,包含各种服务调用, 处理各种业务
System.out.println("订单处理开始");
// 短信消息处理
messageService.sendMessage(id);
System.out.println("订单处理接收");
System.out.println();
}
}消息实现类,编写获取订单id和传入订单的方法
java
public interface MessageService {
// 传入订单id
void sendMessage(String id);
// 获取订单id
String doMessage();
}消息队列的模拟实现
java
import com.example.springboot_mq.service.MessageService;
import org.springframework.stereotype.Service;
import java.util.ArrayList;
//@Service
public class MessageServiceImpl implements MessageService {
// 存储id,类似于消息队列
private ArrayList<String> msgList = new ArrayList<>();
@Override
public void sendMessage(String id) {
System.out.println("待发送短信的订单已纳入处理队列,id"+id);
// 订单纳入消息队列
msgList.add(id);
}
@Override
public String doMessage() {
// 订单移除消息队列
String id = msgList.remove(0);
System.out.println("已完成短信发送业务,id"+id);
return id;
}
}消息队列的真正实现
java
import com.example.springboot_mq.service.MessageService;
import org.springframework.beans.factory.annotation.Autowired;
import org.springframework.jms.core.JmsMessagingTemplate;
import org.springframework.stereotype.Service;
import java.util.ArrayList;
@Service
public class MessageServiceActivemqImpl implements MessageService {
@Autowired
private JmsMessagingTemplate messagingTemplate;
@Override
public void sendMessage(String id) {
System.out.println("待发送短信的订单已纳入处理队列,id"+id);
// 将消息加入消息队列
messagingTemplate.convertAndSend(id);
}
@Override
public String doMessage() {
// 如何发送的,就需要如何接收,所以就要将类型转为之前发送的类型
String id = messagingTemplate.receiveAndConvert(String.class);
System.out.println("已完成短信发送业务,id"+id);
return id;
}
}还需要修改一下application.yml文件的配置,需要连接到ActiveMq的服务器上,并且配置消息的保存位置,类似于放在哪个消息队列中
yaml
server:
port: 80
spring:
activemq:
broker-url: tcp://localhost:61616
user: admin
password: admin
jms:
template:
default-destination: eastwind接着是两个Controller用于调试
获取消息队列的id
java
import com.example.springboot_mq.service.MessageService;
import org.springframework.beans.factory.annotation.Autowired;
import org.springframework.web.bind.annotation.GetMapping;
import org.springframework.web.bind.annotation.RequestMapping;
import org.springframework.web.bind.annotation.RestController;
@RestController
@RequestMapping("/msg")
public class MessageController {
@Autowired
private MessageService messageService;
@GetMapping
public String doMessage(){
String id = messageService.doMessage();
return id;
}
}添加id到消息队列中
java
import com.example.springboot_mq.service.OrderService;
import org.springframework.beans.factory.annotation.Autowired;
import org.springframework.web.bind.annotation.PathVariable;
import org.springframework.web.bind.annotation.PostMapping;
import org.springframework.web.bind.annotation.RequestMapping;
import org.springframework.web.bind.annotation.RestController;
@RestController
@RequestMapping("/orders")
public class OrderController {
@Autowired
private OrderService orderService;
@PostMapping("{id}")
public void order(@PathVariable String id){
orderService.order(id);
}
}访问该地址:`localhost:80//orders/1`,添加一个订单id到消息队列中
访问该地址:`localhost:80//msg`,处理一个订单并移除队列
接着如果我们再去访问`localhost:80//msg`后,就会出现线程堵塞的问题,因为此时没有订单,你再去获取它,就会等待消息的发布,此时再添加,添加成功的同时,订单也被队列处理了
如果添加了订单到消息队列中,访问后台`http://localhost:8161/index.html`后,查看队列,就会发现,出现了一个eastwind的队列
在后台中,也能很明显的看到对应的信息
有一个消息没有被消费,已经被消费的消息数量是2个
虽然消息订阅与发布已经完成了,但是这样做不太合理,因为每个消息都发到了这个默认的消息队列(eastwind)中,所以我们需要做一种比较合理的方式
java
import com.example.springboot_mq.service.MessageService;
import org.springframework.beans.factory.annotation.Autowired;
import org.springframework.jms.core.JmsMessagingTemplate;
import org.springframework.stereotype.Service;
import java.util.ArrayList;
@Service
public class MessageServiceActivemqImpl implements MessageService {
@Autowired
private JmsMessagingTemplate messagingTemplate;
@Override
public void sendMessage(String id) {
System.out.println("待发送短信的订单已纳入处理队列,id"+id);
// 将消息加入消息队列,并指定所加入的消息队列
messagingTemplate.convertAndSend("order.queue.id",id);
}
@Override
public String doMessage() {
// 如何发送的,就需要如何接收,所以就要将类型转为之前发送的类型
String id = messagingTemplate.receiveAndConvert(String.class);
System.out.println("已完成短信发送业务,id"+id);
return id;
}
}当消息投递到队列中后,我们不应该手动去消费,而是让队列自己,主动去消费
添加一个队列的监听器,监听指定的一个队列
java
import org.springframework.jms.annotation.JmsListener;
import org.springframework.stereotype.Component;
@Component
public class MessageListener {
// 监听投递到该队列的消息,自动处理进行操作
@JmsListener(destination = "order.queue.id")
public void receive(String id){
System.out.println("已完成短信发送业务,id" + id);
}
}如果当前队列处理完成后,想交给下一个队列处理,该怎么做呢
java
import org.springframework.jms.annotation.JmsListener;
import org.springframework.messaging.handler.annotation.SendTo;
import org.springframework.stereotype.Component;
@Component
public class MessageListener {
// 监听投递到该队列的消息,自动处理进行操作
@JmsListener(destination = "order.queue.id")
// 该方法结束后的返回值投递到order.test.id的队列中继续进行操作
@SendTo("order.test.id")
public String receive(String id){
System.out.println("已完成短信发送业务,id" + id);
return "new " + id;
}
}切换消息模型由点对点模型到发布订阅模型,修改jms配置即可
yaml
spring:
activemq:
broker-url: tcp://localhost:61616
jms:
pub-sub-domain: truepub-sub-domain默认值为false,即点对点模型,修改为true后就是发布订阅模型。
RabbitMq的使用及安装
RabbitMQ是MQ产品中的目前较为流行的产品之一,它遵从AMQP协议。RabbitMQ的底层实现语言使用的是Erlang,所以安装RabbitMQ需要先安装Erlang。
windows版安装包下载地址:https://www.erlang.org/downloads
下载完毕后得到exe安装文件,一键傻瓜式安装,安装完毕需要重启,需要重启,需要重启。
Erlang安装后需要配置环境变量,否则RabbitMQ将无法找到安装的Erlang。需要配置项如下,作用等同JDK配置环境变量的作用。
windows版安装包下载地址:https://rabbitmq.com/install-windows.html
下载完毕后得到exe安装文件,一键傻瓜式安装
在rabbitMq下的sbin目录,该目录就是可执行文件所在的位置
在该目录打开cmd,输入`rabbitmq-service.bat start`,启动rabbitmq
`rabbitmq-service.bat stop`,停止rabbitmq
RabbitMQ也提供有web控制台服务,但是此功能是一个插件,需要先启用才可以使用
rabbitmq-plugins.bat list # 查看当前所有插件的运行状态
rabbitmq-plugins.bat enable rabbitmq_management # 启动rabbitmq_management插件 启动插件后可以在插件运行状态中查看是否运行,运行后通过浏览器即可打开服务后台管理界面
http://localhost:15672web管理服务默认端口15672,访问后可以打开RabbitMQ的管理界面
首先输入访问用户名和密码,初始化用户名和密码相同,均为:guest,成功登录后进入管理后台界面
整合RabbitMq
direct模型
导入rabbitmq的依赖
xml
<dependency>
<groupId>org.springframework.boot</groupId>
<artifactId>spring-boot-starter-amqp</artifactId>
</dependency>配置RabbitMQ的服务器地址
yaml
spring:
rabbitmq:
host: localhost
port: 5672编写配置类,配置交换机、队列、交换机和队列绑定的情况
java
import org.springframework.amqp.core.Binding;
import org.springframework.amqp.core.BindingBuilder;
import org.springframework.amqp.core.DirectExchange;
import org.springframework.amqp.core.Queue;
import org.springframework.context.annotation.Bean;
import org.springframework.context.annotation.Configuration;
@Configuration
public class RabbitConfigDirect {
@Bean
public Queue directQueue(){
// 第一个true表示:是否持久化
// 第二个true表示:是否是当前连接专用,如果是连接专用,当连接关闭后,当前队列也随之关闭了
// 第三个true表示:是否自动删除
// return new Queue("direct_queue",true,true,true);
return new Queue("direct_queue");
}
@Bean
public Queue directQueue2(){
// 第一个true表示:是否持久化
// 第二个true表示:是否是当前连接专用,如果是连接专用,当连接关闭后,当前队列也随之关闭了
// 第三个true表示:是否自动删除
// return new Queue("direct_queue",true,true,true);
return new Queue("direct_queue2");
}
@Bean
public DirectExchange directExchange(){
return new DirectExchange("directExchange");
}
@Bean
public Binding bindingDirect(){
// 将队列绑定到交换机上,并且叫做direct
return BindingBuilder.bind(directQueue()).to(directExchange()).with("direct");
}
@Bean
public Binding bindingDirect2(){
// 将队列绑定到交换机上,并且叫做direct
return BindingBuilder.bind(directQueue()).to(directExchange()).with("direct2");
}
}整合(topic模型)
步骤①:同上
步骤②:同上
步骤③:初始化主题模式系统设置
JAVA
@Configuration
public class RabbitConfigTopic {
@Bean
public Queue topicQueue(){
return new Queue("topic_queue");
}
@Bean
public Queue topicQueue2(){
return new Queue("topic_queue2");
}
@Bean
public TopicExchange topicExchange(){
return new TopicExchange("topicExchange");
}
@Bean
public Binding bindingTopic(){
return BindingBuilder.bind(topicQueue()).to(topicExchange()).with("topic.*.id");
}
@Bean
public Binding bindingTopic2(){
return BindingBuilder.bind(topicQueue2()).to(topicExchange()).with("topic.orders.*");
}
} 主题模式支持routingKey匹配模式,*表示匹配一个单词,#表示匹配任意内容,这样就可以通过主题交换机将消息分发到不同的队列中,详细内容请参看RabbitMQ系列课程。
步骤④:使用AmqpTemplate操作RabbitMQ
java
@Service
public class MessageServiceRabbitmqTopicImpl implements MessageService {
@Autowired
private AmqpTemplate amqpTemplate;
@Override
public void sendMessage(String id) {
System.out.println("待发送短信的订单已纳入处理队列(rabbitmq topic),id:"+id);
amqpTemplate.convertAndSend("topicExchange","topic.orders.id",id);
}
} 发送消息后,根据当前提供的routingKey与绑定交换机时设定的routingKey进行匹配,规则匹配成功消息才会进入到对应的队列中。
步骤⑤:使用消息监听器在服务器启动后,监听指定队列
JAVA
@Component
public class MessageListener {
@RabbitListener(queues = "topic_queue")
public void receive(String id){
System.out.println("已完成短信发送业务(rabbitmq topic 1),id:"+id);
}
@RabbitListener(queues = "topic_queue2")
public void receive2(String id){
System.out.println("已完成短信发送业务(rabbitmq topic 22222222),id:"+id);
}
} 使用注解@RabbitListener定义当前方法监听RabbitMQ中指定名称的消息队列。
总结
1. springboot整合RabbitMQ提供了AmqpTemplate对象作为客户端操作消息队列
2. 操作ActiveMQ需要配置ActiveMQ服务器地址,默认端口5672
3. 企业开发时通常使用监听器来处理消息队列中的消息,设置监听器使用注解@RabbitListener
4. RabbitMQ有5种消息模型,使用的队列相同,但是交换机不同。交换机不同,对应的消息进入的策略也不同