安装安卓
谷歌开发者的中文网站可以直接下载Android Studio,详细的下载页面是https://developer.android.google.cn/studio/index.html。
安卓应用的目录结构
App项目的目录说明
项目下面有两个分类:一个是app(代表app模块);另一个是Gradle Scripts。其中,app下面又有3个子目录,其功能说明如下:
(1)manifests子目录,下面只有一个XML文件,即AndroidManifest.xml,它是App的运行配置文
件。
(2)java子目录,下面有3个com.example.myapp包,其中第一个包存放当前模块的Java源代码,后
面两个包存放测试用的Java代码。
(3)res子目录,存放当前模块的资源文件。res下面又有4个子目录:
drawable目录存放图形描述文件与图片文件。
layout目录存放App页面的布局文件。
mipmap目录存放App的启动图标(即手机软件的启动图标)。
values目录存放一些常量定义文件,例如字符串常量strings.xml、像素常量dimens.xml、颜色常
量colors.xml、样式风格定义styles.xml等。
Gradle Scripts下面主要是工程的编译配置文件,主要有:
(1)build.gradle,该文件分为项目级与模块级两种,用于描述App工程的编译规则。
(2)proguard-rules.pro,该文件用于描述Java代码的混淆规则。
(3)gradle.properties,该文件用于配置编译工程的命令行参数,一般无须改动。
(4)settings.gradle,该文件配置了需要编译哪些模块。初始内容为include ':app',表示只编译app模
块。
(5)local.properties,项目的本地配置文件,它在工程编译时自动生成,用于描述开发者电脑的环境
配置,包括SDK的本地路径、NDK的本地路径等。
编译配置文件build.gradle
新创建的App项目默认有两个build.gradle,一个是Project项目级别的build.gradle;另一个是Module
模块级别的build.gradle。
项目级别的build.gradle指定了当前项目的总体编译规则,打开该文件在buildscript下面找到
repositories和dependencies两个节点,其中repositories节点用于设置Android Studio插件的网络仓
库地址,而dependencies节点用于设置gradle插件的版本号。由于官方的谷歌仓库位于国外,下载速度
相对较慢,因此可在repositories节点添加阿里云的仓库地址,方便国内开发者下载相关插件。修改之后
的buildscript节点内容如下所示:
buildscript {
    repositories {
        // 以下四行添加阿里云的仓库地址,方便国内开发者下载相关插件
        maven { url 'https://maven.aliyun.com/repository/jcenter' }
        maven { url 'https://maven.aliyun.com/repository/google'}
        maven { url 'https://maven.aliyun.com/repository/gradle-plugin'}
        maven { url 'https://maven.aliyun.com/repository/public'}
        google()
        jcenter()
    }
    dependencies {
    // 配置gradle插件版本,下面的版本号就是Android Studio的版本号
    classpath 'com.android.tools.build:gradle:4.1.0'
    }
}
模块级别的build.gradle对应于具体模块,每个模块都有自己的build.gradle,它指定了当前模块的详细
编译规则。
gradle
android {
    // 指定编译用的SDK版本号。比如30表示使用Android 11.0编译
    compileSdkVersion 30
    // 指定编译工具的版本号。这里的头两位数字必须与compileSdkVersion保持一致,具体的版本号可在sdk安装目录的“sdk\build-tools”下找到
    buildToolsVersion "30.0.3"

    defaultConfig {
        // 指定该模块的应用编号,也就是App的包名
        applicationId "com.example.chapter02"
        // 指定App适合运行的最小SDK版本号。比如19表示至少要在Android 4.4上运行
        minSdkVersion 19
        // 指定目标设备的SDK版本号。表示App最希望在哪个版本的Android上运行
        targetSdkVersion 30
        // 指定App的应用版本号
        versionCode 1
        // 指定App的应用版本名称
        versionName "1.0"
        testInstrumentationRunner "androidx.test.runner.AndroidJUnitRunner"
    }

    buildTypes {
        release {
            minifyEnabled false
            // 混淆配置文件
            proguardFiles getDefaultProguardFile('proguard-android-optimize.txt'), 'proguard-rules.pro'
        }
    }
}

// 指定App编译的依赖信息
dependencies {
    // 指定引用jar包的路径
    implementation fileTree(dir: 'libs', include: ['*.jar'])
    // 指定编译Android的高版本支持库。如AppCompatActivity必须指定编译appcompat库
    implementation 'androidx.appcompat:appcompat:1.2.0'
    // 指定单元测试编译用的junit版本号
    testImplementation 'junit:junit:4.13'
    androidTestImplementation 'androidx.test.ext:junit:1.1.2'
    androidTestImplementation 'androidx.test.espresso:espresso-core:3.3.0'
}
清单文件
每个应用的根目录中都必须包含一个AndroidManifest.xml,并且文件名必须一模一样。
这个文件中包含了App的配置信息,系统需要根据里面的内容运行app的代码,显示界面。
AndroidManifest.xml指定了App的运行配置信息,它是一个XML描述文件,初始内容如下所示:
<?xml version="1.0" encoding="utf-8"?>
<manifest xmlns:android="http://schemas.android.com/apk/res/android"
    package="com.example.chapter02">

    <application
        android:allowBackup="true"
        android:icon="@mipmap/ic_launcher"
        android:label="@string/app_name"
        android:roundIcon="@mipmap/ic_launcher_round"
        android:supportsRtl="true"
        android:theme="@style/AppTheme">

        <activity android:name=".Main2Activity" />

        <!-- activity节点指定了该App拥有的活动页面信息,其中拥有
             android.intent.action.MAIN的activity说明它是入口页面 -->
        <activity android:name=".MainActivity">
            <intent-filter>
                <action android:name="android.intent.action.MAIN" />
                <category android:name="android.intent.category.LAUNCHER" />
            </intent-filter>
        </activity>
    </application>

</manifest>
可见AndroidManifest.xml的根节点为manifest,它的package属性指定了该App的包名。manifest下
面有个application节点,它的各属性说明如下:
注意到application下面还有个activity节点,它是活动页面的注册声明,只有在AndroidManifest.xml中
正确配置了activity节点,才能在运行时访问对应的活动页面。初始配置的MainActivity正是App的默认
主页,之所以说该页面是App主页,是因为它的activity节点内部还配置了以下的过滤信息:
<intent-filter>
    <action android:name="android.intent.action.MAIN" />
    <category android:name="android.intent.category.LAUNCHER" />
</intent-filter>
其中action节点设置的android.intent.action.MAIN表示该页面是App的入口页面,启动App时会最先打
开该页面。而category节点设置的android.intent.category.LAUNCHER决定了是否在手机屏幕上显示
App图标,如果同时有两个activity节点内部都设置了android.intent.category.LAUNCHER,那么桌面就
会显示两个App图标。
安卓基础
页面显示和逻辑处理
利用XML标记描绘应用界面,使用Java代码书写程序逻辑。
把App的界面设计与代码逻辑分开的好处:
Activity的创建和跳转
完整的页面创建过程包括三个步骤:
简单控件
设置文本
在XML中设置文本
TextView
xml
<?xml version="1.0" encoding="utf-8"?>
<LinearLayout xmlns:android="http://schemas.android.com/apk/res/android"
    android:orientation="vertical"
    android:layout_width="match_parent"
    android:layout_height="match_parent">

    <TextView
        android:id="@+id/tv_hello"
        android:layout_width="wrap_content"
        android:layout_height="wrap_content"
        android:text="hello world!"
        />

</LinearLayout>
在Java代码中调用文本视图对象设置文本
java
import android.os.Bundle;
import android.os.PersistableBundle;
import android.widget.TextView;

import androidx.annotation.Nullable;
import androidx.appcompat.app.AppCompatActivity;

public class TextViewActivity extends AppCompatActivity {
    @Override
    public void onCreate(@Nullable Bundle savedInstanceState, @Nullable PersistableBundle persistentState) {
        super.onCreate(savedInstanceState, persistentState);
        // 设置布局
        setContentView(R.layout.activity_text_view);
        TextView textView = findViewById(R.id.tv_hello);
        // 设置文本
        textView.setText("你好,世界!");
    }
}
在XML文件中通过属性android:text设置文本,这种方式中呢,可能会给你一个警告,说需要在一个xml文件中进行字符串的定义,这样会比较规整一些,可以定义也可以不定义,不影响情况
你定义后,可以通过R.string的方式来获取对应的字符串
设置文本大小
演示一下如何使用
xml中的使用方式
xml
<?xml version="1.0" encoding="utf-8"?>
<LinearLayout xmlns:android="http://schemas.android.com/apk/res/android"
    android:orientation="vertical"
    android:layout_width="match_parent"
    android:layout_height="match_parent">

    <TextView
        android:id="@+id/tv_hello"
        android:layout_width="wrap_content"
        android:layout_height="wrap_content"
        android:text="hello world!"
        android:textSize="30sp"
        />

</LinearLayout>
在Java中的使用方式
java
import android.os.Bundle;
import android.os.PersistableBundle;
import android.widget.TextView;

import androidx.annotation.Nullable;
import androidx.appcompat.app.AppCompatActivity;

public class TextViewActivity extends AppCompatActivity {
    @Override
    public void onCreate(@Nullable Bundle savedInstanceState, @Nullable PersistableBundle persistentState) {
        super.onCreate(savedInstanceState, persistentState);
        // 设置布局
        setContentView(R.layout.activity_text_view);
        TextView textView = findViewById(R.id.tv_hello);
        // 设置文本
        textView.setText("你好,世界!");
        textView.setTextSize(30);
    }
}
设置文本的颜色
在Java代码中调用setTextColor方法即可设置文本颜色,具体色值可从Color类取。
通过java代码设置对应的颜色
java
import androidx.appcompat.app.AppCompatActivity;

import android.graphics.Color;
import android.os.Bundle;
import android.widget.TextView;

public class MainActivity extends AppCompatActivity {

    @Override
    protected void onCreate(Bundle savedInstanceState) {
        super.onCreate(savedInstanceState);
        // 设置布局
        setContentView(R.layout.activity_text_view);
        TextView textView = findViewById(R.id.tv_hello);
        // 设置文本
        textView.setText("你好,世界!");
        textView.setTextSize(40);
        // 设置字体颜色
        textView.setTextColor(Color.GREEN);
    }
}设置xml中的颜色
xml
<TextView
    android:layout_width="wrap_content"
    android:layout_height="wrap_content"
    android:text="this is example"
    android:textColor="#ff00ff00"
    />
在java中也可以这样设置
java
import androidx.appcompat.app.AppCompatActivity;

import android.graphics.Color;
import android.os.Bundle;
import android.widget.TextView;

public class MainActivity extends AppCompatActivity {

    @Override
    protected void onCreate(Bundle savedInstanceState) {
        super.onCreate(savedInstanceState);
        // 设置布局
        setContentView(R.layout.activity_text_view);
        TextView textView = findViewById(R.id.tv_hello);
        // 设置文本
        textView.setText("你好,世界!");
        textView.setTextSize(40);
        // 设置字体颜色
        textView.setTextColor(Color.GREEN);
        TextView textView1 = findViewById(R.id.tv_hello2);
        // Java中设置字体颜色
        textView1.setTextColor(0xff6900);
    }
}
在android studio中,有一些颜色已经被定义好了,可以直接使用,颜色在res/values/colors文件中
使用方式:
xml
<TextView
    android:id="@+id/tv_hello2"
    android:layout_width="wrap_content"
    android:layout_height="wrap_content"

    android:text="this is example"
    android:textColor="@color/black"
    />
java
// 设置背景颜色,通过资源文件进行获取
textView1.setBackgroundResource(R.color.black);视图基础
设置视图的宽高
xml
<LinearLayout
    android:layout_width="200px"
    android:layout_height="wrap_content">
    <TextView
        android:id="@+id/tv_hello"
        android:layout_width="wrap_content"
        android:layout_height="wrap_content"
        android:text="hello world!"
        android:textSize="30sp"
        />
</LinearLayout>
java
import androidx.appcompat.app.AppCompatActivity;

import android.graphics.Color;
import android.os.Bundle;
import android.view.ViewGroup;
import android.widget.TextView;

import fun.eastwind.myapplication7.utils.Utils;

public class MainActivity extends AppCompatActivity {

    @Override
    protected void onCreate(Bundle savedInstanceState) {
        super.onCreate(savedInstanceState);
        // 设置布局
        setContentView(R.layout.activity_text_view);
        TextView textView = findViewById(R.id.tv_hello);
        // 设置文本
        textView.setText("你好,世界!");
        textView.setTextSize(40);
        // 设置字体颜色
        textView.setTextColor(Color.GREEN);
        // 获取tv_code的布局参数(含宽度和高度)
        ViewGroup.LayoutParams layoutParams = textView.getLayoutParams();
        // 修改布局参数中的宽度数值,注意默认是px单位,需要把dp数值转成px数值
        // 这里的方法可以将300dp转为对应的px
        layoutParams.width = Utils.dip2px(this,300);
        // 设置tv_code的布局参数
        textView.setLayoutParams(layoutParams);
    }
}
这里默认是px作为单位,我们需要将px转为dp,编写一个工具类
java
import android.content.Context;

public class Utils {

    // 根据手机的分辨率从dp的单位转成为px(像素)
    public static int dip2px(Context context,float dpVal){
        // 获取当前手机的像素密度(1个dp对应几个px)
        float density = context.getResources().getDisplayMetrics().density;
        // 四舍五入取整
        return (int) (dpVal * density + 0.5f);
    }

}
设置视图的间距
设置视图的间距有两种方式:
xml
<?xml version="1.0" encoding="utf-8"?>
<!--设置最外层背景为蓝色-->
<LinearLayout xmlns:android="http://schemas.android.com/apk/res/android"
android:orientation="vertical"
android:layout_width="match_parent"
android:layout_height="match_parent"
android:background="#00AAFF"
>
<!-- 中间布局背景颜色为黄色 -->
<LinearLayout
android:layout_width="match_parent"
android:background="#FFFF99"
android:layout_margin="20dp"
android:padding="60dp"
android:layout_height="match_parent">
<!-- 最内层的背景颜色为红色-->
<LinearLayout
android:layout_width="match_parent"
android:layout_height="match_parent"
android:background="#ff0000"
/>
</LinearLayout>
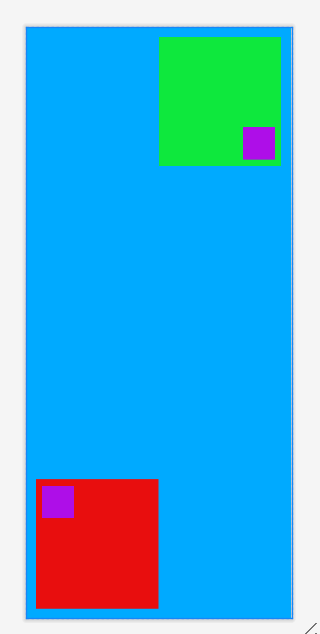
</LinearLayout>设置视图的对齐方式
设置视图的对齐方式有两种途径:
layout_gravity与gravity的取值包括:left、top、right、bottom,还可以用竖线连接各取值,例如"left|top"表示既靠左又靠上,也就是左上角
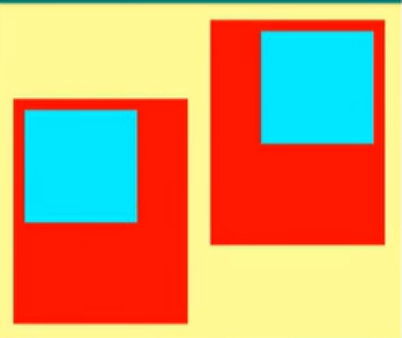
以上图为例,当前布局与父容器的位置指定是通过layout_gravity,而让其指定子容器与当前容器的对齐方式是使用gravity
xml
<?xml version="1.0" encoding="utf-8"?>
<!--设置最外层背景为蓝色-->
<LinearLayout xmlns:android="http://schemas.android.com/apk/res/android"
    android:orientation="horizontal"
    android:layout_width="match_parent"
    android:layout_height="match_parent"
    android:padding="15dp"
    android:background="#00AAFF"
    >
    <!--    第一个子布局背景为红色,它在上级视图中朝下对齐,它的下级视图则靠左对齐-->
    <LinearLayout
        android:layout_width="0dp"
        android:layout_gravity="bottom"
        android:layout_weight="1"
        android:padding="10dp"
        android:background="#E80E0E"
        android:gravity="left"
        android:layout_height="200dp">
        <LinearLayout
            android:layout_width="50dp"
            android:padding="10dp"
            android:background="#AE0EE8"
            android:layout_height="50dp">
        </LinearLayout>
    </LinearLayout>

    <!--    第二个子布局背景为红色,它在上级视图中朝上对齐,它的下级视图则靠右对齐-->
    <LinearLayout
        android:padding="10dp"
        android:layout_width="0dp"
        android:layout_weight="1"
        android:layout_gravity="top"
        android:background="#0EE83D"
        android:gravity="right|bottom"
        android:layout_height="200dp">
        <LinearLayout
            android:layout_width="50dp"
            android:padding="10dp"
            android:background="#AE0EE8"
            android:layout_height="50dp"/>
    </LinearLayout>

</LinearLayout>
结果图如下
常用布局
线性布局LinearLayout
线性布局内部的各视图有两种排列方式:
如果不指定orientation属性,则LinearLayout默认水平方向排列。
xml
<?xml version="1.0" encoding="utf-8"?>
<LinearLayout xmlns:android="http://schemas.android.com/apk/res/android"
    android:layout_width="match_parent"
    android:layout_height="match_parent"
    android:orientation="vertical"
    >
<!--    横向排列-->
    <LinearLayout
        android:layout_width="match_parent"
        android:layout_height="wrap_content">
        <TextView
            android:layout_width="wrap_content"
            android:layout_height="wrap_content"
            android:text="one"
            android:textSize="17sp"
            android:background="#ff6900"
            />
        <TextView
            android:textSize="17sp"
            android:layout_width="wrap_content"
            android:layout_height="wrap_content"
            android:background="#E91E63"
            android:text="two"
            />
    </LinearLayout>
<!-- 纵向排列-->
    <LinearLayout
        android:layout_width="match_parent"
        android:orientation="vertical"
        android:layout_height="wrap_content">
        <TextView
            android:layout_width="wrap_content"
            android:layout_height="wrap_content"
            android:text="one"
            android:textSize="17sp"
            android:background="#ff6900"
            />
        <TextView
            android:textSize="17sp"
            android:layout_width="wrap_content"
            android:layout_height="wrap_content"
            android:background="#E91E63"
            android:text="two"
            />

    </LinearLayout>


</LinearLayout>
权重
线性布局的权重概念,指的是线性布局的下级视图各自拥有多大比例的宽高。
权重属性名叫layout_weight,但该属性不在LinearLayout节点设置,而在线性布局的直接下级视图设置,表示该下级视图占据的宽高比例。
xml
<?xml version="1.0" encoding="utf-8"?>
<LinearLayout xmlns:android="http://schemas.android.com/apk/res/android"
    android:layout_width="match_parent"
    android:layout_height="match_parent"
    android:orientation="vertical"
    >

    <LinearLayout
        android:layout_width="match_parent"
        android:layout_height="wrap_content">
<!--        根据父容器的宽度来均分宽度-->
        <TextView
            android:layout_width="0dp"
            android:layout_weight="1"
            android:textSize="17sp"
            android:text="hello"
            android:layout_height="wrap_content"/>
        <TextView
            android:layout_width="0dp"
            android:layout_weight="1"
            android:textSize="17sp"
            android:text="hello"
            android:layout_height="wrap_content"/>
        <TextView
            android:layout_width="0dp"
            android:layout_weight="1"
            android:textSize="17sp"
            android:text="hello"
            android:layout_height="wrap_content"/>

    </LinearLayout>


</LinearLayout>
相对布局RelativeLayout
相对布局的下级视图位置由其他视图决定。用于确定下级视图位置的参照物分两种:
如果不设定下级视图的参照物,那么下级视图默认显示在RelativeLayout内部的左上角
相对位置的取值
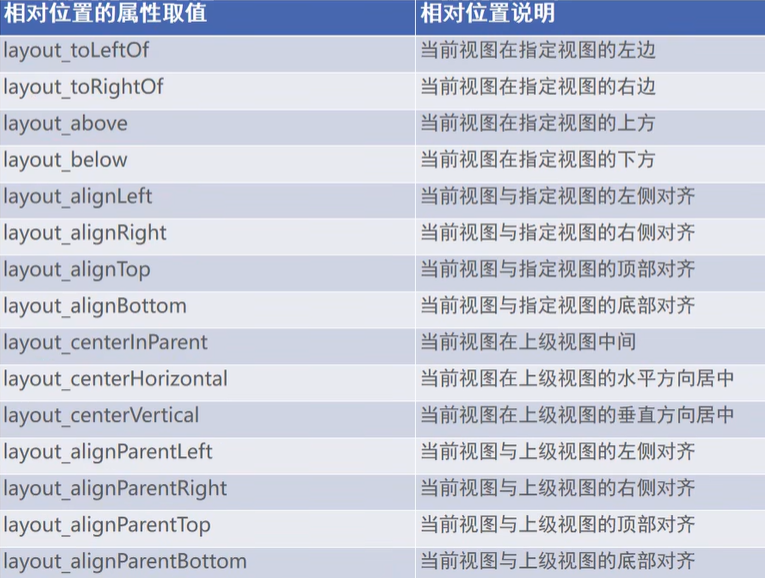
代码示例
xml
<?xml version="1.0" encoding="utf-8"?>
<RelativeLayout xmlns:android="http://schemas.android.com/apk/res/android"
    xmlns:tools="http://schemas.android.com/tools"
    android:layout_width="match_parent"
    android:layout_height="150dp"
    tools:context=".MainActivity3">

<!--    比如我们想在父容器居中的容器右侧来添加一个容器-->
<!--    我们需要先为某个想要添加容器的右侧添加一个id,然后通过id放到这个容器对应的位置-->
<!-- 因为起初都是在页面的左侧,所以到了右侧没有下来,我们对它进行一个下侧的调整-->
    <TextView
        android:layout_width="wrap_content"
        android:text="hello world!"
        android:layout_alignTop="@id/centerForParent"
        android:textColor="#ffffff"
        android:layout_centerVertical="true"
        android:layout_toRightOf="@id/centerForParent"
        android:background="#ff6900"
        android:layout_height="wrap_content"/>

    <!--    相对父容器左上角-->
    <TextView
        android:layout_width="wrap_content"
        android:layout_height="wrap_content"
        android:layout_alignParentLeft="true"
        android:background="#ff6900"
        android:text="hello world!22222"
        android:textColor="#ffffff"
        android:textSize="17sp" />

    <!--    垂直中间-->
    <TextView
        android:layout_width="wrap_content"
        android:layout_height="wrap_content"
        android:layout_centerVertical="true"
        android:background="#ff6900"
        android:text="hello world!22222"
        android:textColor="#ffffff"
        android:textSize="17sp" />

    <!--    水平中间-->
    <TextView
        android:layout_width="wrap_content"
        android:layout_height="wrap_content"
        android:layout_centerHorizontal="true"
        android:background="#ff6900"
        android:text="hello world!22222"
        android:textColor="#ffffff"
        android:textSize="17sp" />
    <!--    相对于父容器进行居中-->
    <TextView
        android:id="@+id/centerForParent"
        android:layout_width="wrap_content"
        android:layout_height="wrap_content"
        android:layout_centerInParent="true"
        android:background="#ff6900"
        android:text="hello world!"
        android:textColor="#ffffff"
        android:textSize="17sp" />

</RelativeLayout>
网格布局GridLayout
网格布局支持多行多列的表格排列。
网格布局默认从左到右、从上到下排列,它新增了两个属性:
xml
<?xml version="1.0" encoding="utf-8"?>
<GridLayout xmlns:android="http://schemas.android.com/apk/res/android"
    android:layout_width="match_parent"
    android:columnCount="2"
    android:rowCount="2"
    android:layout_height="match_parent">

<!--    通过gravity可以设置文字的居中-->
<!--    通过columnWeight的列权重可以填充满这个父容器的宽度-->

    <TextView
        android:layout_height="60dp"
        android:layout_width="0dp"
        android:layout_columnWeight="1"
        android:background="#ffcccc"
        android:text="浅红色"
        android:gravity="center"
        android:textColor="#000000"
        android:textSize="17sp"/>

    <TextView android:layout_width="0dp"
        android:layout_columnWeight="1"
        android:layout_height="60dp"
        android:background="#ffaa00"
        android:text="橙色"
        android:gravity="center"
        android:textColor="#000000"
        android:textSize="17sp"
        />
    <TextView android:layout_width="0dp"
        android:layout_columnWeight="1"
        android:layout_height="60dp"
        android:background="#ffcccc"
        android:text="浅红色"
        android:gravity="center"
        android:textColor="#000000"
        android:textSize="17sp"/>

    <TextView android:layout_width="0dp"
        android:layout_columnWeight="1"
        android:layout_height="60dp"
        android:background="#ffaa00"
        android:gravity="center"
        android:text="橙色"
        android:textColor="#000000"
        android:textSize="17sp"
        />


</GridLayout>
滚动视图ScrollView
滚动视图有两种:
xml
<?xml version="1.0" encoding="utf-8"?>
<LinearLayout xmlns:android="http://schemas.android.com/apk/res/android"
    android:layout_width="match_parent"
    android:orientation="vertical"
    android:layout_height="match_parent">


<!--    添加水平方向的滚动条-->
    <HorizontalScrollView
        android:layout_width="wrap_content"
        android:layout_height="200dp">
        <!--水平方向的线性布局,两个子视图的颜色分别为青色和黄色-->
        <LinearLayout
            android:layout_width="wrap_content"
            android:orientation="horizontal"
            android:layout_height="match_parent">
            <!--这两个View组合之后就会超出页面,此时你需要拖动才能查看-->
            <View
                android:layout_width="300dp"
                android:layout_height="match_parent"
                android:background="#aaffff"
                />
            <View
                android:layout_width="300dp"
                android:layout_height="match_parent"
                android:background="#ffff00"
                />
        </LinearLayout>
    </HorizontalScrollView>

    <ScrollView
        android:layout_width="match_parent"
        android:layout_height="wrap_content">
        <!--垂直方向的线性布局,两个子视图的颜色分别为青色和黄色-->
        <LinearLayout
            android:layout_width="wrap_content"
            android:orientation="vertical"
            android:layout_height="match_parent">
            <!--这两个View组合之后就会超出页面,此时你需要拖动才能查看-->
            <View
                android:layout_width="match_parent"
                android:layout_height="400dp"
                android:background="#8BC34A"
                />
            <View
                android:layout_width="match_parent"
                android:layout_height="400dp"
                android:background="#FDFD24"
                />
        </LinearLayout>
    </ScrollView>

</LinearLayout>
按钮触控
按钮控件Button由TextView派生而来,它们之间的区别有:
Button的属性
与TextView相比,Button增加了两个新属性:
onClick方法已经过时了,但是依然可以被使用
xml
<?xml version="1.0" encoding="utf-8"?>
<LinearLayout xmlns:android="http://schemas.android.com/apk/res/android"
    android:layout_width="match_parent"
    android:layout_height="match_parent"
    android:orientation="vertical">
    <TextView
        android:id="@+id/show_time"
        android:layout_width="match_parent"
        android:gravity="center"
        android:text="点击按钮后显示时间"
        android:textSize="30sp"
        android:layout_height="wrap_content"/>
    <TextView
        android:gravity="center"
        android:layout_width="match_parent"
        android:layout_height="wrap_content"
        android:text="下面的按钮英文默认大写"
        android:textColor="@color/black"
        android:textSize="17sp"
        />

    <Button
        android:onClick="doClick"
        android:layout_width="match_parent"
        android:layout_height="wrap_content"
        android:text="Hello World点击后显示时间"
        />

    <TextView
        android:gravity="center"
        android:layout_width="match_parent"
        android:layout_height="wrap_content"
        android:text="下面的按钮英文保持不变"
        android:textColor="@color/black"
        android:textSize="17sp"
        />

<!--    textAllCaps为true时,让小写字母自动变为大写字母-->
    <Button

        android:textAllCaps="true"
        android:layout_width="match_parent"
        android:layout_height="wrap_content"
        android:text="Hello World"
        />

</LinearLayout>
这里的方法是在点击后获取当前的时间以及对应按钮的内容
java
package fun.eastwind.myapplication7;

import androidx.appcompat.app.AppCompatActivity;

import android.os.Bundle;
import android.view.View;
import android.widget.Button;
import android.widget.TextView;

import java.text.SimpleDateFormat;
import java.util.Date;

public class MainActivity6 extends AppCompatActivity {

    private TextView textView;

    @Override
    protected void onCreate(Bundle savedInstanceState) {
        super.onCreate(savedInstanceState);
        setContentView(R.layout.activity_main6);
        // ctrl + alt + f 快速全局化变量
        textView = findViewById(R.id.show_time);
    }

    public void doClick(View view){
        // 格式化文本,并设置时间和设置按钮的内容是什么
        textView.setText(String.format("%s you click for this button,this button" +
                " content is %s",getNowTime(), ((TextView)view).getText() ));
    }

    /*获取当前时间*/
    public String getNowTime(){
        // 如果获取当前时间记不住,可以打开SimpleDateFormat的源码进行查看,往上翻,里面有
        SimpleDateFormat sdf = new SimpleDateFormat("HH:mm:ss");
        return sdf.format(new Date());
    }
}
这里有一个小技巧,如果你创建了多个activity,想单独查看一个activity时,你可以这样做
打开AndroidManifest.xml文件
xml
<?xml version="1.0" encoding="utf-8"?>
<manifest xmlns:android="http://schemas.android.com/apk/res/android">

    <application
        android:allowBackup="true"
        android:icon="@mipmap/ic_launcher"
        android:label="@string/app_name"
        android:roundIcon="@mipmap/ic_launcher_round"
        android:supportsRtl="true"
        android:theme="@style/Theme.Lulu">
        <activity
            android:name=".MainActivity5"
            android:exported="false" />
        <activity
            android:name=".MainActivity4"
            android:exported="false" />
        <activity
            android:name=".MainActivity3"
            android:exported="false" />
        <activity
            android:name=".MainActivity2"
            android:exported="false" />
        <activity
            android:name=".MainActivity6"
            android:exported="true">
            <intent-filter>
                <action android:name="android.intent.action.MAIN" />

                <category android:name="android.intent.category.LAUNCHER" />
            </intent-filter>
        </activity>
    </application>

</manifest>
假设文件像里面这样繁杂,你可以找到你想修改的activity的名称,然后注释掉同名的内容,并将android:name修改为你想使用的activity即可
点击事件
监听器,意思是专门监听控件的动作行为。只有控件发生了指定的动作,监听器才会触发开关去执行对应的代码逻辑。
按钮控件有两种常用的监听器:
示例代码
布局文件xml
xml
<?xml version="1.0" encoding="utf-8"?>
<LinearLayout xmlns:android="http://schemas.android.com/apk/res/android"
    android:layout_width="match_parent"
    android:orientation="vertical"
    android:layout_height="match_parent">

    <Button
        android:id="@+id/btn_click"
        android:layout_width="match_parent"
        android:layout_height="wrap_content"
        android:text="指定单独的点击监听器"
        android:textColor="#000000"
        android:textSize="15sp"
        />

    <TextView
        android:id="@+id/tv_content"
        android:layout_width="match_parent"
        android:padding="5dp"
        android:gravity="center"
        android:textColor="#000000"
        android:textSize="15sp"
        android:text="点击后设置内容"
        android:layout_height="wrap_content"/>

</LinearLayout>
逻辑代码实现了对应的接口,并实现里面的方法后,通过方法进行编写
java
import androidx.appcompat.app.AppCompatActivity;

import android.os.Bundle;
import android.view.View;
import android.widget.Button;
import android.widget.TextView;

public class ButtonClickActivity extends AppCompatActivity {

    private Button button;
    private TextView textView;

    @Override
    protected void onCreate(Bundle savedInstanceState) {
        super.onCreate(savedInstanceState);
        setContentView(R.layout.activity_button_click);
        button = findViewById(R.id.btn_click);
        textView = findViewById(R.id.tv_content);
        button.setOnClickListener(new MyOnClickListener(textView));
    }

    // 加入static可以防止内存泄露的问题
    static class MyOnClickListener implements View.OnClickListener{

        private final TextView textView;

        public MyOnClickListener(TextView textView) {
            this.textView = textView;
        }

        @Override
        public void onClick(View v) {
            textView.setText("you clicked this button");
        }
    }


}
还有另一种情况,当需要设置点击事件的按钮太多时,需要进行太多的类创建,太过麻烦,这里提供另一种方法
在原先的视图上再次添加一个按钮
xml
<Button
    android:id="@+id/btn_public"
    android:layout_width="match_parent"
    android:layout_height="wrap_content"
    android:text="指定公共的点击监听器"
    android:textColor="#000000"
    android:textSize="15sp"
    />
java
import androidx.appcompat.app.AppCompatActivity;

import android.os.Bundle;
import android.view.View;
import android.widget.Button;
import android.widget.TextView;

public class ButtonClickActivity extends AppCompatActivity implements View.OnClickListener {

    private Button button;
    private TextView textView;
    private Button button_public;

    @Override
    protected void onCreate(Bundle savedInstanceState) {
        super.onCreate(savedInstanceState);
        setContentView(R.layout.activity_button_click);
        button = findViewById(R.id.btn_click);
        textView = findViewById(R.id.tv_content);
        button.setOnClickListener(new MyOnClickListener(textView));
        // 令其实现对应的点击接口,在此处进行设置
        button_public = findViewById(R.id.btn_public);
        button_public.setOnClickListener(this);
    }

    @Override
    public void onClick(View v) {
        switch (v.getId()){
            // 通过switch方法来进行确定,当匹配到对应的id时,进行操作
            case R.id.btn_public:
                textView.setText("you clicked this button,but this button is public");
                break;
        }
    }

    // 加入static可以防止内存泄露的问题
    static class MyOnClickListener implements View.OnClickListener{

        private final TextView textView;

        public MyOnClickListener(TextView textView) {
            this.textView = textView;
        }

        @Override
        public void onClick(View v) {
            textView.setText("you clicked this button");
        }
    }


}
长按点击事件
该事件可以通过上述两种方法来实现,也可以通过下面这种方法来实现
设置长按的按钮
xml
<Button
    android:id="@+id/btn_long"
    android:layout_width="match_parent"
    android:layout_height="wrap_content"
    android:text="指定长按的点击监听器"
    android:textColor="#000000"
    android:textSize="15sp"
    />
java
import androidx.appcompat.app.AppCompatActivity;

import android.os.Bundle;
import android.view.View;
import android.widget.Button;
import android.widget.TextView;

public class ButtonClickActivity extends AppCompatActivity implements View.OnClickListener {

    private Button button;
    private TextView textView;
    private Button button_public;
    private Button button_long;

    @Override
    protected void onCreate(Bundle savedInstanceState) {
        super.onCreate(savedInstanceState);
        setContentView(R.layout.activity_button_click);
        button = findViewById(R.id.btn_click);
        textView = findViewById(R.id.tv_content);
        button.setOnClickListener(new MyOnClickListener(textView));
        // 令其实现对应的点击接口,在此处进行设置
        button_public = findViewById(R.id.btn_public);
        button_public.setOnClickListener(this);

        button_long = findViewById(R.id.btn_long);
        button_long.setOnLongClickListener((View.OnLongClickListener) v -> {
            // 长按后就会有该效果
            textView.setText("you clicked this button,but this button is long time");
            // 这里返回true就会自动在当前按钮使用该方法,false会传递给父容器再次进行操作
            return true;
        });
    }

    @Override
    public void onClick(View v) {
        switch (v.getId()){
            // 通过switch方法来进行确定,当匹配到对应的id时,进行操作
            case R.id.btn_public:
                textView.setText("you clicked this button,but this button is public");
                break;
        }
    }

    // 加入static可以防止内存泄露的问题
    static class MyOnClickListener implements View.OnClickListener{

        private final TextView textView;

        public MyOnClickListener(TextView textView) {
            this.textView = textView;
        }

        @Override
        public void onClick(View v) {
            textView.setText("you clicked this button");
        }
    }


}
禁用和恢复按钮
在实际业务中,按钮通常拥有两种状态,即不可用状态与可用状态,它们在外观和功能上的区别如下:
是否允许点击由enabled属性控制,属性值为true时表示允许点击,为false时表示不允许点击
xml
xml
<?xml version="1.0" encoding="utf-8"?>
<LinearLayout xmlns:android="http://schemas.android.com/apk/res/android"
    xmlns:app="http://schemas.android.com/apk/res-auto"
    xmlns:tools="http://schemas.android.com/tools"
    android:layout_width="match_parent"
    android:layout_height="match_parent"
    android:orientation="vertical"
    tools:context=".MainActivity7">

    <LinearLayout
        android:layout_width="match_parent"
        android:layout_height="wrap_content">
        <Button
            android:id="@+id/enable"
            android:layout_weight="1"
            android:layout_width="0dp"
            android:text="启用测试按钮"
            android:layout_height="wrap_content"
            android:textSize="17sp"
            />
        <Button
            android:id="@+id/disable"
            android:layout_weight="1"
            android:layout_width="0dp"
            android:text="禁用测试按钮"
            android:layout_height="wrap_content"
            android:textSize="17sp"
            />
    </LinearLayout>

    <Button
        android:enabled="false"
        android:layout_width="match_parent"
        android:text="测试按钮"
        android:id="@+id/test"
        android:layout_height="wrap_content"
        android:textSize="17sp"
        />

    <TextView
        android:id="@+id/txt"
        android:layout_width="wrap_content"
        android:text="这里查看测试按钮的点击结果"
        android:layout_height="wrap_content"/>

</LinearLayout>
method
java
package fun.eastwind.myapplication7;

import androidx.appcompat.app.AppCompatActivity;

import android.os.Bundle;
import android.view.View;
import android.widget.Button;
import android.widget.TextView;

public class MainActivity7 extends AppCompatActivity implements View.OnClickListener {

    private Button button;
    private Button disableButton;
    private Button test_button;
    private TextView txt;

    @Override
    protected void onCreate(Bundle savedInstanceState) {
        super.onCreate(savedInstanceState);
        setContentView(R.layout.activity_main7);
        // 初始化按钮功能
        button = findViewById(R.id.enable);
        button.setOnClickListener(this);
        disableButton = findViewById(R.id.disable);
        disableButton.setOnClickListener(this);
        test_button = findViewById(R.id.test);
        test_button.setOnClickListener(this);
        txt = findViewById(R.id.txt);
    }

    @Override
    public void onClick(View v) {
        switch (v.getId()){
            case R.id.enable:
                test_button.setEnabled(true);
                break;
            case R.id.disable:
                test_button.setEnabled(false);
                break;
            case R.id.test:
                txt.setText("update is ok!");
                break;
        }
    }
}
图像视图ImageView
图像视图展示的图片通常位于res/drawable*目录,设置图像视图的显示图片有两种方式:
我们可以提前将一张图片放置在drawable目录下
xml
<?xml version="1.0" encoding="utf-8"?>
<LinearLayout xmlns:android="http://schemas.android.com/apk/res/android"
    xmlns:app="http://schemas.android.com/apk/res-auto"
    xmlns:tools="http://schemas.android.com/tools"
    android:layout_width="match_parent"
    android:layout_height="match_parent"
    android:orientation="vertical"
    tools:context=".MainActivity7">

    <!--setting one's picture-->
    <ImageView
        android:id="@+id/img_view"
        android:layout_width="match_parent"
        android:layout_margin="10dp"
        android:src="@drawable/blog"
        android:layout_height="300dp"/>

</LinearLayout>
java
import androidx.appcompat.app.AppCompatActivity;
import android.os.Bundle;
import android.view.View;
import android.widget.Button;
import android.widget.ImageView;
import android.widget.TextView;
public class MainActivity7 extends AppCompatActivity {
private ImageView imageView;
@Override
protected void onCreate(Bundle savedInstanceState) {
super.onCreate(savedInstanceState);
setContentView(R.layout.activity_main7);
imageView = findViewById(R.id.img_view);
// 设置picture,在java中
imageView.setImageResource(R.drawable.ic_launcher_background);
}
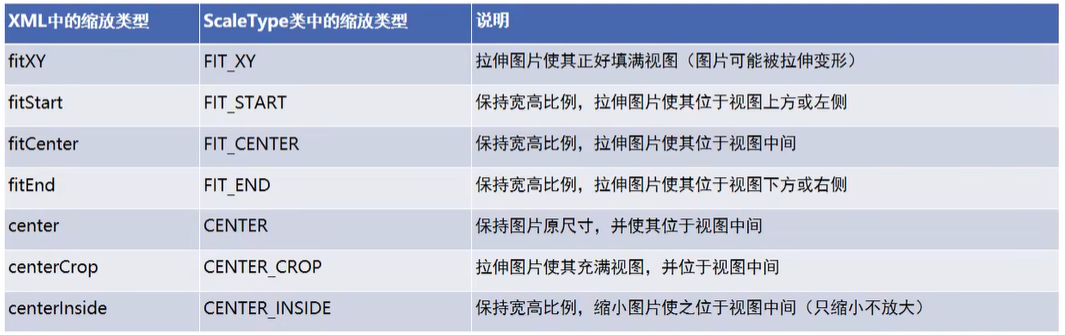
}图像视图的缩放类型
ImageView本身默认图片居中显示,若要改变图片的显示方式,可通过scaleType属性设定,该属性的取值说明如下:
使用方式
xml
<?xml version="1.0" encoding="utf-8"?>
<LinearLayout xmlns:android="http://schemas.android.com/apk/res/android"
    xmlns:app="http://schemas.android.com/apk/res-auto"
    xmlns:tools="http://schemas.android.com/tools"
    android:layout_width="match_parent"
    android:layout_height="match_parent"
    android:orientation="vertical"
    tools:context=".MainActivity7">

    <!--setting one's picture-->
    <ImageView
        android:scaleType="fitXY"
        android:id="@+id/img_view"
        android:layout_width="match_parent"
        android:layout_margin="10dp"
        android:src="@drawable/blog"
        android:layout_height="300dp"/>

</LinearLayout>
java
import androidx.appcompat.app.AppCompatActivity;

import android.os.Bundle;
import android.view.View;
import android.widget.Button;
import android.widget.ImageView;
import android.widget.TextView;

public class MainActivity7 extends AppCompatActivity  {

    private ImageView imageView;

    @Override
    protected void onCreate(Bundle savedInstanceState) {
        super.onCreate(savedInstanceState);
        setContentView(R.layout.activity_main7);
        imageView = findViewById(R.id.img_view);
        // 设置picture,在java中
        imageView.setImageResource(R.drawable.ic_launcher_background);
        // 使用jAVA进行操作
        imageView.setScaleType(ImageView.ScaleType.FIT_START);
    }


}
图像按钮ImageButton
ImageButton是显示图片的图像按钮,但它继承自ImageView,而非继承Button。
ImageButton和Button之间的区别有:
ImageButton的使用场合
在某些场合,有的字符无法由输入法打出来,或者某些文字以特殊字体展示,就适合先切图再放到ImageButton。例如:开平方符号等等
ImageButton与ImageView之间的区别有:
同时展示文本与图像
同时展示文本与图像的可能途径包括:
1. 利用LinearLayout对ImageView和TextView组合布局。
2. 通过按钮控件Button的drawable*属性设置文本周围的图标
样式无效的情况
如果在编写代码时,发现样式不起作用,可以这样设置
修改themes.xml文件的样式,修改为如下内容
xml
parent="Theme.MaterialComponents.DayNight.DarkActionBar.Bridge"
Activity
Activity的启动和结束
从当前页面跳到新页面,跳转代码如下:
从当前页面回到上一个页面,相当于关闭当前页码,返回代码如下:
页面1
xml
<?xml version="1.0" encoding="utf-8"?>
<LinearLayout xmlns:android="http://schemas.android.com/apk/res/android"
    android:layout_width="match_parent"
    android:gravity="center"
    android:layout_height="match_parent">

    <Button
        android:id="@+id/btn_act_next"
        android:layout_width="wrap_content"
        android:text="跳转下一个页面"
        android:layout_height="wrap_content"/>

</LinearLayout>
页面2
xml
<?xml version="1.0" encoding="utf-8"?>
<LinearLayout xmlns:android="http://schemas.android.com/apk/res/android"
    android:layout_width="match_parent"
    android:gravity="center"
    android:layout_height="match_parent">

    <Button
        android:id="@+id/btn_act_last"
        android:layout_width="wrap_content"
        android:text="跳转到上一个页面"
        android:layout_height="wrap_content"/>

</LinearLayout>
页面1跳转到页面2的具体功能
java
import androidx.appcompat.app.AppCompatActivity;

import android.content.Intent;
import android.os.Bundle;
import android.view.View;

public class MainActivity extends AppCompatActivity implements View.OnClickListener {

    @Override
    protected void onCreate(Bundle savedInstanceState) {
        super.onCreate(savedInstanceState);
        setContentView(R.layout.activity_main);
        findViewById(R.id.btn_act_next).setOnClickListener(this);
    }

    @Override
    public void onClick(View v) {
        // new Intent(当前页面, 目标对象.class)
        startActivity(new Intent(this, MainActivity2.class));
    }
}
页面2返回页面1的具体功能
java
import androidx.appcompat.app.AppCompatActivity;

import android.os.Bundle;
import android.view.View;

public class MainActivity2 extends AppCompatActivity {

    @Override
    protected void onCreate(Bundle savedInstanceState) {
        super.onCreate(savedInstanceState);
        setContentView(R.layout.activity_main2);
        findViewById(R.id.btn_act_last).setOnClickListener(new View.OnClickListener() {
            @Override
            public void onClick(View v) {
                // 返回上一级页面
                finish();
            }
        });
    }
}
Activity的生命周期
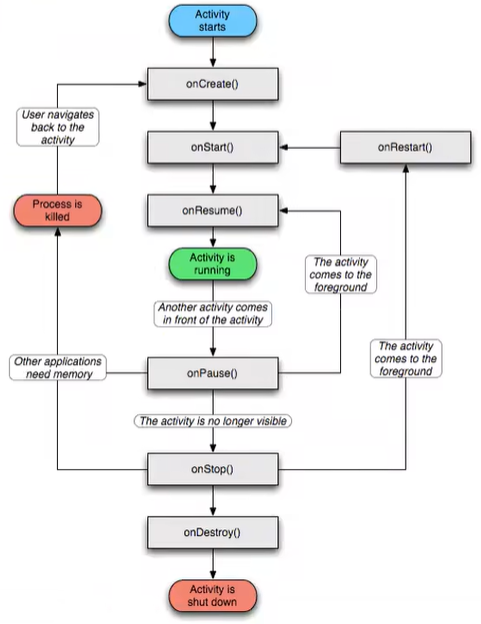
各状态之间的切换流程

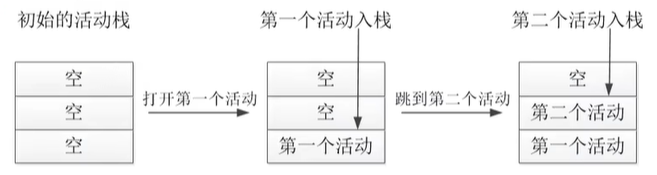
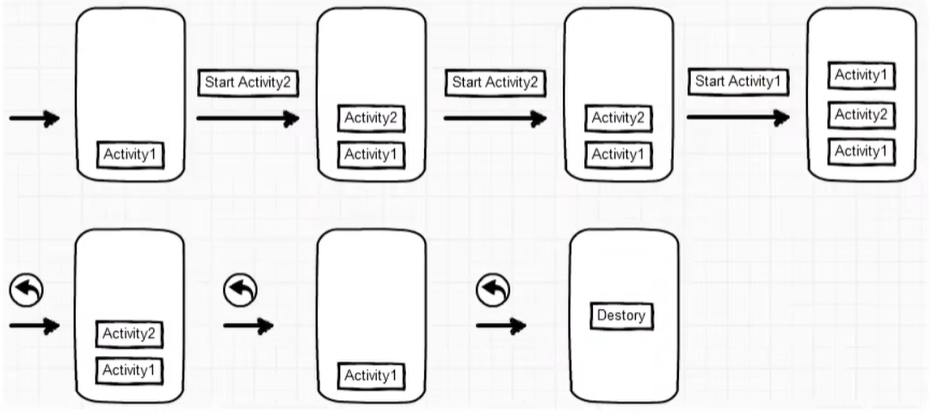
Activity的启动模式
某App先后打开两个活动,此时活动栈的变动情况如下图所示:
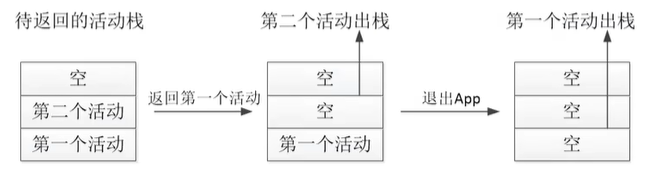
依次结束已经打开的两个活动,此时活动栈的变动情况如下图所示:
我们可以修改Activity的启动模式
在配置文件中指定启动模式
launchMode属性值说明如下
在AndroidManifest.xml文件中进行配置
xml
<activity
android:name=".MainActivity"
android:launchMode="standard"
android:exported="true">
<intent-filter>
<action android:name="android.intent.action.MAIN" />
<category android:name="android.intent.category.LAUNCHER" />
</intent-filter>
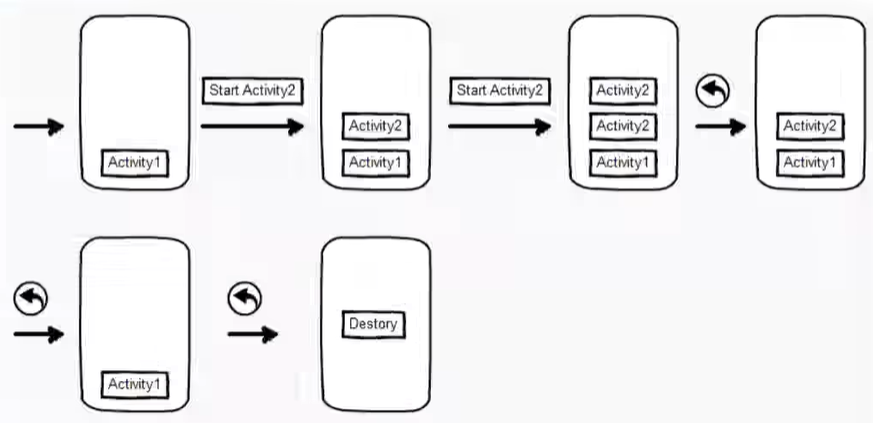
</activity>默认启动模式standard
该模式可以被设定,不在manifest设定时候,Activity的默认模式是standard。在该模式下,启动的Activity会按照启动顺序被依次压入Task栈中。
栈顶复用模式singleTop
在该模式下,如果栈顶Activity为我们要新建的Activity(目标Activity),那么就不会重复创建新的Activity。
应用场景
适合开启渠道多、多应用开启调用的Activity,通过这种设置可以避免已经创建过的Activity被重复创建,多数通过动态设置使用。
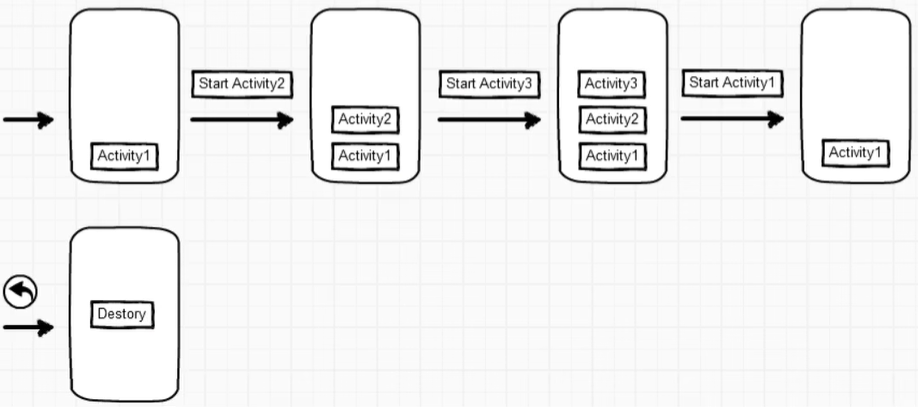
栈内复用模式singleTask
与singleTop模式相似,只不过singleTop模式是只针对栈顶的元素,而singleTask模式下,如果task栈内存在目标Activity实例,则将task内的对应Activity实例之上的所有Activity弹出栈,并将Activity置于栈顶,获得焦点。
应用场景
程序主界面:我们不希望主界面被创建多次,而且在主界面退出的时候,退出整个App是最好的效果
耗费系统资源的Activity:对于那些极其耗费系统资源的Activity,我们可以考虑将其设为singleTask模式,减少资源耗费。
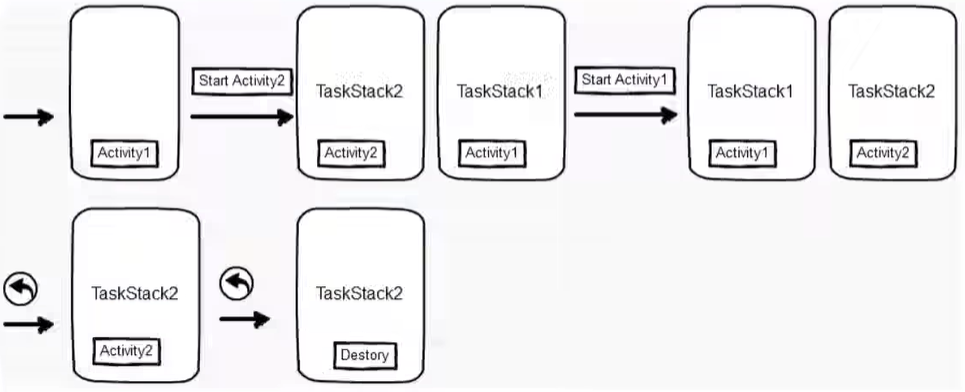
全局唯一模式singleInstance
在该模式下,我们会为目标Activity创建一个新的Task栈,将目标Activity放入新的Task,并让目标Activity获得焦点。新的Task有且只有这一个Activity实例。 如果已经创建过目标Activity实例,则不会创建新的Task,而是将以前创建过的Activity唤醒。
如果我们想在跳转页面时,主动修改启动模式,可以这样做
java
import androidx.appcompat.app.AppCompatActivity;

import android.content.Intent;
import android.os.Bundle;
import android.view.View;

public class MainActivity extends AppCompatActivity implements View.OnClickListener {

    @Override
    protected void onCreate(Bundle savedInstanceState) {
        super.onCreate(savedInstanceState);
        setContentView(R.layout.activity_main);
        findViewById(R.id.btn_act_next).setOnClickListener(this);
    }

    @Override
    public void onClick(View v) {
        // new Intent(当前页面, 目标对象.class)
        Intent intent = new Intent(this, MainActivity2.class);
        // 修改启动方式
        intent.setFlags(Intent.FLAG_ACTIVITY_CLEAR_TOP);
        startActivity(intent);

    }
}
在代码里设置启动标志
启动标志的取值说明如下:
实现登录效果
java
import androidx.appcompat.app.AppCompatActivity;

import android.content.Intent;
import android.os.Bundle;
import android.view.View;

public class MainActivity extends AppCompatActivity implements View.OnClickListener {

    @Override
    protected void onCreate(Bundle savedInstanceState) {
        super.onCreate(savedInstanceState);
        setContentView(R.layout.activity_main);
        findViewById(R.id.btn_act_next).setOnClickListener(this);
    }

    @Override
    public void onClick(View v) {
        // new Intent(当前页面, 目标对象.class)
        Intent intent = new Intent(this, MainActivity2.class);
        // 当登录后,拥有登录状态,清空原有栈的所有实例,为其创建一个新的栈
        // 因为登录成功后,原有栈空间,也就是登录及登录之前的内容,全部清空,当登录状态来到首页时,返回就直接退出
        // 因为已经登录了,返回也不会返回登录页面
        intent.setFlags(Intent.FLAG_ACTIVITY_CLEAR_TASK | Intent.FLAG_ACTIVITY_NEW_TASK);
        startActivity(intent);
    }
}
显式Intent和隐式Intent
Intent是各个组件之间信息沟通的桥梁,它用于Android各组件之间的通信,主要完成下列工作:
Intent的组成部分
显式Intent
显示Intent,直接指定来源活动与目标活动,属于精确匹配。它有三种构建方式:
java
@Override
public void onClick(View v) {
    Intent intent = new Intent(this, MainActivity2.class);
    startActivity(intent);
}java
@Override
public void onClick(View v) {
Intent intent = new Intent();
intent.setClass(this, MainActivity2.class);
startActivity(intent);
}java
@Override
public void onClick(View v) {
Intent intent = new Intent();
ComponentName componentName = new ComponentName(this, MainActivity2.class);
intent.setComponent(componentName);
startActivity(intent);
}隐式Intent
隐式Intent不指明去哪个页面
基础页面
xml
<?xml version="1.0" encoding="utf-8"?>
<LinearLayout xmlns:android="http://schemas.android.com/apk/res/android"
    android:layout_width="match_parent"
    android:gravity="center"
    android:orientation="vertical"
    android:layout_height="match_parent">

    <TextView
        android:layout_width="wrap_content"
        android:text="点击按钮向12345拨号"
        android:layout_marginBottom="10dp"
        android:layout_height="wrap_content"/>

    <Button
        android:id="@+id/btn_act_next"
        android:layout_width="wrap_content"
        android:text="跳转拨号页面"
        android:layout_height="wrap_content"/>

    <Button
        android:id="@+id/btn_act_next2"
        android:layout_width="wrap_content"
        android:text="跳转短信页面"
        android:layout_height="wrap_content"/>

    <Button
        android:id="@+id/btn_act_next3"
        android:layout_width="wrap_content"
        android:text="跳转自己的项目页面"
        android:layout_height="wrap_content"/>

</LinearLayout>
功能代码
java
import androidx.appcompat.app.AppCompatActivity;

import android.content.ComponentName;
import android.content.Intent;
import android.net.Uri;
import android.os.Bundle;
import android.view.View;

public class MainActivity extends AppCompatActivity implements View.OnClickListener {

    @Override
    protected void onCreate(Bundle savedInstanceState) {
        super.onCreate(savedInstanceState);
        setContentView(R.layout.activity_main);
        findViewById(R.id.btn_act_next).setOnClickListener(this);
        findViewById(R.id.btn_act_next2).setOnClickListener(this);
        findViewById(R.id.btn_act_next3).setOnClickListener(this);
    }

    @Override
    public void onClick(View v) {
        String phoneNo = "12345";
        Intent intent = new Intent();
        switch (v.getId()){
            case R.id.btn_act_next:
                // 设置意图动作为准备拨号
                intent.setAction(Intent.ACTION_DIAL);
                // 声明一个拨号的Uri
                Uri uri = Uri.parse("tel:" + phoneNo);
                intent.setData(uri);
                startActivity(intent);
                break;
            case R.id.btn_act_next2:
                // 设置意图动作为准备发短信
                intent.setAction(Intent.ACTION_SENDTO);
                // 声明一个拨号的Uri
                Uri uri2 = Uri.parse("sms:" + phoneNo);
                intent.setData(uri2);
                startActivity(intent);
                break;
            case R.id.btn_act_next3:
                // 跳转到自己编写的项目上
                intent.setAction("android.intent.action.NING");
                intent.addCategory(Intent.CATEGORY_DEFAULT);
                startActivity(intent);
                break;
        }
    }
}
向下一个Activity发送数据
Intent使用Bundle对象存放待传递的数据信息。
Bundle对象操作各类型数据的读写方法说明见下表
在代码中发送消息包裹,调用意图对象的putExtras方法,即可存入消息包裹。
xml
<?xml version="1.0" encoding="utf-8"?>
<LinearLayout xmlns:android="http://schemas.android.com/apk/res/android"
    android:layout_width="match_parent"
    android:gravity="center"
    android:orientation="vertical"
    android:layout_height="match_parent">

    <TextView
        android:id="@+id/txt"
        android:layout_width="wrap_content"
        android:text="今天天气真不错啊!"
        android:layout_height="wrap_content"/>

    <Button
        android:id="@+id/send_txt"
        android:layout_width="wrap_content"
        android:text="发送以上文字"
        android:layout_height="wrap_content"/>

</LinearLayout>
java
import androidx.appcompat.app.AppCompatActivity;

import android.content.ComponentName;
import android.content.Intent;
import android.net.Uri;
import android.os.Bundle;
import android.view.View;
import android.widget.TextView;

public class MainActivity extends AppCompatActivity implements View.OnClickListener {

    private TextView textView;

    @Override
    protected void onCreate(Bundle savedInstanceState) {
        super.onCreate(savedInstanceState);
        setContentView(R.layout.activity_main);
        findViewById(R.id.send_txt).setOnClickListener(this);
        textView = findViewById(R.id.txt);
    }

    @Override
    public void onClick(View v) {
        // 获取对应的字符串
        String content = textView.getText().toString();
        Intent intent = new Intent(this, MainActivity2.class);
        Bundle bundle = new Bundle();
        // 设置当前时间
        bundle.putString("request_time", String.valueOf(System.currentTimeMillis()));
        bundle.putString("request_content",content);
        intent.putExtras(bundle);
        startActivity(intent);
    }
}
在代码中接收消息包裹,调用意图对象的getExtras方法,即可取出消息包裹。
xml
<?xml version="1.0" encoding="utf-8"?>
<LinearLayout xmlns:android="http://schemas.android.com/apk/res/android"
    android:layout_width="match_parent"
    android:gravity="center"
    android:orientation="vertical"
    android:layout_height="match_parent">

    <TextView
        android:id="@+id/receive"
        android:layout_width="wrap_content"
        android:layout_height="wrap_content"/>

    <Button
        android:id="@+id/btn_act_last"
        android:layout_width="wrap_content"
        android:text="跳转到上一个页面"
        android:layout_height="wrap_content"/>

</LinearLayout>
java
import androidx.appcompat.app.AppCompatActivity;

import android.os.Bundle;
import android.view.View;
import android.widget.TextView;

public class MainActivity2 extends AppCompatActivity {

    private TextView textView;

    @Override
    protected void onCreate(Bundle savedInstanceState) {
        super.onCreate(savedInstanceState);
        setContentView(R.layout.activity_main2);
        textView = findViewById(R.id.receive);
        // 获取从之前页面传递的数据
        Bundle res = getIntent().getExtras();
        String request_time = res.getString("request_time");
        String request_content = res.getString("request_content");
        textView.setText("currentTime is " + request_time + "content is" + request_content);
    }
}
向上一个Activity返回数据
处理下一个页面的应答数据,详细步骤说明如下:
startActivityForResult方法已过时,以下代码示例中会说明新的使用方法
页面2的页面
xml
<?xml version="1.0" encoding="utf-8"?>
<LinearLayout xmlns:android="http://schemas.android.com/apk/res/android"
    android:layout_width="match_parent"
    android:gravity="center"
    android:orientation="vertical"
    android:layout_height="match_parent">

    <TextView
        android:id="@+id/receive"
        android:layout_width="wrap_content"
        android:layout_height="wrap_content"/>

    <Button
        android:id="@+id/btn_act_last"
        android:layout_width="wrap_content"
        android:text="跳转到上一个页面"
        android:layout_height="wrap_content"/>

</LinearLayout>
页面1的页面
xml
<?xml version="1.0" encoding="utf-8"?>
<LinearLayout xmlns:android="http://schemas.android.com/apk/res/android"
    android:layout_width="match_parent"
    android:gravity="center"
    android:orientation="vertical"
    android:layout_height="match_parent">

    <TextView
        android:id="@+id/txt"
        android:layout_width="wrap_content"
        android:text="今天天气真不错啊!"
        android:layout_height="wrap_content"/>

    <Button
        android:id="@+id/receive_txt"
        android:layout_width="wrap_content"
        android:text="回到上一个页面,表示接收到数据"
        android:layout_height="wrap_content"/>

</LinearLayout>
页面2跳转到页面1及页面1结束时返回给页面2的结果操作
java
import android.app.Activity;
import android.content.Intent;
import android.os.Bundle;
import android.view.View;
import android.widget.Button;
import android.widget.TextView;

import androidx.activity.result.ActivityResultLauncher;
import androidx.activity.result.contract.ActivityResultContracts;
import androidx.appcompat.app.AppCompatActivity;

public class MainActivity2 extends AppCompatActivity implements View.OnClickListener {

    private TextView textView;
    private Button button;
    private ActivityResultLauncher<Intent> intentActivityResultLauncher;

    @Override
    protected void onCreate(Bundle savedInstanceState) {
        super.onCreate(savedInstanceState);
        setContentView(R.layout.activity_main2);
        textView = findViewById(R.id.receive);

        // 从当前页码返回数据给上一个页面
        button = findViewById(R.id.btn_act_last);
        button.setOnClickListener(this);
        // 回调方法
        intentActivityResultLauncher = registerForActivityResult
                (new ActivityResultContracts.StartActivityForResult(), result -> {
                    // 跳转回上一个页面后,上一个页面可以选择回到此处,可以携带一些数据回来
                    if (result != null){
                        Intent data = result.getData();
                        if (data != null && result.getResultCode() == Activity.RESULT_OK){
                            // 设置返回的结果到textview上
                            Bundle extras = data.getExtras();
                            String res1 = extras.getString("res");
                            textView.setText(res1);
                        }
                    }
                });
    }

    @Override
    public void onClick(View v) {
        Intent intent = new Intent(this, MainActivity.class);
        Bundle bundle = new Bundle();
        bundle.putString("val","this is val");
        intent.putExtras(bundle);
        // 回调数据
        intentActivityResultLauncher.launch(intent);
    }
}
页面1接收页面2并返回给页面2数据
java
import androidx.appcompat.app.AppCompatActivity;

import android.app.Activity;
import android.content.ComponentName;
import android.content.Intent;
import android.net.Uri;
import android.os.Bundle;
import android.view.View;
import android.widget.Button;
import android.widget.TextView;

public class MainActivity extends AppCompatActivity{

    private TextView textView;

    @Override
    protected void onCreate(Bundle savedInstanceState) {
        super.onCreate(savedInstanceState);
        setContentView(R.layout.activity_main);
        textView = findViewById(R.id.txt);
        // 获取之前页面的数据
        Bundle bundle = getIntent().getExtras();
        textView.setText(bundle.getString("val"));
        Button button = findViewById(R.id.receive_txt);
        button.setOnClickListener(new View.OnClickListener() {
            @Override
            public void onClick(View v) {
                Intent intent = new Intent();
                Bundle bundle = new Bundle();
                bundle.putString("res","for ok!");
                intent.putExtras(bundle);
                setResult(Activity.RESULT_OK,intent);
                finish();
            }
        });
    }
}
利用资源文件配置字符串
xml
<?xml version="1.0" encoding="utf-8"?>
<LinearLayout xmlns:android="http://schemas.android.com/apk/res/android"
    android:layout_width="match_parent"
    android:gravity="center"
    android:layout_height="match_parent">

    <!--在xml中的获取方式-->
    <TextView
        android:id="@+id/tv_resource"
        android:text="@string/app_name"
        android:layout_width="wrap_content"
        android:layout_height="wrap_content"/>

</LinearLayout>
strings.xml
xml
<resources>
    <string name="app_name">My Application</string>
    <string name="weather">rain</string>
</resources>
java
import androidx.appcompat.app.AppCompatActivity;

import android.os.Bundle;
import android.widget.TextView;

public class MainActivity3 extends AppCompatActivity {

    private TextView textView;

    @Override
    protected void onCreate(Bundle savedInstanceState) {
        super.onCreate(savedInstanceState);
        setContentView(R.layout.activity_main3);
        textView = findViewById(R.id.tv_resource);
        // 从string.xml里获取名叫weather_str的字符串值
        String weather = getString(R.string.weather);
        textView.setText(weather);
    }
}
利用元数据传递配置信息
在整合第三方sdk时(高德地图、微信登录等),需要对应的token,就可以放到此处
先在该文件提前放置meta-data
AndroidManifest.xml
xml
<?xml version="1.0" encoding="utf-8"?>
<manifest xmlns:android="http://schemas.android.com/apk/res/android">

    <application
        android:allowBackup="true"
        android:icon="@mipmap/ic_launcher"
        android:label="@string/app_name"
        android:roundIcon="@mipmap/ic_launcher_round"
        android:supportsRtl="true"
        android:theme="@style/Theme.Lulu">
        <activity
            android:name=".MainActivity"
            android:exported="false" />
        <activity
            android:name=".MainActivity3"
            android:exported="true"
            android:launchMode="standard">
            <intent-filter>
                <action android:name="android.intent.action.MAIN" />

                <category android:name="android.intent.category.LAUNCHER" />
            </intent-filter>

            <!--添加元数据-->
            <!--引用string.xml中的数据-->
            <meta-data android:name="weather" android:value="@string/weather"/>
            <!--也可以自己进行添加-->
<!--            <meta-data android:name="weather" android:value="hahah"/>-->
        </activity>
    </application>

</manifest>
在Java代码中,获取元数据信息的步骤分为下列三步:
java
import androidx.appcompat.app.AppCompatActivity;
import android.content.pm.ActivityInfo;
import android.content.pm.PackageManager;
import android.os.Bundle;
import android.widget.TextView;
public class MainActivity3 extends AppCompatActivity {
private TextView textView;
@Override
protected void onCreate(Bundle savedInstanceState) {
super.onCreate(savedInstanceState);
setContentView(R.layout.activity_main3);
textView = findViewById(R.id.tv_resource);
// 获取包管理器
PackageManager pm = getPackageManager();
try {
// 从包管理器中获取当前的活动信息
ActivityInfo info = pm.getActivityInfo(getComponentName(), PackageManager.GET_META_DATA);
// 获取元数据
Bundle metaData = info.metaData;
String weather = metaData.getString("weather");
textView.setText(weather);
} catch (PackageManager.NameNotFoundException e) {
e.printStackTrace();
}
}
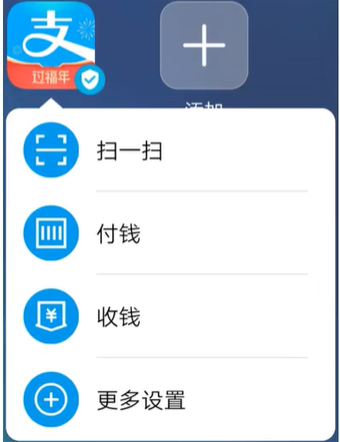
}给应用界面注册快捷方式
元数据不仅能传递简单的字符串参数,还能传送更复杂的资源数据,比如支付宝的快捷方式菜单。
先在res下创建一个目录xml,再到xml中创建一个XML文件(Values XML File)
按照以下模板来进行编写
xml
<?xml version="1.0" encoding="utf-8"?>
<shortcuts xmlns:android="http://schemas.android.com/apk/res/android">

    <shortcut
        android:shortcutId="first"
        android:enabled="true"
        android:icon="@mipmap/ic_launcher"
        android:shortcutShortLabel="@string/first"
        android:shortcutLongLabel="@string/startOrStop">
        <intent
            android:action="android.intent.action.VIEW"
            android:targetPackage="fun.eastwind.myapplication8"
            android:targetClass="fun.eastwind.myapplication8.MainActivity3"
            />
        <categories android:name="android.shortcut.conversation"/>
    </shortcut>

    <shortcut
        android:shortcutId="second"
        android:enabled="true"
        android:icon="@mipmap/ic_launcher"
        android:shortcutShortLabel="@string/second"
        android:shortcutLongLabel="@string/jump">
        <intent
            android:action="android.intent.action.VIEW"
            android:targetPackage="fun.eastwind.myapplication8"
            android:targetClass="fun.eastwind.myapplication8.MainActivity2"
            />
        <categories android:name="android.shortcut.conversation"/>
    </shortcut>

</shortcuts>
strings.xml
xml
<resources>
    <string name="app_name">My Application</string>
    <string name="weather">rain</string>
    <string name="first">first</string>
    <string name="startOrStop">启停活动</string>
    <string name="second">second</string>
    <string name="jump">来回跳转</string>
</resources>
AndroidManifest.xml
xml
<!--exported需要修改为true,因为它需要从其他页面来进行启动该视图-->
<activity
    android:name=".MainActivity2"
    android:exported="true" />
<activity
    android:name=".MainActivity"
    android:exported="true" />
中级控件
图形定制
图像Drawable
Android把所有能够显示的图形都抽象为Drawable类(可绘制的)。这里的图形不止是图片,还包括色
块、画板、背景等。
包含图片在内的图形文件放在res目录的各个drawable目录下,其中drawable目录一般保存描述性的
XML文件,而图片文件一般放在具体分辨率的drawable目录下。例如:
基本上,分辨率每加大一级,宽度和高度就要增加二分之一或三分之一像素。如果各目录存在同名图
片,Android就会根据手机的分辨率分别适配对应文件夹里的图片。在开发App时,为了兼容不同的手机
屏幕,在各目录存放不同分辨率的图片,才能达到最合适的显示效果。例如,在drawable-hdpi放了一
张背景图片bg.png(分辨率为480×800),其他目录没放,使用分辨率为480×800的手机查看该App界
面没有问题,但是使用分辨率为720×1280的手机查看该App会发现背景图片有点模糊,原因是Android
为了让bg.png适配高分辨率的屏幕,强行把bg.png拉伸到了720×1280,拉伸的后果是图片变模糊了。
在XML布局文件中引用图形文件可使用“@drawable/不含扩展名的文件名称”这种形式。
形状图形
shape是形状图形文件的根节点,它描述了当前是哪种几何图形。下面是shape节点的常用属性说明。
size(尺寸)
size是shape的下级节点,它描述了形状图形的宽高尺寸。若无size节点,则表示宽高与宿主视图一样大
小。下面是size节点的常用属性说明。
stroke(描边)
stroke是shape的下级节点,它描述了形状图形的描边规格。若无stroke节点,则表示不存在描边。下
面是stroke节点的常用属性说明。
corners(圆角)
corners是shape的下级节点,它描述了形状图形的圆角大小。若无corners节点,则表示没有圆角。下
面是corners节点的常用属性说明。
solid(填充)
solid是shape的下级节点,它描述了形状图形的填充色彩。若无solid节点,则表示无填充颜色。下面是
solid节点的常用属性说明。
padding(间隔)
padding是shape的下级节点,它描述了形状图形与周围边界的间隔。若无padding节点,则表示四周不
设间隔。下面是padding节点的常用属性说明。
gradient(渐变)
gradient是shape的下级节点,它描述了形状图形的颜色渐变。若无gradient节点,则表示没有渐变效
果。下面是gradient节点的常用属性说明。
渐变类型的取值说明
在实际开发中,形状图形主要使用3个节点:stroke(描边)、corners(圆角)和solid(填充)。至于shape根节点的属性一般不用设置(默认矩形即可)。
下面是一个xml页面,带有两个按钮,点击后可以产生不同的效果
xml
<?xml version="1.0" encoding="utf-8"?>
<LinearLayout xmlns:android="http://schemas.android.com/apk/res/android"
    android:layout_width="match_parent"
    android:orientation="vertical"
    android:layout_height="match_parent">

    <View
        android:layout_margin="10dp"
        android:id="@+id/v_content"
        android:layout_width="match_parent"
        android:layout_height="200dp"/>

    <LinearLayout
        android:layout_width="match_parent"
        android:layout_height="wrap_content">
        <!--点击按钮后切换背景-->
        <Button
            android:layout_width="0dp"
            android:layout_weight="1"
            android:text="圆角矩形背景"
            android:id="@+id/btn_rect"
            android:layout_height="wrap_content"/>

        <Button
            android:layout_width="0dp"
            android:layout_weight="1"
            android:text="椭圆背景"
            android:id="@+id/btn_oval"
            android:layout_height="wrap_content"/>

    </LinearLayout>
</LinearLayout>
通过在drawable上创建对应形状的xml文件来创建两个形状
矩形
xml
<?xml version="1.0" encoding="utf-8"?>
<shape xmlns:android="http://schemas.android.com/apk/res/android">

    <!--指定形状内部的颜色-->
    <solid android:color="#ffdd66"/>
    <!--指定形状轮廓的粗细与颜色-->
    <stroke android:width="1dp" android:color="#aaaaaa"/>
    <!--指定形状四个圆角的半径-->
    <corners android:radius="10dp"/>

</shape>
椭圆
xml
<?xml version="1.0" encoding="utf-8"?>
<!--android:shape="oval"指定为椭圆-->
<shape xmlns:android="http://schemas.android.com/apk/res/android"
    android:shape="oval"
    >

    <!--指定形状的内部颜色-->
    <solid android:color="#ff66aa"/>
    <!--指定形状轮廓的粗细与颜色-->
    <stroke android:width="1dp" android:color="#aaaaaa"/>


</shape>
设置view资源显示的代码
java
import androidx.appcompat.app.AppCompatActivity;

import android.os.Bundle;
import android.view.View;

public class MainActivity extends AppCompatActivity implements View.OnClickListener {

    private View view;

    @Override
    protected void onCreate(Bundle savedInstanceState) {
        super.onCreate(savedInstanceState);
        setContentView(R.layout.activity_main);
        view = findViewById(R.id.v_content);
        findViewById(R.id.btn_rect).setOnClickListener(this);
        findViewById(R.id.btn_oval).setOnClickListener(this);
        view.setBackgroundResource(R.drawable.shape_oval_rose);
    }

    @Override
    public void onClick(View v) {
        switch (v.getId()){
            case R.id.btn_rect:
                view.setBackgroundResource(R.drawable.shape_rect_gold);
                break;
            case R.id.btn_oval:
                view.setBackgroundResource(R.drawable.shape_oval_rose);
                break;
        }
    }
}
九宫格图片
将某张图片设置成视图背景时,如果图片尺寸太小,则系统会自动拉伸图片使之填满背景。
可是一旦图片拉得过大,其画面容易变得模糊。
我们创建一个文件夹(drawable-xhdpi)在res下,并拖入一张图片到这个文件夹下
右击这张图片,找到create 9-patch file,进行创建
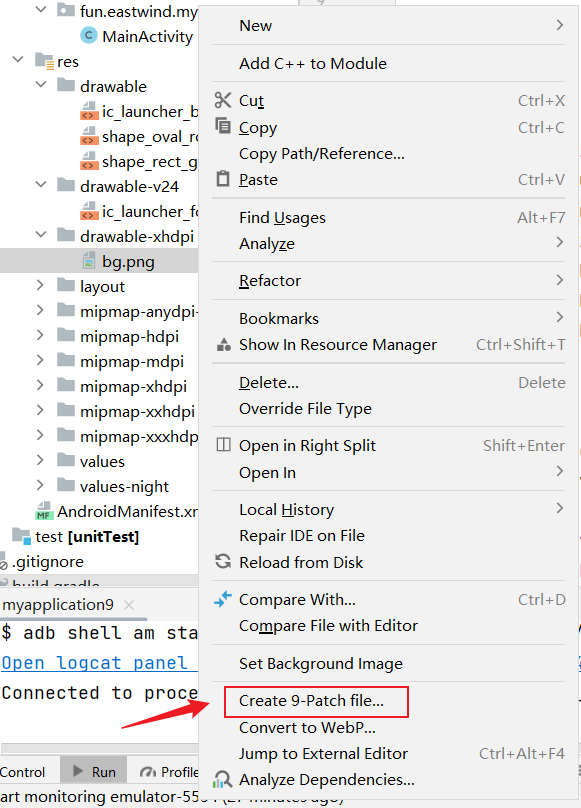
就可以创建出对应的9宫格图片了
状态列表图形
Button按钮的背景在正常情况下是凸起的,在按下时是凹陷的,从按下到弹起的过程,用户便能知道点击了这个按钮。
状态列表图形不仅用于按钮控件,还可用于其他拥有多种状态的控件
在drawable目录下创建一个selector文件(btn_nine_selector),对按钮的样式进行设置
这里的drawable是自己画的图形
xml
<?xml version="1.0" encoding="utf-8"?>
<selector xmlns:android="http://schemas.android.com/apk/res/android">

    <!--android:state_pressed="true"被按下时采用drawable的图片-->
    <item android:state_pressed="true" android:drawable="@drawable/shape_oval_rose"/>
    <!--没有被按下时-->
    <item android:drawable="@drawable/shape_rect_gold"/>

</selector>
在这里使用对应的选择器来作为背景
xml
<?xml version="1.0" encoding="utf-8"?>
<LinearLayout xmlns:android="http://schemas.android.com/apk/res/android"
    android:layout_width="match_parent"
    android:orientation="vertical"
    android:layout_height="match_parent">


    <LinearLayout
        android:layout_width="match_parent"
        android:layout_height="wrap_content">
        <!--点击按钮后切换背景-->
        <Button
            android:layout_width="0dp"
            android:layout_weight="1"
            android:text="默认样式的按钮"
            android:id="@+id/btn_rect"
            android:layout_height="wrap_content"/>

        <!--处于点击状态时切换效果-->
        <Button
            android:layout_width="0dp"
            android:layout_weight="1"
            android:background="@drawable/btn_nine_selector"
            android:text="定制样式的按钮"
            android:id="@+id/btn_oval"
            android:layout_height="wrap_content"/>

    </LinearLayout>
</LinearLayout>
选择按钮
复选框CheckBox
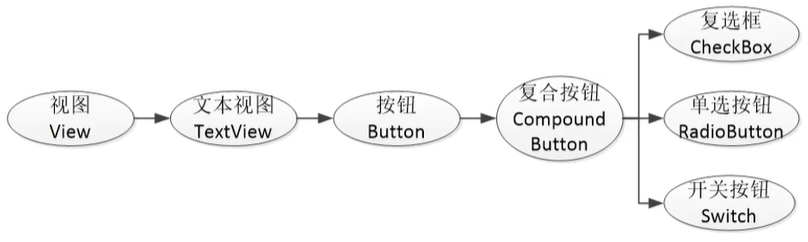
CompoundButton类是抽象的复合按钮,由它派生而来的子类包括:复选框CheckBox、单选按钮RadioButton以及开关按钮Switch
下图描述了复合按钮的继承关系:
xml页面
xml
<?xml version="1.0" encoding="utf-8"?>
<LinearLayout xmlns:android="http://schemas.android.com/apk/res/android"
    android:layout_width="match_parent"
    android:orientation="vertical"
    android:layout_height="match_parent">

    <CheckBox
        android:id="@+id/default_activity_button"
        android:layout_width="match_parent"
        android:text="系统默认的多选框"
        android:gravity="center"
        android:layout_height="wrap_content"/>

    <!--我们想修改这个多选框的效果,可以通过自己创建对应的选择器来进行修改-->
    <!--通过button可以设置对应的多选框的按钮-->
    <!--android:checked="true"默认选中-->
    <CheckBox
        android:checked="true"
        android:layout_marginTop="10dp"
        android:button="@drawable/check_box"
        android:id="@+id/custom_checkbox"
        android:layout_width="match_parent"
        android:text="定制版的多选框"
        android:gravity="center"
        android:layout_height="wrap_content"/>

</LinearLayout>
选中或未选中时的效果
xml
<?xml version="1.0" encoding="utf-8"?>
<selector xmlns:android="http://schemas.android.com/apk/res/android">

    <!--选中时-->
    <item android:state_checked="true" android:drawable="@drawable/shape_oval_rose"/>
    <!--未选中时-->
    <item android:drawable="@drawable/ic_launcher_background"/>


</selector>
为checkbox设置监听
java
import androidx.appcompat.app.AppCompatActivity;

import android.os.Bundle;
import android.widget.CheckBox;
import android.widget.CompoundButton;

public class MainActivity2 extends AppCompatActivity implements CompoundButton.OnCheckedChangeListener {

    @Override
    protected void onCreate(Bundle savedInstanceState) {
        super.onCreate(savedInstanceState);
        setContentView(R.layout.activity_main2);

        /*为多选框设置事件监听*/
        CheckBox checkBox = findViewById(R.id.custom_checkbox);
        CheckBox checkBox2 = findViewById(R.id.default_activity_button);
        checkBox.setOnCheckedChangeListener(this);
        checkBox2.setOnCheckedChangeListener(this);
    }

    @Override
    public void onCheckedChanged(CompoundButton buttonView, boolean isChecked) {
        String check = isChecked ? "勾选" : "取消勾选";
        String format = String.format("您" + check + "了该多选框");
        buttonView.setText(format);
    }
}
开关按钮Switch
Switch是开关按钮,它在选中与取消选中时可展现的页面元素比复选框丰富。
Switch控件新添加的XML属性说明如下:
xml
<?xml version="1.0" encoding="utf-8"?>
<LinearLayout xmlns:android="http://schemas.android.com/apk/res/android"
    android:layout_width="match_parent"
    android:orientation="vertical"
    android:layout_height="match_parent">

    <LinearLayout
        android:layout_width="match_parent"
        android:orientation="horizontal"
        android:layout_height="wrap_content">

        <TextView
            android:layout_width="0dp"
            android:layout_weight="1"
            android:text="Switch开关:"
            android:layout_gravity="start"
            android:padding="5dp"
            android:layout_height="wrap_content"/>

        <Switch
            android:id="@+id/sw_status"
            android:layout_width="80dp"
            android:layout_gravity="end"
            android:layout_height="30dp"/>

    </LinearLayout>

    <TextView
        android:id="@+id/sw_btn"
        android:text="Switch目前为关"
        android:padding="5dp"
        android:layout_width="match_parent"
        android:layout_height="wrap_content"/>


</LinearLayout>
java
import androidx.appcompat.app.AppCompatActivity;

import android.os.Bundle;
import android.widget.CompoundButton;
import android.widget.Switch;
import android.widget.TextView;

public class MainActivity3 extends AppCompatActivity implements CompoundButton.OnCheckedChangeListener {

    private TextView textView;

    @Override
    protected void onCreate(Bundle savedInstanceState) {
        super.onCreate(savedInstanceState);
        setContentView(R.layout.activity_main3);
        Switch aSwitch = findViewById(R.id.sw_status);
        textView = findViewById(R.id.sw_btn);
        aSwitch.setOnCheckedChangeListener(this);
    }

    @Override
    public void onCheckedChanged(CompoundButton buttonView, boolean isChecked) {
        String isStatus = isChecked ? "开" : "关";
        textView.setText(isStatus);
    }
}
仿iOS的开关按钮
借助状态列表图形StateListDrawable,分别定义已选中时候的“开”图形,以及未选中时候的“关”图形。
然后将CheckBox控件的background属性设置为该状态图形。
xml
<?xml version="1.0" encoding="utf-8"?>
<LinearLayout xmlns:android="http://schemas.android.com/apk/res/android"
    android:layout_width="match_parent"
    android:orientation="vertical"
    android:layout_height="match_parent">

    <LinearLayout
        android:layout_width="match_parent"
        android:orientation="horizontal"
        android:layout_height="wrap_content">

        <TextView
            android:layout_width="0dp"
            android:layout_weight="1"
            android:text="Switch开关:"
            android:layout_gravity="start"
            android:padding="5dp"
            android:layout_height="wrap_content"/>

        <!--可以将按钮设为空android:button="@null"
        为其设置背景,就看不见按钮了
        -->
        <CheckBox
            android:id="@+id/ck_status"
            android:layout_width="60dp"
            android:layout_height="30dp"
            android:layout_gravity="end"
            android:background="@drawable/switch_selector"
            android:button="@null" />

    </LinearLayout>

    <TextView
        android:id="@+id/sw_btn"
        android:text="Switch目前为关"
        android:padding="5dp"
        android:layout_width="match_parent"
        android:layout_height="wrap_content"/>


</LinearLayout>
对应的checkBox的资源图片
xml
<?xml version="1.0" encoding="utf-8"?>
<selector xmlns:android="http://schemas.android.com/apk/res/android">
    <item android:state_checked="true" android:drawable="@drawable/open"/>
    <item android:drawable="@drawable/close"/>
</selector>
单选按钮RadioButton
单选按钮要在一组按钮中选择其中一项,并且不能多选,这要求有个容器确定这组按钮的范围,这个容器便是单选组RadioGroup。
RadioGroup实质上是个布局,同一组RadioButton都要放在同一个RadioGroup节点下。
除了RadioButton,也允许放置其他控件。
xml
<?xml version="1.0" encoding="utf-8"?>
<LinearLayout xmlns:android="http://schemas.android.com/apk/res/android"
    android:layout_width="match_parent"
    android:orientation="vertical"
    android:layout_height="match_parent">

   <RadioGroup
       android:id="@+id/gender"
       android:gravity="center"
       android:layout_width="match_parent"
       android:orientation="vertical"
       android:layout_height="wrap_content">

       <RadioButton
           android:id="@+id/boy"
           android:text="男"
           android:layout_width="wrap_content"
           android:layout_height="wrap_content"/>
       <RadioButton
           android:text="女"
           android:id="@+id/girl"
           android:layout_width="wrap_content"
           android:layout_height="wrap_content"/>

   </RadioGroup>

    <TextView
        android:id="@+id/text"
        android:padding="10dp"
        android:layout_width="wrap_content"
        android:text="点击单选按钮后有不同的效果"
        android:layout_height="wrap_content"/>

</LinearLayout>
具体功能
java
import android.os.Bundle;
import android.widget.RadioGroup;
import android.widget.TextView;

import androidx.appcompat.app.AppCompatActivity;

public class MainActivity3 extends AppCompatActivity implements RadioGroup.OnCheckedChangeListener {

    private TextView textView;

    @Override
    protected void onCreate(Bundle savedInstanceState) {
        super.onCreate(savedInstanceState);
        setContentView(R.layout.activity_main3);
        RadioGroup radioGroup = findViewById(R.id.gender);
        radioGroup.setOnCheckedChangeListener(this);
        textView = findViewById(R.id.text);
    }

    @Override
    public void onCheckedChanged(RadioGroup group, int checkedId) {
        switch (checkedId){
            case R.id.boy:
                textView.setText("I\'m boy");
                break;
            case R.id.girl:
                textView.setText("I\'m girl");
        }
    }
}
单选组的用法
判断选中了哪个单选按钮,通常不是监听某个单选按钮,而是监听单选组的选中事件。
下面是RadioGroup常用的3个方法:
文本输入
编辑框EditText
编辑框EditText用于接收软键盘输入的文字,例如用户名、密码、评价内容等,它由文本视图派生而
来,除了TextView已有的各种属性和方法,EditText还支持下列XML属性。
xml
<?xml version="1.0" encoding="utf-8"?>
<LinearLayout xmlns:android="http://schemas.android.com/apk/res/android"
    android:layout_width="match_parent"
    android:orientation="vertical"
    android:padding="10dp"
    android:layout_height="match_parent">

    <TextView
        android:layout_width="wrap_content"
        android:text="下面是登录信息"
        android:textSize="16sp"
        android:layout_height="wrap_content"/>

    <EditText
        android:textColorHint="#d6d6d6"
        android:hint="请输入用户名"
        android:inputType="text"
        android:layout_width="match_parent"
        android:layout_height="wrap_content"/>

    <EditText
        android:textColorHint="#d6d6d6"
        android:hint="请输入密码"
        android:inputType="textPassword"
        android:layout_width="match_parent"
        android:layout_height="wrap_content"/>

</LinearLayout>
我们还可以对边框的形状进行修改,修改为圆角矩形
通过selector选择器,来修改对应的输入框背景即可
创建选择器
xml
<?xml version="1.0" encoding="utf-8"?>
<selector xmlns:android="http://schemas.android.com/apk/res/android">

    <!--输入框被获取焦点后-->
    <item android:state_focused="true" android:drawable="@drawable/edit_focus_shape"/>
    <item  android:drawable="@drawable/edit_focus_nor"/>

</selector>
选择器中对应的资源
edit_focus_shape
xml
<?xml version="1.0" encoding="utf-8"?>
<shape xmlns:android="http://schemas.android.com/apk/res/android">

    <!--指定形状内部的填充颜色-->
    <solid android:color="#ffffff" />

    <!--指定形状轮廓的粗细与颜色-->
    <stroke
        android:width="1dp"
        android:color="#0000ff" />

    <!--指定圆角半径-->
    <corners android:radius="5dp" />

    <padding
        android:bottom="2dp"
        android:left="2dp"
        android:right="2dp"
        android:top="2dp" />

</shape>
edit_focus_nor
xml
<?xml version="1.0" encoding="utf-8"?>
<shape xmlns:android="http://schemas.android.com/apk/res/android">

    <!--指定形状内部的填充颜色-->
    <solid android:color="#ffffff" />

    <!--指定形状轮廓的粗细与颜色-->
    <stroke
        android:width="1dp"
        android:color="#aaaaaa" />

    <!--指定圆角半径-->
    <corners android:radius="5dp" />

    <padding
        android:bottom="2dp"
        android:left="2dp"
        android:right="2dp"
        android:top="2dp" />

</shape>
在对应的输入框中进行设置
xml
<?xml version="1.0" encoding="utf-8"?>
<LinearLayout xmlns:android="http://schemas.android.com/apk/res/android"
    android:layout_width="match_parent"
    android:orientation="vertical"
    android:padding="10dp"
    android:layout_height="match_parent">

    <TextView
        android:layout_width="wrap_content"
        android:text="下面是登录信息"
        android:textSize="16sp"
        android:layout_height="wrap_content"/>

    <EditText
        android:textColorHint="#d6d6d6"
        android:hint="请输入用户名"
        android:inputType="text"
        android:layout_width="match_parent"
        android:layout_height="wrap_content"/>

    <!--让边框消失-->
    <EditText
        android:background="@drawable/input_selector"
        android:textColorHint="#d6d6d6"
        android:hint="请输入密码"
        android:inputType="textPassword"
        android:layout_width="match_parent"
        android:layout_height="wrap_content"/>

</LinearLayout>
焦点变更监听器
下面是一个当手机号小于11位时,点击密码输入框后将焦点转移回手机输入框的代码示例
xml
<?xml version="1.0" encoding="utf-8"?>
<LinearLayout xmlns:android="http://schemas.android.com/apk/res/android"
    android:layout_width="match_parent"
    android:orientation="vertical"
    android:padding="10dp"
    android:layout_height="match_parent">

    <EditText
        android:id="@+id/phone"
        android:layout_width="match_parent"
        android:hint="请输入11位手机号"
        android:layout_height="wrap_content"/>

    <EditText
        android:id="@+id/pwd"
        android:layout_width="match_parent"
        android:hint="请输入6位密码"
        android:layout_height="wrap_content"/>

    <Button
        android:layout_width="match_parent"
        android:textSize="20sp"
        android:text="登录"
        android:layout_height="wrap_content"/>

    <TextView
        android:id="@+id/tip"
        android:layout_marginTop="50dp"
        android:layout_gravity="center"
        android:layout_width="wrap_content"
        android:padding="12dp"
        android:background="#d6d8d7"
        android:text=""
        android:layout_height="wrap_content"/>

</LinearLayout>
java
import android.os.Bundle;
import android.view.View;
import android.widget.EditText;
import android.widget.RadioGroup;
import android.widget.TextView;

import androidx.appcompat.app.AppCompatActivity;

public class MainActivity3 extends AppCompatActivity implements View.OnFocusChangeListener {

    private EditText editTextPhone;
    private EditText editTextPwd;
    private TextView textView;

    @Override
    protected void onCreate(Bundle savedInstanceState) {
        super.onCreate(savedInstanceState);
        setContentView(R.layout.activity_main3);
        editTextPhone = findViewById(R.id.phone);
        editTextPwd = findViewById(R.id.pwd);
        textView = findViewById(R.id.tip);
        editTextPhone.setOnFocusChangeListener(this);
        editTextPwd.setOnFocusChangeListener(this);
    }


    @Override
    public void onFocusChange(View v, boolean hasFocus) {
        switch (v.getId()){
            case R.id.pwd:
                if (editTextPhone.getText().length() < 11){
                    // 如果长度小于11
                    textView.setText("手机号不允许小于11位");
                    // 让手机输入框获得焦点
                    editTextPhone.requestFocus();
                }
                break;
        }
    }
}
文本变化监听器
判断手机号输入满11位后自动关闭软键盘,或者密码输入满6位后自动关闭软键盘,此时要注册文本变化监听器。
达到指定位数便自动关闭键盘的功能,可以再分解为两个独立的功能点
xml
<?xml version="1.0" encoding="utf-8"?>
<LinearLayout xmlns:android="http://schemas.android.com/apk/res/android"
    android:layout_width="match_parent"
    android:orientation="vertical"
    android:padding="10dp"
    android:layout_height="match_parent">

    <EditText
        android:id="@+id/phone"
        android:layout_width="match_parent"
        android:hint="输入11位自动隐藏输入法"
        android:maxLength="11"
        android:layout_height="wrap_content"/>

    <EditText
        android:id="@+id/pwd"
        android:maxLength="6"
        android:layout_width="match_parent"
        android:hint="输入6位自动隐藏输入法"
        android:layout_height="wrap_content"/>

    <Button
        android:layout_width="match_parent"
        android:textSize="20sp"
        android:text="登录"
        android:layout_height="wrap_content"/>

    <TextView
        android:id="@+id/tip"
        android:layout_marginTop="50dp"
        android:layout_gravity="center"
        android:layout_width="wrap_content"
        android:padding="12dp"
        android:background="#d6d8d7"
        android:text=""
        android:layout_height="wrap_content"/>

</LinearLayout>
功能实现
java
import android.os.Bundle;
import android.text.Editable;
import android.text.TextWatcher;
import android.view.View;
import android.widget.EditText;
import android.widget.RadioGroup;
import android.widget.TextView;

import androidx.appcompat.app.AppCompatActivity;

public class MainActivity3 extends AppCompatActivity {

    private EditText editTextPhone;
    private EditText editTextPwd;
    private TextView textView;

    @Override
    protected void onCreate(Bundle savedInstanceState) {
        super.onCreate(savedInstanceState);
        setContentView(R.layout.activity_main3);
        editTextPhone = findViewById(R.id.phone);
        editTextPwd = findViewById(R.id.pwd);
        textView = findViewById(R.id.tip);
        editTextPhone.addTextChangedListener(new HideTextWatcher(editTextPhone,11));
        editTextPwd.addTextChangedListener(new HideTextWatcher(editTextPwd,6));
    }

    // 定义一个编辑框监听器,在输入文本达到指定长度时自动隐藏输入法
    private class HideTextWatcher implements TextWatcher {
        // 声明一个编辑框对象
        private EditText editText;
        // 声明一个最大长度变量;
        private int mMaxLength;

        public HideTextWatcher(EditText editTextPhone, int maxLength) {
            editText = editTextPhone;
            mMaxLength = maxLength;
        }

        @Override
        public void beforeTextChanged(CharSequence s, int start, int count, int after) {

        }

        @Override
        public void onTextChanged(CharSequence s, int start, int before, int count) {

        }

        @Override
        public void afterTextChanged(Editable s) {
            // 获取已输入的文本字符串
            String strLen = s.toString();
            // 到达最大长度时
            if (strLen.length() == mMaxLength){
                // 隐藏输入法软键盘
                ViewUtil.hideOnInputMethod(MainActivity3.this,editText);
            }
        }
    }
}
关闭软键盘的工具类
java
import android.app.Activity;
import android.content.Context;
import android.view.View;
import android.view.inputmethod.InputMethodManager;

public class ViewUtil {

    public static void hideOnInputMethod(Activity activity, View view) {
        // 从系统服务中获取输入法管理器
        InputMethodManager systemService = (InputMethodManager) activity.getSystemService(Context.INPUT_METHOD_SERVICE);
        // 关闭屏幕上的输入法软键盘
        systemService.hideSoftInputFromWindow(view.getWindowToken(),0);
    }

}
对话框
提醒对话框AlertDialog
使用方法
xml
<?xml version="1.0" encoding="utf-8"?>
<androidx.constraintlayout.widget.ConstraintLayout xmlns:android="http://schemas.android.com/apk/res/android"
    xmlns:app="http://schemas.android.com/apk/res-auto"
    xmlns:tools="http://schemas.android.com/tools"
    android:layout_width="match_parent"
    android:layout_height="match_parent"
    tools:context=".MainActivity4">


    <Button
        android:id="@+id/button"
        android:layout_width="wrap_content"
        android:layout_height="wrap_content"
        android:text="弹出提醒对话框"
        app:layout_constraintBottom_toBottomOf="parent"
        app:layout_constraintEnd_toEndOf="parent"
        app:layout_constraintHorizontal_bias="0.498"
        app:layout_constraintStart_toStartOf="parent"
        app:layout_constraintTop_toTopOf="parent"
        app:layout_constraintVertical_bias="0.221" />

    <TextView
        android:id="@+id/textView"
        android:layout_width="wrap_content"
        android:layout_height="wrap_content"
        android:textSize="20sp"
        android:text=""
        app:layout_constraintBottom_toBottomOf="parent"
        app:layout_constraintEnd_toEndOf="parent"
        app:layout_constraintHorizontal_bias="0.498"
        app:layout_constraintStart_toStartOf="parent"
        app:layout_constraintTop_toBottomOf="@+id/button"
        app:layout_constraintVertical_bias="0.135" />
</androidx.constraintlayout.widget.ConstraintLayout>
功能代码
java
import androidx.appcompat.app.AlertDialog;
import androidx.appcompat.app.AppCompatActivity;

import android.content.DialogInterface;
import android.os.Bundle;
import android.view.View;
import android.widget.Button;
import android.widget.TextView;

public class MainActivity4 extends AppCompatActivity implements View.OnClickListener {

    private Button button;
    private TextView textView;

    @Override
    protected void onCreate(Bundle savedInstanceState) {
        super.onCreate(savedInstanceState);
        setContentView(R.layout.activity_main4);
        button = findViewById(R.id.button);
        textView = findViewById(R.id.textView);
        button.setOnClickListener(this);
    }

    @Override
    public void onClick(View v) {
        // 创建提醒对话框的建造器
        AlertDialog.Builder builder = new AlertDialog.Builder(this);
        // 设置对话框的标题文本
        builder.setTitle("尊敬的用户");
        // 设置对话框的内容文本
        builder.setMessage("你真的要卸载我吗?");
        // 设置对话框的肯定按钮文本及其点击监听器
        builder.setPositiveButton("残忍卸载", (dialog, which) -> {
            textView.setText("good bye");
        });
        // 设置对话框的否定按钮文本及其监听器
        builder.setNegativeButton("我再想想", (dialog, which) -> {
            textView.setText("hello,i go");
        });
        // 根据构建器构建提醒对话框
        AlertDialog alertDialog = builder.create();
        alertDialog.show();
    }
}
日期对话框DatePickerDialog
xml
<?xml version="1.0" encoding="utf-8"?>
<androidx.constraintlayout.widget.ConstraintLayout xmlns:android="http://schemas.android.com/apk/res/android"
    xmlns:app="http://schemas.android.com/apk/res-auto"
    xmlns:tools="http://schemas.android.com/tools"

    android:layout_width="match_parent"
    android:layout_height="match_parent"
    tools:context=".MainActivity4">

    <!--android:datePickerMode="spinner"此处可以选择对应的日历类型
    android:calendarViewShown="false关闭后是隐藏旁边的日历
    -->
    <DatePicker

        android:id="@+id/datePicker"
        android:layout_width="match_parent"
        android:layout_height="wrap_content"
        android:calendarViewShown="false"
        android:datePickerMode="spinner"
        app:layout_constraintBottom_toBottomOf="parent"
        app:layout_constraintEnd_toEndOf="parent"
        app:layout_constraintHorizontal_bias="0.0"
        app:layout_constraintStart_toStartOf="parent"
        app:layout_constraintTop_toTopOf="parent"
        app:layout_constraintVertical_bias="0.001" />

    <!--显示日期-->
    <Button
        android:id="@+id/confirm_button_setDate"
        android:layout_width="match_parent"
        android:layout_height="wrap_content"
        android:layout_marginTop="12dp"
        android:text="选择日期"
        app:layout_constraintBottom_toBottomOf="parent"
        app:layout_constraintEnd_toEndOf="parent"
        app:layout_constraintHorizontal_bias="0.0"
        app:layout_constraintStart_toStartOf="parent"
        app:layout_constraintTop_toBottomOf="@+id/datePicker"
        app:layout_constraintVertical_bias="0.043" />

    <Button
        android:id="@+id/confirm_button"
        android:layout_width="match_parent"
        android:layout_height="wrap_content"
        android:layout_marginTop="12dp"
        android:text="确定"
        app:layout_constraintBottom_toBottomOf="parent"
        app:layout_constraintEnd_toEndOf="parent"
        app:layout_constraintHorizontal_bias="0.0"
        app:layout_constraintStart_toStartOf="parent"
        app:layout_constraintTop_toBottomOf="@+id/datePicker"
        app:layout_constraintVertical_bias="0.464" />

    <TextView
        android:textSize="20sp"
        android:id="@+id/tv_date"
        android:text="测试"
        android:gravity="center"
        android:layout_width="match_parent"
        android:layout_height="wrap_content"
        app:layout_constraintBottom_toBottomOf="parent"
        app:layout_constraintEnd_toEndOf="parent"
        app:layout_constraintHorizontal_bias="0.0"
        app:layout_constraintStart_toStartOf="parent"
        app:layout_constraintTop_toTopOf="@+id/confirm_button"
        app:layout_constraintVertical_bias="0.395" />

</androidx.constraintlayout.widget.ConstraintLayout>
功能代码
java
import android.app.DatePickerDialog;
import android.os.Bundle;
import android.view.View;
import android.widget.Button;
import android.widget.DatePicker;
import android.widget.TextView;
import androidx.appcompat.app.AppCompatActivity;


public class MainActivity4 extends AppCompatActivity implements View.OnClickListener, DatePickerDialog.OnDateSetListener {


    private TextView textView;
    private Button button1;
    private DatePicker datePicker;
    private Button button2;

    @Override
    protected void onCreate(Bundle savedInstanceState) {
        super.onCreate(savedInstanceState);
        setContentView(R.layout.activity_main4);
        button1 = findViewById(R.id.confirm_button);
        button2 = findViewById(R.id.confirm_button_setDate);
        textView = findViewById(R.id.tv_date);
        datePicker = findViewById(R.id.datePicker);
        button1.setOnClickListener(this);
        button2.setOnClickListener(this);
    }

    @Override
    public void onClick(View v) {
        // 获取对应的年月日,并显示到页面上
        int year = datePicker.getYear();
        // 这里的month是从0开始的,所以此处+1
        int month = datePicker.getMonth() + 1;
        int dayOfMonth = datePicker.getDayOfMonth();
        switch (v.getId()){
            case R.id.confirm_button:
                System.out.println("6666666666666666666666666666666666666666666666");
                textView.setText(String.format("%s年%s月%s日",year,month,dayOfMonth));
                break;
            case R.id.confirm_button_setDate:
                // 获取日历的一个实例,里面包含了当前的年月日
                /*Calendar calendar = Calendar.getInstance();
                calendar.get(Calendar.YEAR);
                calendar.get(Calendar.MONTH);
                calendar.get(Calendar.DAY_OF_MONTH);*/
                DatePickerDialog dialog = new DatePickerDialog(this, this, 2090, 5, 12);
                // 显示日期对话框
                dialog.show();
                break;
        }

    }

    @Override
    public void onDateSet(DatePicker view, int year, int month, int dayOfMonth) {
        textView.setText(String.format("%s年%s月%s日",year,month,dayOfMonth));
    }
}
时间对话框TimePickerDialog
xml
<?xml version="1.0" encoding="utf-8"?>
<androidx.constraintlayout.widget.ConstraintLayout xmlns:android="http://schemas.android.com/apk/res/android"
    xmlns:app="http://schemas.android.com/apk/res-auto"
    xmlns:tools="http://schemas.android.com/tools"

    android:layout_width="match_parent"
    android:layout_height="match_parent"
    tools:context=".MainActivity4">

    <!--android:timePickerMode="spinner"此处可以选择对应的日期类型
    android:calendarViewShown="false关闭后是隐藏旁边的日历
    -->
    <TimePicker
        android:id="@+id/time_picker"
        android:timePickerMode="spinner"
        android:layout_width="match_parent"
        android:layout_height="wrap_content"
        app:layout_constraintBottom_toBottomOf="parent"
        app:layout_constraintEnd_toEndOf="parent"
        app:layout_constraintHorizontal_bias="0.0"
        app:layout_constraintStart_toStartOf="parent"
        app:layout_constraintTop_toTopOf="parent"
        app:layout_constraintVertical_bias="0.001" />

    <Button
        android:id="@+id/confirm_button"
        android:layout_width="match_parent"
        android:layout_height="wrap_content"
        android:layout_marginTop="12dp"
        android:text="确定"
        app:layout_constraintBottom_toBottomOf="parent"
        app:layout_constraintEnd_toEndOf="parent"
        app:layout_constraintHorizontal_bias="0.0"
        app:layout_constraintStart_toStartOf="parent"
        app:layout_constraintTop_toBottomOf="@+id/time_picker"
        app:layout_constraintVertical_bias="0.137" />

    <TextView
        android:id="@+id/tv_time"
        android:layout_width="match_parent"
        android:layout_height="wrap_content"
        android:layout_marginTop="228dp"
        android:gravity="center"
        android:text="测试"
        android:textSize="20sp"
        app:layout_constraintBottom_toBottomOf="parent"
        app:layout_constraintEnd_toEndOf="parent"
        app:layout_constraintHorizontal_bias="0.0"
        app:layout_constraintStart_toStartOf="parent"
        app:layout_constraintTop_toBottomOf="@+id/time_picker"
        app:layout_constraintVertical_bias="0.0" />

</androidx.constraintlayout.widget.ConstraintLayout>
java
import android.app.DatePickerDialog;
import android.app.TimePickerDialog;
import android.os.Build;
import android.os.Bundle;
import android.view.View;
import android.widget.Button;
import android.widget.DatePicker;
import android.widget.TextView;
import android.widget.TimePicker;

import androidx.appcompat.app.AppCompatActivity;

import java.util.Calendar;


public class MainActivity4 extends AppCompatActivity implements View.OnClickListener, TimePickerDialog.OnTimeSetListener {


    private TextView textView;
    private Button button1;
    private TimePicker timePicker;

    @Override
    protected void onCreate(Bundle savedInstanceState) {
        super.onCreate(savedInstanceState);
        setContentView(R.layout.activity_main4);
        button1 = findViewById(R.id.confirm_button);
        textView = findViewById(R.id.tv_time);
        timePicker = findViewById(R.id.time_picker);
        button1.setOnClickListener(this);
        // 设置为 24小时制
        timePicker.setIs24HourView(true);
    }

    @Override
    public void onClick(View v) {
        switch (v.getId()){
            case R.id.confirm_button:
                // 获取日历的一个实例,里面包含了当前的时分秒
                Calendar calendar = Calendar.getInstance();
                // 构建一个时间对话框,该对话框已经集成了时间选择器.
                // TimePickerDialog的第二个构造参数指定了时间监听器
                TimePickerDialog timePickerDialog = new TimePickerDialog(this,
                        this,
                        calendar.get(Calendar.HOUR_OF_DAY),     // 小时
                        calendar.get(Calendar.MINUTE),  // 分钟
                        true);  // true表示显示24小时制,false12小时制
                timePickerDialog.show();    // 显示时间对话框
                break;
        }
    }

    @Override
    public void onTimeSet(TimePicker view, int hourOfDay, int minute) {
        // 获取时间输入框设定的小时和分钟
        textView.setText(String.format("currentTime is %d 时 %d 分",hourOfDay,minute));
    }
}
案例:找回密码
登录页面一般有两种方式:
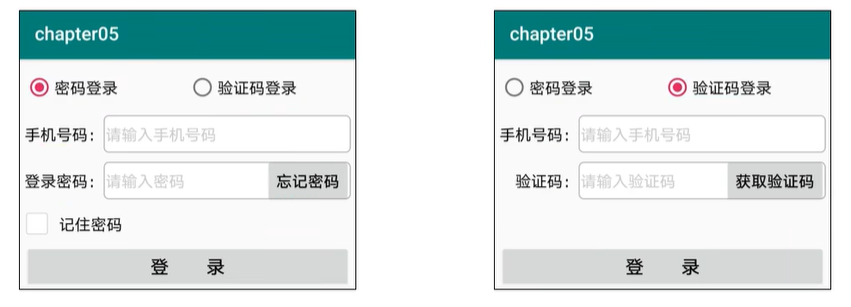
点击忘记密码后,会跳转到忘记密码对应的页面,在该页面输入和确认新密码,并校验找回密码的合法性(通过短信验证码检查)
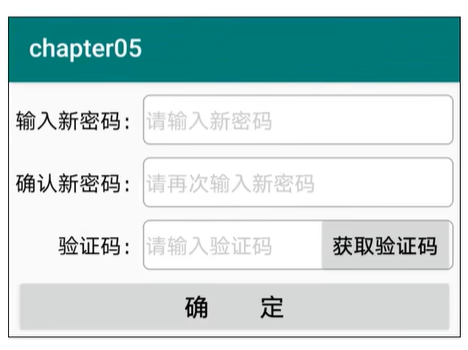
登录页面
xml
<?xml version="1.0" encoding="utf-8"?>
<LinearLayout xmlns:android="http://schemas.android.com/apk/res/android"
    android:layout_width="match_parent"
    android:orientation="vertical"
    android:padding="10dp"
    android:layout_height="match_parent">

    <RadioGroup
        android:layout_width="match_parent"
        android:orientation="horizontal"
        android:layout_height="wrap_content">
        <RadioButton
            android:id="@+id/pwd_login"
            android:layout_width="0dp"
            android:layout_weight="1"
            android:checked="true"
            android:text="密码登录"
            android:layout_height="wrap_content"/>
        <RadioButton
            android:id="@+id/vertical_login"
            android:layout_width="0dp"
            android:layout_weight="1"
            android:text="验证码登录"
            android:layout_height="wrap_content"/>
    </RadioGroup>

    <LinearLayout
        android:layout_width="match_parent"
        android:orientation="vertical"
        android:layout_height="wrap_content">
        <LinearLayout
            android:layout_width="match_parent"
            android:layout_height="wrap_content">
            <TextView
                android:layout_width="wrap_content"
                android:text="手机号码:"
                android:textSize="18sp"
                android:layout_height="wrap_content"/>
            <EditText
                android:maxLength="11"
                android:id="@+id/et_phone"
                android:layout_width="match_parent"
                android:hint="请输入手机号码"
                android:textSize="18sp"
                android:background="@drawable/input_selector"
                android:layout_height="wrap_content"/>
        </LinearLayout>
        <LinearLayout
            android:layout_width="match_parent"
            android:orientation="horizontal"
            android:layout_height="wrap_content">
            <TextView
                android:id="@+id/tx_pwd"
                android:layout_width="wrap_content"
                android:text="登录密码:"
                android:textSize="18sp"
                android:layout_height="wrap_content"/>
            <EditText
                android:maxLength="6"
                android:id="@+id/pwd_vertical_code"
                android:layout_width="0dp"
                android:layout_weight="1"
                android:hint="请输入密码"
                android:textSize="18sp"
                android:background="@drawable/input_selector"
                android:layout_height="wrap_content"/>
            <Button
                android:id="@+id/get_vertical"
                android:layout_width="wrap_content"
                android:text="忘记密码"
                android:layout_height="wrap_content"/>
        </LinearLayout>
    </LinearLayout>

    <!--android:visibility="invisible"隐藏元素,但位置依然保留-->
    <!--android:visibility="gone"隐藏元素,但位置不保留-->
    <!--android:visibility="visible"显示元素-->
    <CheckBox
        android:id="@+id/remember_pwd"
        android:layout_width="wrap_content"
        android:visibility="invisible"
        android:text="记住密码"
        android:layout_height="wrap_content"/>

    <Button
        android:id="@+id/vertical_code_test"
        android:layout_width="match_parent"
        android:text="登录"
        android:layout_height="wrap_content"/>

</LinearLayout>
登录页面代码逻辑
java
import androidx.activity.result.ActivityResult;
import androidx.activity.result.ActivityResultCallback;
import androidx.activity.result.ActivityResultLauncher;
import androidx.activity.result.contract.ActivityResultContracts;
import androidx.appcompat.app.AlertDialog;
import androidx.appcompat.app.AppCompatActivity;

import android.app.Activity;
import android.content.Intent;
import android.os.Bundle;
import android.text.Editable;
import android.text.TextWatcher;
import android.view.View;
import android.widget.Button;
import android.widget.CheckBox;
import android.widget.EditText;
import android.widget.RadioButton;
import android.widget.TextView;
import android.widget.Toast;

import java.util.Random;

public class Login extends AppCompatActivity implements View.OnClickListener {

    private RadioButton pwd_button;
    private RadioButton vertical_button;
    private TextView textView_pwd;
    private Button get_vertical;
    private EditText editText_pwd;
    private CheckBox checkBox;
    private EditText editText;

    private ActivityResultLauncher<Intent> register;
    private Button vertical_code_test;
    private String verifyCode;

    @Override
    protected void onCreate(Bundle savedInstanceState) {
        super.onCreate(savedInstanceState);
        setContentView(R.layout.activity_login);
        // 密码登录按钮
        pwd_button = findViewById(R.id.pwd_login);
        // 验证码登录按钮
        vertical_button = findViewById(R.id.vertical_login);
        // 登录密码or验证码
        textView_pwd = findViewById(R.id.tx_pwd);
        // 登录密码or验证码:输入框
        editText_pwd = findViewById(R.id.pwd_vertical_code);
        // 对验证码做校验的按钮
        vertical_code_test = findViewById(R.id.vertical_code_test);
        // 按钮
        get_vertical = findViewById(R.id.get_vertical);
        // 记住密码按钮
        checkBox = findViewById(R.id.remember_pwd);
        pwd_button.setOnClickListener(this);
        vertical_button.setOnClickListener(this);
        get_vertical.setOnClickListener(this);
        editText = findViewById(R.id.et_phone);
        editText.addTextChangedListener(new HideTextWatcher(editText,11));
        editText_pwd.addTextChangedListener(new HideTextWatcher(editText_pwd,6));
        vertical_code_test.setOnClickListener(this);
        register = registerForActivityResult(new ActivityResultContracts.StartActivityForResult(), new ActivityResultCallback<ActivityResult>() {
            @Override
            public void onActivityResult(ActivityResult result) {
                // 回传参数,在此处接收上一个页面的返回结果
                Intent data = result.getData();
                if (data != null && result.getResultCode() == Activity.RESULT_OK){
                    String new_pwd = data.getStringExtra("new_pwd");
                    AlertDialog.Builder builder = new AlertDialog.Builder(Login.this);
                    builder.setTitle("密码");
                    builder.setMessage("密码是" + new_pwd);
                    builder.setPositiveButton("知道了",null);
                }
            }
        });
    }

    @Override
    public void onClick(View v) {
        switch (v.getId()){
            case R.id.pwd_login:
                // 设置为被选中
                pwd_button.setChecked(true);
                textView_pwd.setText("登录密码");
                editText_pwd.setHint("请输入密码");
                get_vertical.setText("忘记密码");
                // 显示记住密码多选框
                checkBox.setVisibility(View.VISIBLE);
                break;
            case R.id.vertical_login:
                // 设置为被选中
                vertical_button.setChecked(true);
                textView_pwd.setText("手机号码");
                editText_pwd.setHint("请输入验证码");
                get_vertical.setText("获取验证码");
                // 显示记住密码多选框
                checkBox.setVisibility(View.GONE);
                break;
            case R.id.get_vertical:
                String phone = editText.getText().toString();
                if (phone.length() < 11){
                    // 密码小于11位,弹出提示
                    Toast.makeText(this,"请输入正确的手机号",Toast.LENGTH_SHORT);
                    return;
                }
                // 如果被选中的是这个
                if (pwd_button.isChecked()){
                    // 忘记密码时页面跳转,携带手机号码到找回密码的页面
                    Intent intent = new Intent(this,ForgetPwd.class);
                    intent.putExtra("phone",phone);
                    // 进行忘记密码的回传
                    // 将参数进行传递
                    register.launch(intent);
                } else if (vertical_button.isChecked()) {
                    // 生成6位随机的验证码(全局验证码)
                    verifyCode = String.format("0%6d",new Random().nextInt(999999));
                    // 弹出提醒的对话框
                    AlertDialog.Builder builder = new AlertDialog.Builder(this);
                    builder.setTitle("请记住验证码");
                    builder.setMessage("手机"+ phone + ",本次验证码为" + verifyCode);
                    // 给出好的后,不需要返回任何操作
                    builder.setPositiveButton("好的",null);
                    AlertDialog alertDialog = builder.create();
                    alertDialog.show();
                }
                break;
            case R.id.vertical_code_test:
                if (vertical_button.isChecked()){
                    // 验证码登录被选中时
                    if (verifyCode.equals(editText_pwd)){
                        Toast.makeText(this,"login success",Toast.LENGTH_SHORT);
                    }else Toast.makeText(this,"验证码错误",Toast.LENGTH_SHORT);
                }
        }
    }

    private class HideTextWatcher implements TextWatcher {
        private EditText mView;
        private int mLength;
        public HideTextWatcher(EditText et, int maxLength) {
            this.mView = et;
            this.mLength = maxLength;
        }

        @Override
        public void beforeTextChanged(CharSequence s, int start, int count, int after) {

        }

        @Override
        public void onTextChanged(CharSequence s, int start, int before, int count) {

        }

        @Override
        public void afterTextChanged(Editable s) {
            if (s.toString().length() == mLength){
                ViewUtil.hideOnInputMethod(Login.this,mView);
            }
        }
    }
}
忘记密码页面
xml
<?xml version="1.0" encoding="utf-8"?>
<LinearLayout xmlns:android="http://schemas.android.com/apk/res/android"
    android:layout_width="match_parent"
    android:orientation="vertical"
    android:padding="10dp"
    android:layout_height="match_parent">

    <LinearLayout
        android:layout_width="match_parent"
        android:orientation="horizontal"
        android:layout_height="wrap_content">
        <TextView
            android:layout_width="wrap_content"
            android:textColor="@color/black"
            android:textSize="17sp"
            android:text="输入新密码:"
            android:layout_height="wrap_content"/>
        <EditText
            android:id="@+id/new_pwd"
            android:layout_width="0dp"
            android:layout_weight="1"
            android:hint="请输入新密码"
            android:layout_height="wrap_content"/>
    </LinearLayout>

    <LinearLayout
        android:layout_width="match_parent"
        android:orientation="horizontal"
        android:layout_height="wrap_content">
        <TextView
            android:layout_width="wrap_content"
            android:textColor="@color/black"
            android:textSize="17sp"
            android:text="确认新密码:"
            android:layout_height="wrap_content"/>
        <EditText
            android:id="@+id/confirm_new_pwd"
            android:layout_width="0dp"
            android:layout_weight="1"
            android:hint="请再次输入新密码"
            android:layout_height="wrap_content"/>
    </LinearLayout>
    <LinearLayout
        android:layout_width="match_parent"
        android:orientation="horizontal"
        android:layout_height="wrap_content">
        <TextView
            android:layout_width="wrap_content"
            android:textColor="@color/black"
            android:textSize="17sp"
            android:text="验证码:"
            android:layout_height="wrap_content"/>
        <EditText
            android:id="@+id/vertical_code_forget"
            android:layout_width="0dp"
            android:layout_weight="1"
            android:hint="请输入验证码"
            android:layout_height="wrap_content"/>
        <Button
            android:id="@+id/get_vertical_code"
            android:layout_width="wrap_content"
            android:text="获取验证码"
            android:layout_height="wrap_content"/>
    </LinearLayout>

    <Button
        android:id="@+id/pwd_confirm"
        android:text="确定"
        android:layout_width="match_parent"
        android:layout_height="wrap_content"/>

</LinearLayout>
忘记密码相关逻辑
java
import androidx.appcompat.app.AlertDialog;
import androidx.appcompat.app.AppCompatActivity;

import android.app.Activity;
import android.content.Intent;
import android.os.Bundle;
import android.view.View;
import android.widget.Button;
import android.widget.EditText;
import android.widget.Toast;

import java.util.Random;

public class ForgetPwd extends AppCompatActivity implements View.OnClickListener {

    private String mPhone;
    private Button button;
    private EditText confirm_new_pwd;
    private EditText new_pwd;
    private String verticalCode;
    private EditText vertical_code_forget;

    @Override
    protected void onCreate(Bundle savedInstanceState) {
        super.onCreate(savedInstanceState);
        setContentView(R.layout.activity_forget_pwd);
        button = findViewById(R.id.pwd_confirm);
        confirm_new_pwd = findViewById(R.id.confirm_new_pwd);
        new_pwd = findViewById(R.id.new_pwd);
        vertical_code_forget = findViewById(R.id.vertical_code_forget);
        button.setOnClickListener(this);
        mPhone = getIntent().getStringExtra("phone");
        Button get_vertical_code = findViewById(R.id.get_vertical_code);
        get_vertical_code.setOnClickListener(this);
    }

    @Override
    public void onClick(View v) {
        switch (v.getId()){
            case R.id.get_vertical_code:
                // 生成随机六位数的验证码
                verticalCode = String.format("0%6d", new Random().nextInt(999999));
                // 弹出提示框提示验证码
                AlertDialog.Builder builder = new AlertDialog.Builder(this);
                builder.setTitle("验证码");
                builder.setMessage("验证码为" + verticalCode);
                builder.setPositiveButton("知道了",null);
                break;
            case R.id.pwd_confirm:
                // 验证新密码与确认密码是否等长
                if (!new_pwd.getText().toString().equals(confirm_new_pwd.getText().toString())){
                    Toast.makeText(this,"密码与确认密码不一致",Toast.LENGTH_SHORT);
                    return;
                }

                // 验证码是否正确
                if (!verticalCode.equals(vertical_code_forget.getText().toString())){
                    Toast.makeText(this,"验证码不正确",Toast.LENGTH_SHORT);
                    return;
                }

                Toast.makeText(this,"密码修改成功",Toast.LENGTH_SHORT);
                // 将修改好的密码返回给上一个页面
                Intent intent = new Intent();
                intent.putExtra("new_pwd",new_pwd.getText().toString());
                setResult(Activity.RESULT_OK,intent);
                finish();
                break;
        }
    }
}
输入框背景
xml
<?xml version="1.0" encoding="utf-8"?>
<shape xmlns:android="http://schemas.android.com/apk/res/android">

    <!--指定形状内的颜色-->
    <solid android:color="#FFFDFD"/>
    <!--指定轮廓粗细和颜色-->
    <stroke android:width="1dp" android:color="#aaaaaa"/>
    <!--指定圆角半径-->
    <corners android:radius="10dp" />

</shape>
数据存储
共享参数SharedPreferences
共享参数主要适用于如下场合:
实际开发中,共享参数经常存储的数据有App的个性化配置信息、用户使用App的行为信息、临时需要保存的片段信息等
用法:
xml
<?xml version="1.0" encoding="utf-8"?>
<LinearLayout xmlns:android="http://schemas.android.com/apk/res/android"
    android:layout_width="match_parent"
    android:orientation="vertical"
    android:padding="10dp"
    android:layout_height="match_parent">

    <LinearLayout
        android:layout_marginBottom="10dp"
        android:layout_width="match_parent"
        android:orientation="horizontal"
        android:layout_height="wrap_content">
        <TextView
            android:layout_width="wrap_content"
            android:text="姓名:"
            android:textSize="18sp"
            android:layout_height="wrap_content"/>
        <EditText
            android:id="@+id/name"
            android:layout_width="0dp"
            android:layout_weight="1"
            android:background="@drawable/input_shape"
            android:hint="请输入姓名"
            android:layout_height="wrap_content"/>
    </LinearLayout>

    <LinearLayout
        android:layout_width="match_parent"
        android:orientation="horizontal"
        android:layout_height="wrap_content">
        <TextView
            android:layout_width="wrap_content"
            android:text="年龄:"
            android:textSize="18sp"
            android:layout_height="wrap_content"/>
        <EditText
            android:id="@+id/age"
            android:background="@drawable/input_shape"
            android:layout_width="0dp"
            android:layout_weight="1"
            android:hint="请输入年龄"
            android:layout_height="wrap_content"/>
    </LinearLayout>

    <CheckBox
        android:id="@+id/marry"
        android:layout_width="wrap_content"
        android:text="已婚"
        android:layout_height="wrap_content"/>

    <Button
        android:id="@+id/save_share"
        android:layout_width="match_parent"
        android:text="保存到共享参数"
        android:layout_height="wrap_content"/>

    <TextView
        android:layout_width="wrap_content"
        android:id="@+id/show_nameAndAge"
        android:layout_height="wrap_content"/>

</LinearLayout>
java
import androidx.appcompat.app.AppCompatActivity;

import android.content.Context;
import android.content.SharedPreferences;
import android.os.Bundle;
import android.view.View;
import android.widget.Button;
import android.widget.CheckBox;
import android.widget.EditText;
import android.widget.TextView;

public class MainActivity extends AppCompatActivity implements View.OnClickListener {

    private EditText age;
    private EditText name;
    private CheckBox marry;
    private Button save_share;
    private SharedPreferences config;
    private TextView show_nameAndAge;

    @Override
    protected void onCreate(Bundle savedInstanceState) {
        super.onCreate(savedInstanceState);
        setContentView(R.layout.activity_main);
        age = findViewById(R.id.age);
        name = findViewById(R.id.name);
        marry = findViewById(R.id.marry);
        save_share = findViewById(R.id.save_share);
        save_share.setOnClickListener(this);

        config = getSharedPreferences("config", Context.MODE_PRIVATE);

        show_nameAndAge = findViewById(R.id.show_nameAndAge);

        // 当应用结束后可以从缓存中再次读出
        reload();

    }

    private void reload() {
        // 第二个参数是默认值
        String names = config.getString("name", "");
        int ages = config.getInt("age", 0);
        if (!names.equals("") && ages != 0){
            show_nameAndAge.setText("name is " + names + "age is " + ages);
        }
    }

    @Override
    public void onClick(View v) {
        String age = this.age.getText().toString();
        String name = this.name.getText().toString();
        SharedPreferences.Editor edit = config.edit();
        edit.putString("name",name);
        edit.putInt("age", Integer.parseInt(age));
        edit.putBoolean("is_marry",marry.isChecked());
        // commit是同步的,apply是异步的
        edit.commit();
    }
}
存储卡的文件操作
私有存储空间与公共存储空间
Android把外部存储分成了两块区域,一块是所有应用均可访问的公共空间,另一块是只有应用自己才可访问的私有空间。
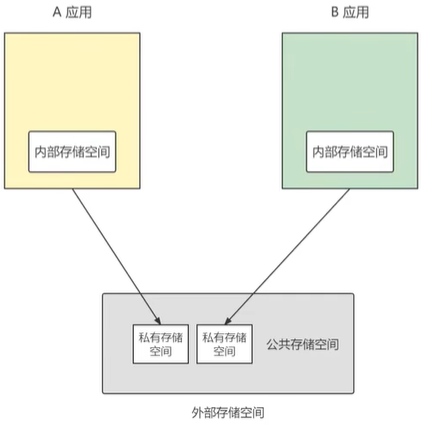
如果运行后没有显示,可能是没有权限的问题,访问不到的同学,新增一个Android 12(API31)的虚拟手机,在里面运行项目就能看到了
具体示例代码如下:
xml
<?xml version="1.0" encoding="utf-8"?>
<LinearLayout xmlns:android="http://schemas.android.com/apk/res/android"
    android:layout_width="match_parent"
    android:orientation="vertical"
    android:padding="10dp"
    android:layout_height="match_parent">

    <LinearLayout
        android:orientation="horizontal"
        android:layout_width="match_parent"
        android:layout_height="wrap_content">
        <TextView
            android:layout_width="wrap_content"
            android:textSize="18sp"
            android:text="姓名:"
            android:layout_height="wrap_content"/>
        <EditText
            android:id="@+id/input_name"
            android:paddingLeft="5dp"
            android:background="@drawable/input_background"
            android:layout_width="0dp"
            android:layout_weight="1"
            android:hint="请输入姓名"
            android:layout_height="wrap_content"/>

    </LinearLayout>

    <Button
        android:id="@+id/read_content"
        android:layout_width="match_parent"
        android:text="读取"
        android:layout_height="wrap_content"/>

    <Button
        android:id="@+id/write_content"
        android:layout_width="match_parent"
        android:text="写入"
        android:layout_height="wrap_content"/>

    <TextView
        android:id="@+id/show_content"
        android:textSize="20sp"
        android:layout_gravity="center"
        android:layout_width="wrap_content"
        android:text="展示"
        android:layout_height="wrap_content"/>

</LinearLayout>
java
import androidx.appcompat.app.AppCompatActivity;

import android.os.Bundle;
import android.os.Environment;
import android.util.Log;
import android.view.View;
import android.widget.Button;
import android.widget.EditText;
import android.widget.TextView;
import android.widget.Toast;

import java.io.File;

public class MainActivity5 extends AppCompatActivity implements View.OnClickListener {

    private EditText input_name;
    private Button write_content;
    private Button read_content;
    private TextView show_content;

    private String path;

    @Override
    protected void onCreate(Bundle savedInstanceState) {
        super.onCreate(savedInstanceState);
        setContentView(R.layout.activity_main5);
        input_name = findViewById(R.id.input_name);
        read_content = findViewById(R.id.read_content);
        write_content = findViewById(R.id.write_content);
        show_content = findViewById(R.id.show_content);
        read_content.setOnClickListener(this);
        write_content.setOnClickListener(this);
    }

    @Override
    public void onClick(View v) {
        switch (v.getId()){
            case R.id.read_content:
                String name = input_name.getText().toString();

                String directory = null;
                // 外部存储的私有空间
                directory = getExternalFilesDir(Environment.DIRECTORY_DOWNLOADS).toString();
                String fileName = System.currentTimeMillis() + ".txt";
                path = directory + File.separatorChar + fileName;
                Log.d("ning",path);
                FileUtil.saveText(path,name);
                Toast.makeText(this,"保存成功",Toast.LENGTH_SHORT);
                break;
            case R.id.write_content:
                String content = FileUtil.openText(path);
                show_content.setText(content);
                break;
        }
    }
}
文件读写工具类
java
import java.io.BufferedReader;
import java.io.BufferedWriter;
import java.io.FileReader;
import java.io.FileWriter;
import java.io.IOException;

public class FileUtil {

    // 把字符串保存到指定路径的文本文件
    public static void saveText(String path,String txt){
        BufferedWriter os = null;
        try {
            os = new BufferedWriter(new FileWriter(path));
        } catch (IOException e) {
            e.printStackTrace();
        }
        finally {
            try {
                if (os != null) {
                    os.close();
                }
            } catch (IOException e) {
                e.printStackTrace();
            }
        }

    }

    // 从指定路径的文本文件中读取内容字符串
    public static String openText(String path){

        BufferedReader is = null;
        StringBuilder stringBuilder = new StringBuilder();
        try {
            is = new BufferedReader(new FileReader(path));
            String line = null;
            while ((line = is.readLine()) != null){
                // 一行一行的读取并拼接
                stringBuilder.append(line);
            }
        }catch (Exception e) {
            e.printStackTrace();
        }
        finally {
            try {
                if (is != null) {
                    is.close();
                }
            } catch (IOException e) {
                e.printStackTrace();
            }
        }
        return stringBuilder.toString();
    }

}
在存储卡中读写图片文件
xml
<?xml version="1.0" encoding="utf-8"?>
<LinearLayout xmlns:android="http://schemas.android.com/apk/res/android"
    android:layout_width="match_parent"
    android:orientation="vertical"
    android:layout_height="match_parent">

    <Button
        android:id="@+id/save"
        android:layout_width="match_parent"
        android:text="保存"
        android:layout_height="wrap_content"/>

    <Button
        android:id="@+id/read"
        android:layout_width="match_parent"
        android:text="读取"
        android:layout_height="wrap_content"/>

    <ImageView
        android:id="@+id/img_view"
        android:layout_width="match_parent"
        android:scaleType="fitCenter"
        android:layout_height="400dp" />

</LinearLayout>
java
import androidx.appcompat.app.AppCompatActivity;

import android.graphics.Bitmap;
import android.graphics.BitmapFactory;
import android.net.Uri;
import android.os.Bundle;
import android.os.Environment;
import android.view.View;
import android.widget.Button;
import android.widget.ImageView;
import android.widget.Toast;

import java.io.File;

public class MainActivity6 extends AppCompatActivity implements View.OnClickListener {

    private String path;
    private ImageView imageView;

    @Override
    protected void onCreate(Bundle savedInstanceState) {
        super.onCreate(savedInstanceState);
        setContentView(R.layout.activity_main6);
        Button read = findViewById(R.id.read);
        Button save = findViewById(R.id.save);
        imageView = findViewById(R.id.img_view);
        read.setOnClickListener(this);
        save.setOnClickListener(this);
    }

    @Override
    public void onClick(View v) {
        switch (v.getId()){
            case R.id.save:
                // 获取图片并保存
                // 获取当前App的私有下载目录
                path = getExternalFilesDir(Environment.DIRECTORY_DOWNLOADS).toString() + System.currentTimeMillis()
                        + File.separatorChar
                        + ".jpeg";

                // 从指定资源文件中获取位图对象
                Bitmap b1 = BitmapFactory.decodeResource(getResources(), R.drawable.bg);
                // 把位图对象保存为图片文件
                FileUtil.saveImg(path,b1);
                Toast.makeText(this,"保存成功",Toast.LENGTH_SHORT);
                break;
            case R.id.read:
                // 读取图片
//                Bitmap bitmap = FileUtil.openImg(path);

                // 另一种方式
//                Bitmap bitmap = BitmapFactory.decodeFile(path);

                // 直接调用setImageURI方法,设置图像视图的路径对象
                imageView.setImageURI(Uri.parse(path));
                break;

        }
    }
}
读写图片的工具类
java
import android.graphics.Bitmap;
import android.graphics.BitmapFactory;

import java.io.BufferedReader;
import java.io.BufferedWriter;
import java.io.File;
import java.io.FileInputStream;
import java.io.FileOutputStream;
import java.io.FileReader;
import java.io.FileWriter;
import java.io.IOException;

public class FileUtil {

    // 把字符串保存到指定路径的文本文件
    public static void saveText(String path,String txt){
        BufferedWriter os = null;
        try {
            os = new BufferedWriter(new FileWriter(path));
        } catch (IOException e) {
            e.printStackTrace();
        }
        finally {
            try {
                if (os != null) {
                    os.close();
                }
            } catch (IOException e) {
                e.printStackTrace();
            }
        }

    }

    // 从指定路径的文本文件中读取内容字符串
    public static String openText(String path){

        BufferedReader is = null;
        StringBuilder stringBuilder = new StringBuilder();
        try {
            is = new BufferedReader(new FileReader(path));
            String line = null;
            while ((line = is.readLine()) != null){
                // 一行一行的读取并拼接
                stringBuilder.append(line);
            }
        }catch (Exception e) {
            e.printStackTrace();
        }
        finally {
            try {
                if (is != null) {
                    is.close();
                }
            } catch (IOException e) {
                e.printStackTrace();
            }
        }
        return stringBuilder.toString();
    }

    // 把位图数据保存到指定路径
    public static void saveImg(String path, Bitmap b1) {
        FileOutputStream fos = null;
        try {
            fos = new FileOutputStream(path);
            b1.compress(Bitmap.CompressFormat.JPEG,100,fos);
        }catch (Exception e){
            e.printStackTrace();
        }finally {
            try {
                if (fos != null) {
                    fos.close();
                }
            } catch (IOException e) {
                e.printStackTrace();
            }
        }


    }

    // 从指定路径的图片文件中读取位图数据
    public static Bitmap openImg(String path) {
        Bitmap bitmap = null;
        FileInputStream fis = null;
        try {
            fis = new FileInputStream(path);
            bitmap = BitmapFactory.decodeStream(fis);
            return bitmap;
        }catch (Exception e){
            e.printStackTrace();
        }finally {
            try {
                if (fis != null) {
                    fis.close();
                }
            } catch (IOException e) {
                e.printStackTrace();
            }
        }
        return null;
    }
}
高级控件
下拉列表
xml
<?xml version="1.0" encoding="utf-8"?>
<LinearLayout xmlns:android="http://schemas.android.com/apk/res/android"
    android:layout_width="match_parent"
    android:orientation="vertical"
    android:layout_height="match_parent">

    <TextView
        android:layout_width="match_parent"
        android:text="下拉模式的列表框"
        android:layout_height="wrap_content"/>

    <!--下拉模式dropdown-->
    <!--对话框dialog-->
    <Spinner
        android:id="@+id/spinner_dropdown"
        android:layout_width="match_parent"
        android:spinnerMode="dropdown"
        android:layout_height="wrap_content"/>

</LinearLayout>
适配器Adapter
适配器负责从数据集合中取出对应的数据显示到条目布局上。
数组适配器ArrayAdapter
构建对应的列表项
xml
<?xml version="1.0" encoding="utf-8"?>
<!--tools:text="火星" tools预览
先引入对应的tools文件 xmlns:tools="http://schemas.android.com/tools"
再添加对应的内容,就可以预览了
-->
<TextView xmlns:android="http://schemas.android.com/apk/res/android"
    xmlns:tools="http://schemas.android.com/tools"
    android:orientation="vertical"
    android:layout_width="match_parent"
    android:gravity="center"
    android:textColor="#0000ff"
    tools:text="火星"
    android:layout_height="50dp">


</TextView>
java
import androidx.appcompat.app.AppCompatActivity;

import android.os.Bundle;
import android.view.View;
import android.widget.AdapterView;
import android.widget.ArrayAdapter;
import android.widget.Spinner;
import android.widget.Toast;

public class MainActivity extends AppCompatActivity implements AdapterView.OnItemSelectedListener {

    private Spinner spinner;

    // 定义下拉列表需要显示的文本数组
    private final static String[] starArray = {"1","2","3"};

    @Override
    protected void onCreate(Bundle savedInstanceState) {
        super.onCreate(savedInstanceState);
        setContentView(R.layout.activity_main);
        spinner = findViewById(R.id.spinner_dropdown);
        ArrayAdapter<String> arrayAdapter = new ArrayAdapter<>(this, R.layout.item_selector, starArray);
        spinner.setAdapter(arrayAdapter);
        // 设置下拉列表第一项
        spinner.setSelection(0);
        // 给下拉框设置监听,一旦用户选中某一项,就触发监听器的onItemSelected方法
        spinner.setOnItemSelectedListener(this);
    }

    @Override
    public void onItemSelected(AdapterView<?> parent, View view, int position, long id) {
        Toast.makeText(MainActivity.this,"当前被点击的是" + starArray[position],Toast.LENGTH_SHORT).show();
    }

    @Override
    public void onNothingSelected(AdapterView<?> parent) {

    }
}
并且,当Spinner为dialog模式时,还可以设置标题
xml
<!--下拉模式dropdown-->
<!--对话框dialog-->
<Spinner
    android:id="@+id/spinner_dropdown"
    android:layout_width="match_parent"
    android:spinnerMode="dialog"
    android:layout_height="wrap_content"/>
java
import androidx.appcompat.app.AppCompatActivity;

import android.os.Bundle;
import android.view.View;
import android.widget.AdapterView;
import android.widget.ArrayAdapter;
import android.widget.Spinner;
import android.widget.Toast;

public class MainActivity extends AppCompatActivity implements AdapterView.OnItemSelectedListener {

    private Spinner spinner;

    // 定义下拉列表需要显示的文本数组
    private final static String[] starArray = {"1","2","3"};

    @Override
    protected void onCreate(Bundle savedInstanceState) {
        super.onCreate(savedInstanceState);
        setContentView(R.layout.activity_main);
        spinner = findViewById(R.id.spinner_dropdown);
        ArrayAdapter<String> arrayAdapter = new ArrayAdapter<>(this, R.layout.item_selector, starArray);
        spinner.setAdapter(arrayAdapter);
        spinner.setPrompt("标题");
        // 设置下拉列表第一项
        spinner.setSelection(0);
        // 给下拉框设置监听,一旦用户选中某一项,就触发监听器的onItemSelected方法
        spinner.setOnItemSelectedListener(this);
    }

    @Override
    public void onItemSelected(AdapterView<?> parent, View view, int position, long id) {
        Toast.makeText(MainActivity.this,"当前被点击的是" + starArray[position],Toast.LENGTH_SHORT).show();
    }

    @Override
    public void onNothingSelected(AdapterView<?> parent) {

    }
}
简单适配器SimpleAdapter
SimpleAdapter允许在列表项中同时展示文本与图片。
xml
<?xml version="1.0" encoding="utf-8"?>
<LinearLayout xmlns:android="http://schemas.android.com/apk/res/android"
    android:layout_width="match_parent"
    android:orientation="vertical"
    android:layout_height="match_parent">

    <TextView
        android:layout_width="match_parent"
        android:textSize="17sp"
        android:text="SimAdaptor"
        android:gravity="center"
        android:layout_height="wrap_content"/>

    <Spinner
        android:id="@+id/simple_spinner"
        android:layout_width="match_parent"
        android:spinnerMode="dialog"
        android:layout_height="wrap_content"/>

</LinearLayout>
对应的每一项数据
xml
<?xml version="1.0" encoding="utf-8"?>
<LinearLayout xmlns:android="http://schemas.android.com/apk/res/android"
    android:orientation="horizontal"
    xmlns:tools="http://schemas.android.com/tools"
    android:layout_marginBottom="10dp"
    android:layout_width="match_parent"

    android:layout_height="wrap_content">

    <ImageView
        android:id="@+id/iv_item"
        android:layout_width="0dp"
        android:layout_weight="1"
        tools:src="@drawable/ic_launcher_background"
        android:layout_height="50dp"/>

    <TextView
        android:id="@+id/tv_item"
        android:layout_width="0dp"
        android:layout_weight="3"
        tools:text="地球"
        android:textSize="17sp"
        android:textColor="#ff0000"
        android:gravity="center"
        android:layout_height="wrap_content"/>

</LinearLayout>
功能代码
java
import androidx.appcompat.app.AppCompatActivity;

import android.os.Bundle;
import android.view.View;
import android.widget.AdapterView;
import android.widget.SimpleAdapter;
import android.widget.Spinner;
import android.widget.Toast;

import java.util.ArrayList;
import java.util.HashMap;
import java.util.List;
import java.util.Map;

public class MainActivity2 extends AppCompatActivity implements AdapterView.OnItemSelectedListener {

    private Spinner spinner;

    // 定义图标列表
    public static final int[] iconArray = {
            R.drawable.ic_launcher_background,
            R.drawable.ic_launcher_background
    };

    // 定义名称列表
    public static final String[] nameArray = {
            "1","2"
    };

    @Override
    protected void onCreate(Bundle savedInstanceState) {
        super.onCreate(savedInstanceState);
        setContentView(R.layout.activity_main2);
        spinner = findViewById(R.id.simple_spinner);

        List<Map<String,Object>> list = new ArrayList<>();
        for (int i = 0; i < iconArray.length; i++) {
            Map<String,Object> item = new HashMap<>();
            item.put("icon",iconArray[i]);
            item.put("name",nameArray[i]);
            list.add(item);
        }
        SimpleAdapter simpleAdapter = new SimpleAdapter(this, list, R.layout.item_simple,
                new String[]{"icon", "name"}, new int[]{R.id.iv_item, R.id.tv_item});
        spinner.setAdapter(simpleAdapter);
        spinner.setPrompt("标题");
        spinner.setSelection(0);
        spinner.setOnItemSelectedListener(this);

    }

    @Override
    public void onItemSelected(AdapterView<?> parent, View view, int position, long id) {
        Toast.makeText(this,"选中了" + nameArray[position],Toast.LENGTH_SHORT).show();
    }

    @Override
    public void onNothingSelected(AdapterView<?> parent) {

    }
}
广播
收发标准广播
广播的收发过程分为三个步骤:
xml
<?xml version="1.0" encoding="utf-8"?>
<LinearLayout xmlns:android="http://schemas.android.com/apk/res/android"
    xmlns:app="http://schemas.android.com/apk/res-auto"
    xmlns:tools="http://schemas.android.com/tools"
    android:layout_width="match_parent"
    android:layout_height="match_parent"
    tools:context=".MainActivity">

    <Button
        android:id="@+id/btn_send_standard"
        android:layout_width="match_parent"
        android:layout_height="wrap_content"
        android:text="发送标准广播"
        android:textSize="17sp"
        />

</LinearLayout>
发送标准广播及开关广播接收器
java
import androidx.appcompat.app.AppCompatActivity;

import android.content.Intent;
import android.content.IntentFilter;
import android.os.Bundle;
import android.view.View;
import android.widget.Button;

import fun.eastwind.myapplication.receiver.StandardReceiver;

public class MainActivity extends AppCompatActivity implements View.OnClickListener {

    private StandardReceiver standardReceiver;

    @Override
    protected void onCreate(Bundle savedInstanceState) {
        super.onCreate(savedInstanceState);
        setContentView(R.layout.activity_main);
        findViewById(R.id.btn_send_standard).setOnClickListener(this);
    }

    @Override
    public void onClick(View v) {
        // 发送标准广播
        Intent intent = new Intent(StandardReceiver.STANDARD_ACTION);
        sendBroadcast(intent);
    }

    @Override
    protected void onStart() {
        super.onStart();
        // 注册广播接收器
        standardReceiver = new StandardReceiver();
        // 创建一个意图过滤器,只处理Standard的广播
        IntentFilter filter = new IntentFilter(StandardReceiver.STANDARD_ACTION);
        // 注册接收器,注册后才能正常接收广播
        registerReceiver(standardReceiver,filter);
    }

    @Override
    protected void onStop() {
        super.onStop();
        // 注销接收器,注销后不再接收广播
        unregisterReceiver(standardReceiver);
    }
}
定义广播接收器
java
import android.content.BroadcastReceiver;
import android.content.Context;
import android.content.Intent;
import android.util.Log;

/**
 * 广播接收者
 * 定义一个标准广播的接收器
 * */
public class StandardReceiver extends BroadcastReceiver {

    public static final String STANDARD_ACTION = "content";

    // 一旦接收到标准广播,马上触发接收器的onReceive方法
    @Override
    public void onReceive(Context context, Intent intent) {
        if (intent != null && intent.getAction().equals(STANDARD_ACTION)){
            Log.d("ning","收到一个标准广播");
        }
    }
}
有序广播
标准广播是一种无序广播,无序广播是没有顺序的,都在同一时间发出
xml
<?xml version="1.0" encoding="utf-8"?>
<LinearLayout xmlns:android="http://schemas.android.com/apk/res/android"
    xmlns:app="http://schemas.android.com/apk/res-auto"
    xmlns:tools="http://schemas.android.com/tools"
    android:layout_width="match_parent"
    android:layout_height="match_parent"
    tools:context=".MainActivity">

    <Button
        android:id="@+id/btn_send_standard_order"
        android:layout_width="match_parent"
        android:layout_height="wrap_content"
        android:text="发送有序广播"
        android:textSize="17sp"
        />

</LinearLayout>
发送广播及开关广播
java
import androidx.appcompat.app.AppCompatActivity;

import android.content.Intent;
import android.content.IntentFilter;
import android.os.Bundle;
import android.view.View;
import android.widget.Button;

import fun.eastwind.myapplication.receiver.OrderReceiverA;
import fun.eastwind.myapplication.receiver.OrderReceiverB;
import fun.eastwind.myapplication.receiver.StandardReceiver;

public class MainActivity3 extends AppCompatActivity implements View.OnClickListener {

    public static final String STANDARD_ACTION = "content";
    private OrderReceiverA orderReceiverA;
    private OrderReceiverB orderReceiverB;

    @Override
    protected void onCreate(Bundle savedInstanceState) {
        super.onCreate(savedInstanceState);
        setContentView(R.layout.activity_main3);
        findViewById(R.id.btn_send_standard_order).setOnClickListener(this);
    }

    @Override
    public void onClick(View v) {
        // 创建一个指定动作的意图
        Intent intent = new Intent(STANDARD_ACTION);
        sendOrderedBroadcast(intent,null);
    }

    @Override
    protected void onStart() {
        super.onStart();
        // 多个接收器处理有序广播的顺序规则为:
        // 1、优先级越大的接收器,越早接收到有序广播
        // 2、优先级相同时,越早注册的接收器越早接收到有序广播
        orderReceiverA = new OrderReceiverA();
        IntentFilter intentFilter = new IntentFilter(STANDARD_ACTION);
        intentFilter.setPriority(8);
        registerReceiver(orderReceiverA,intentFilter);

        orderReceiverB = new OrderReceiverB();
        IntentFilter intentFilter2 = new IntentFilter(STANDARD_ACTION);
        intentFilter2.setPriority(10);
        registerReceiver(orderReceiverB,intentFilter2);
    }

    @Override
    protected void onStop() {
        super.onStop();
        unregisterReceiver(orderReceiverA);
        unregisterReceiver(orderReceiverB);
    }
}
广播A与广播B
java
import android.content.BroadcastReceiver;
import android.content.Context;
import android.content.Intent;
import android.util.Log;

import fun.eastwind.myapplication.MainActivity3;

public class OrderReceiverA extends BroadcastReceiver {
    @Override
    public void onReceive(Context context, Intent intent) {
        if (intent != null && intent.getAction().equals(MainActivity3.STANDARD_ACTION)){
            Log.d("ning","接收器A接收到了广播");
        }
    }
}
广播B的优先级比广播A高,并且它终止了后面的广播继续进行接收
java
import android.content.BroadcastReceiver;
import android.content.Context;
import android.content.Intent;
import android.util.Log;

import fun.eastwind.myapplication.MainActivity3;

public class OrderReceiverB extends BroadcastReceiver {
    @Override
    public void onReceive(Context context, Intent intent) {
        if (intent != null && intent.getAction().equals(MainActivity3.STANDARD_ACTION)){
            Log.d("ning","接收器B接收到了广播");
            // 中断广播
            abortBroadcast();
        }
    }
}
广播的静态注册
在代码中注册接收器,该方法被称为动态注册。
在AndroidManifest.xml中注册接收器,该方式被称作静态注册。
xml
<?xml version="1.0" encoding="utf-8"?>
<LinearLayout xmlns:android="http://schemas.android.com/apk/res/android"
    android:layout_width="match_parent"
    android:layout_height="match_parent">

    <Button
        android:id="@+id/btn_send_standard_static"
        android:layout_width="match_parent"
        android:layout_height="wrap_content"
        android:text="发送振动广播"
        android:textSize="17sp"
        />

</LinearLayout>
发送广播
java
import androidx.appcompat.app.AppCompatActivity;

import android.content.ComponentName;
import android.content.Intent;
import android.os.Bundle;
import android.view.View;

public class BroadStaticActivity extends AppCompatActivity implements View.OnClickListener {

    @Override
    protected void onCreate(Bundle savedInstanceState) {
        super.onCreate(savedInstanceState);
        setContentView(R.layout.activity_broad_static);
        findViewById(R.id.btn_send_standard_static).setOnClickListener(this);
    }

    @Override
    public void onClick(View v) {
        // Android8.0之后删除了大部分静态注册,防止退出App后仍在接收广播,
        // 为了让应用能够继续接收静态广播,需要给静态注册的广播指定包名
        String fullName = "fun.eastwind.myapplication.receiver.MyReceiver";
        Intent content = new Intent("content");
        // 发送静态广播之时,需要通过setComponent方法指定接收器的完整路径
        ComponentName componentName = new ComponentName(this, fullName);
        // 设置意图的组件信息
        content.setComponent(componentName);
        sendBroadcast(content);
    }
}
接收广播,并振动
java
import android.content.BroadcastReceiver;
import android.content.Context;
import android.content.Intent;
import android.os.Vibrator;
import android.util.Log;

public class MyReceiver extends BroadcastReceiver {

    @Override
    public void onReceive(Context context, Intent intent) {
        if (intent != null && intent.getAction().equals("content")){
            Log.d("ning","震动");
            // 从系统服务中获取震动管理器
            Vibrator vb = (Vibrator) context.getSystemService(Context.VIBRATOR_SERVICE);
            // 振动0.5秒
            vb.vibrate(500);
        }
    }
}
在AndroidManifest.xml中静态注册
xml
<receiver
    android:name=".receiver.MyReceiver"
    android:exported="true">
    <intent-filter>
        <action android:name="content"/>
    </intent-filter>
</receiver>
系统分钟到达广播
发送广播和停止广播
java
import androidx.appcompat.app.AppCompatActivity;

import android.content.Intent;
import android.content.IntentFilter;
import android.os.Bundle;

import fun.eastwind.myapplication.receiver.TimeReceiver;

public class SystemMinuteActivity extends AppCompatActivity {

    private TimeReceiver timeReceiver;

    @Override
    protected void onCreate(Bundle savedInstanceState) {
        super.onCreate(savedInstanceState);
        setContentView(R.layout.activity_system_minute);
    }

    @Override
    protected void onStart() {
        super.onStart();
        timeReceiver = new TimeReceiver();
        IntentFilter intentFilter = new IntentFilter(Intent.ACTION_TIME_TICK);
        // 系统分钟广播是每分钟自动发送的
        registerReceiver(timeReceiver,intentFilter);
    }

    @Override
    protected void onStop() {
        super.onStop();
        unregisterReceiver(timeReceiver);
    }
}
接收广播
java
import android.content.BroadcastReceiver;
import android.content.Context;
import android.content.Intent;
import android.util.Log;

public class TimeReceiver extends BroadcastReceiver {
    @Override
    public void onReceive(Context context, Intent intent) {
        if (intent != null){
            Log.d("ning","收到了分钟到达广播");
        }
    }
}
监听系统广播
使用方法与分钟到达广播相同
定时管理器AlarmManager
广播接收
java
import android.app.AlarmManager;
import android.app.PendingIntent;
import android.content.BroadcastReceiver;
import android.content.Context;
import android.content.Intent;
import android.os.Build;
import android.util.Log;

public class AlarmReceiver extends BroadcastReceiver {

    public static final String ALARM_ACTION = "context";
    private final Context mContext;

    public AlarmReceiver(Context context) {
        this.mContext = context;
    }

    @Override
    public void onReceive(Context context, Intent intent) {
        if (intent != null && intent.getAction().equals(ALARM_ACTION)){
            Log.d("ning","收到闹钟");
            sendAlarm();
        }
    }

    // 发送闹钟广播
    public void sendAlarm() {
        Intent intent = new Intent(ALARM_ACTION);
        // 创建一个用于广播的延迟意图
        PendingIntent pendingIntent = PendingIntent.getBroadcast(mContext,0,intent,PendingIntent.FLAG_IMMUTABLE);
        AlarmManager alarmManager = (AlarmManager) mContext.getSystemService(Context.ALARM_SERVICE);
        if (Build.VERSION.SDK_INT >= Build.VERSION_CODES.M){
            // 允许在空闲时发送广播 Android6.0之后的方法
            alarmManager.setAndAllowWhileIdle(AlarmManager.RTC_WAKEUP,1000,pendingIntent);
        }else{
            // Android 6.0之前
            // 设置一次性闹钟,延迟若干秒后,携带延迟意图发送闹钟广播
            // 从系统服务中获取闹钟服务
            alarmManager.set(AlarmManager.RTC_WAKEUP,1000,pendingIntent);
        }


    }


}
广播发送、开启、关闭
java
import androidx.appcompat.app.AppCompatActivity;

import android.content.Intent;
import android.content.IntentFilter;
import android.os.Bundle;
import android.view.View;
import android.widget.Button;

import fun.eastwind.myapplication.receiver.AlarmReceiver;
import fun.eastwind.myapplication.receiver.TimeReceiver;

public class SystemMinuteActivity extends AppCompatActivity implements View.OnClickListener {

    private TimeReceiver timeReceiver;
    private AlarmReceiver alarmReceiver;

    @Override
    protected void onCreate(Bundle savedInstanceState) {
        super.onCreate(savedInstanceState);
        setContentView(R.layout.activity_system_minute);
        Button button = findViewById(R.id.btn_alarm);
        button.setOnClickListener(this);
    }

    @Override
    public void onClick(View v) {

    }

    @Override
    protected void onStart() {
        super.onStart();
        alarmReceiver = new AlarmReceiver(getApplicationContext());
        IntentFilter intentFilter = new IntentFilter(AlarmReceiver.ALARM_ACTION);
        registerReceiver(alarmReceiver,intentFilter);
    }

    @Override
    protected void onStop() {
        super.onStop();
        unregisterReceiver(alarmReceiver);
    }
}
OkHttp
OkHttp的基础用法
先在Gradle中添加依赖,一般在模块的build.gradle中进行添加
gradle
dependencies {
    implementation 'com.squareup.okhttp3:okhttp:4.10.0'
}
完成了 OkHttp 依赖的更新,还需要开启一下安卓的用户网络权限,在 AndroidManifest.xml 文件添加下面这句:
xml
<uses-permission android:name="android.permission.INTERNET" />
get
java
/**
 * 异步GET请求
 *
 * @param url           请求资源的路径
 * @param authorization 验证用户,不需要验证的,传入空,即可
 * @param params        URL的参数
 * @param callback      请求的回调
 */
public static  void asyncGet(String url, String authorization, Callback callback, String... params) {
    Request.Builder requestBuilder = new Request.Builder().url(makeUrl(url, params)).get().tag(TAG);

    requestBuilder.addHeader("Accept", "*/*");
    requestBuilder.addHeader("Connection", "Keep-Alive");
    requestBuilder.addHeader("User-Agent", "Android");
    requestBuilder.addHeader("Referer", "http://www.fpliu.com");
    if (!TextUtils.isEmpty(authorization)) {
        requestBuilder.addHeader("Authorization", authorization);
    }
    Request request = requestBuilder.build();

    Call call = okHttpClient.newCall(request);
    call.enqueue(callback);
}
post
FORM提交
示例一:
java
/**
 * 异步POST请求,请求体是表单
 *
 * @param url           请求资源的路径
 * @param authorization 验证用户,不需要验证的,传入空,即可
 * @param params        请求参数
 * @param callback      请求的回调
 */
public static void asyncPostForm(String url, String authorization, List<KV> params, Callback callback) {
    FormBody.Builder formBodyBuilder = new FormBody.Builder();
    if (params != null) {
        for (KV kv : params) {
            if (kv == null) {
                continue;
            }
            String key = kv.getKey();
            String value = kv.getValue();
            if (TextUtils.isEmpty(key)) {
                continue;
            }
            formBodyBuilder.add(key, value);
        }
    }

    Request.Builder requestBuilder = new Request.Builder().url(makeUrl(url, params)).post(formBodyBuilder.build()).tag(TAG);

    requestBuilder.addHeader("Accept", "*/*");
    requestBuilder.addHeader("Connection", "Keep-Alive");
    requestBuilder.addHeader("User-Agent", "Android");
    requestBuilder.addHeader("Referer", "http://www.fpliu.com");
    if (!TextUtils.isEmpty(authorization)) {
        requestBuilder.addHeader("Authorization", authorization);
    }
    Request request = requestBuilder.build();

    Call call = okHttpClient.newCall(request);
    call.enqueue(callback);
}
示例二:
java
/**
 * 异步POST请求,请求体是表单
 *
 * @param url           请求资源的路径
 * @param authorization 验证用户,不需要验证的,传入空,即可
 * @param params        请求参数
 * @param callback      请求的回调
 */
public static void asyncPostForm(String url, String authorization, Callback callback, String... params) {
    FormBody.Builder formBodyBuilder = new FormBody.Builder();
    if (params != null) {
        int length = params.length / 2;
        for (int i = 0; i < length; i++) {
            String key = params[i];
            String value = params[i + 1];
            if (TextUtils.isEmpty(key)) {
                continue;
            }
            formBodyBuilder.add(key, value);
        }
    }

    Request.Builder requestBuilder = new Request.Builder().url(makeUrl(url, params)).post(formBodyBuilder.build()).tag(TAG);

    requestBuilder.addHeader("Accept", "*/*");
    requestBuilder.addHeader("Connection", "Keep-Alive");
    requestBuilder.addHeader("User-Agent", "Android");
    requestBuilder.addHeader("Referer", "http://www.fpliu.com");
    if (!TextUtils.isEmpty(authorization)) {
        requestBuilder.addHeader("Authorization", authorization);
    }
    Request request = requestBuilder.build();

    Call call = okHttpClient.newCall(request);
    call.enqueue(callback);
}
JSON提交
示例:
java
/**
 * 异步POST请求,请求体是JSON
 *
 * @param url           请求资源的路径
 * @param authorization 验证用户,不需要验证的,传入空,即可
 * @param json          JSON字符串,使用String类型可以支持GSON、fastJson、json-lib等库的转化,而不局限于一种
 * @param callback      请求的回调
 */
public static void asyncPostJson(String url, String authorization, String json, Callback callback) {
    RequestBody requestBody = RequestBody.create(MediaType.parse("application/json;charset=UTF-8"), json);

    Request.Builder requestBuilder = new Request.Builder().url(url).post(requestBody).tag(TAG);

    requestBuilder.addHeader("Accept", "*/*");
    requestBuilder.addHeader("Connection", "Keep-Alive");
    requestBuilder.addHeader("User-Agent", "Android");
    requestBuilder.addHeader("Referer", "http://www.fpliu.com");
    if (!TextUtils.isEmpty(authorization)) {
        requestBuilder.addHeader("Authorization", authorization);
    }
    Request request = requestBuilder.build();

    Call call = okHttpClient.newCall(request);
    call.enqueue(callback);
}
文件提交
示例:
java
/**
 * 异步POST请求,请求体是文件(二进制数据流)
 *
 * @param url           请求资源的路径
 * @param authorization 验证用户,不需要验证的,传入空,即可
 * @param filePath      JSON字符串,使用String类型可以支持GSON、fastJson、json-lib等库的转化,而不局限于一种
 * @param callback      请求的回调
 */
public static void asyncPostFile(String url, String authorization, String filePath, Callback callback) {
    if (TextUtils.isEmpty(filePath) && requestCallBack != null) {
        requestCallBack.onFailure(null, new FileNotFoundException("文件路径不能为空"));
        return;
    }

    File file = new File(filePath);
    RequestBody requestBody = RequestBody.create(MediaType.parse("application/octet-stream"), file);

    Request.Builder requestBuilder = new Request.Builder().url(url).post(requestBody).tag(TAG);

    requestBuilder.addHeader("Accept", "*/*");
    requestBuilder.addHeader("Connection", "Keep-Alive");
    requestBuilder.addHeader("User-Agent", "Android");
    requestBuilder.addHeader("Referer", "http://www.fpliu.com");
    if (!TextUtils.isEmpty(authorization)) {
        requestBuilder.addHeader("Authorization", authorization);
    }
    Request request = requestBuilder.build();

    Call call = okHttpClient.newCall(request);
    call.enqueue(callback);
}
这里要特别注意,如果想要读取`SD`卡里的文件,需要申请`android.permission.READ_EXTERNAL_STORAGE`这个权限, 如果您的`targetSdkVersion`被设置成了大于等于`23`,您还必须要在代码中动态申请这个权限。为了方便, 可以使用RxPermissions这个框架,示例:
java
RxPermissions rxPermissions = new RxPermissions(this);
rxPermissions.requestEach(Manifest.permission.READ_EXTERNAL_STORAGE).subscribe(new Observer() {
    @Override
    public void onSubscribe(@NonNull Disposable d) {
        Log.d(TAG, "onSubscribe()");
    }

    @Override
    public void onNext(@NonNull Permission permission) {
        Log.d(TAG, "onNext()" + permission);
        if (permission.granted) {
            //客户授权了
            OKHttpRequest.init(MainActivity.this);
            OKHttpRequest.asyncPostFile("http://192.168.1.103/upload", "", "/sdcard/xx.txt", new Callback() {
                @Override
                public void onFailure(Call call, IOException e) {
                    Log.e(TAG, "onFailure()", e);
                }

                @Override
                public void onResponse(Call call, Response response) throws IOException {
                    Log.d(TAG, response.body().string());
                }
            });
        } else if (permission.shouldShowRequestPermissionRationale){
            //客户没有授权,并且选择了不再提示,需要提示用户
            Toast.makeText(MainActivity.this, "您曾经选择过不授权,您想再授权,请到设置里进行授权", Toast.LENGTH_SHORT).show();
        }
    }

    @Override
    public void onError(@NonNull Throwable e) {
        Log.e(TAG, "onError()", e);
    }

    @Override
    public void onComplete() {
        Log.d(TAG, "onComplete()");
    }
});
Multipart提交
示例:
java
/**
 * 异步POST请求,请求体是Multipart
 *
 * @param url           请求资源的路径
 * @param authorization 验证用户,不需要验证的,传入空,即可
 * @param parts         每一部分的列表
 * @param callback      请求的回调
 */
public static void asyncPostMultipart(String url, String authorization, List<MultipartBody.Part> parts, Callback callback) {
    MultipartBody.Builder multipartBodyBuilder = new MultipartBody.Builder().setType(MultipartBody.FORM);

    if (parts != null) {
        for (MultipartBody.Part part : parts) {
            multipartBodyBuilder.addPart(part);
        }
    }
    Request.Builder requestBuilder = new Request.Builder().url(url).post(multipartBodyBuilder.build()).tag(TAG);

    requestBuilder.addHeader("Accept", "*/*");
    requestBuilder.addHeader("Connection", "Keep-Alive");
    requestBuilder.addHeader("User-Agent", "Android");
    requestBuilder.addHeader("Referer", "http://www.fpliu.com");
    if (!TextUtils.isEmpty(authorization)) {
        requestBuilder.addHeader("Authorization", authorization);
    }
    Request request = requestBuilder.build();

    Call call = okHttpClient.newCall(request);
    call.enqueue(callback);
}
delete
`Delete`请求用于删除资源,不应该携带大量信息,所以,一般`Delete`请求没有实体。
java
import okhttp3.OkHttpClient;
import okhttp3.Request;
import okhttp3.Response;
import java.io.IOException;

public class OkHttpDeleteExample {

    public static void main(String[] args) {
        OkHttpClient client = new OkHttpClient();

        // 创建请求
        Request request = new Request.Builder()
                .url("https://api.example.com/resource/1") // 替换为你的URL
                .delete()
                .build();

        try (Response response = client.newCall(request).execute()) {
            if (!response.isSuccessful()) {
                throw new IOException("Unexpected code " + response);
            }

            // 打印响应
            System.out.println(response.body().string());
        } catch (IOException e) {
            e.printStackTrace();
        }
    }
}
put
`PUT`请求与`POST`请求在协议本身,除了请求方法本身的不同,其他方面没有任何差别。 从`Restful`风格上讲:只是语义上不同,`POST`用于创建资源,而`PUT`用于更新资源。
所以将
java
.post(requestBody)
修改为:
java
.put(requestBody)
即可。